How to Use Falling Effects on Foneo AI Photo Editor
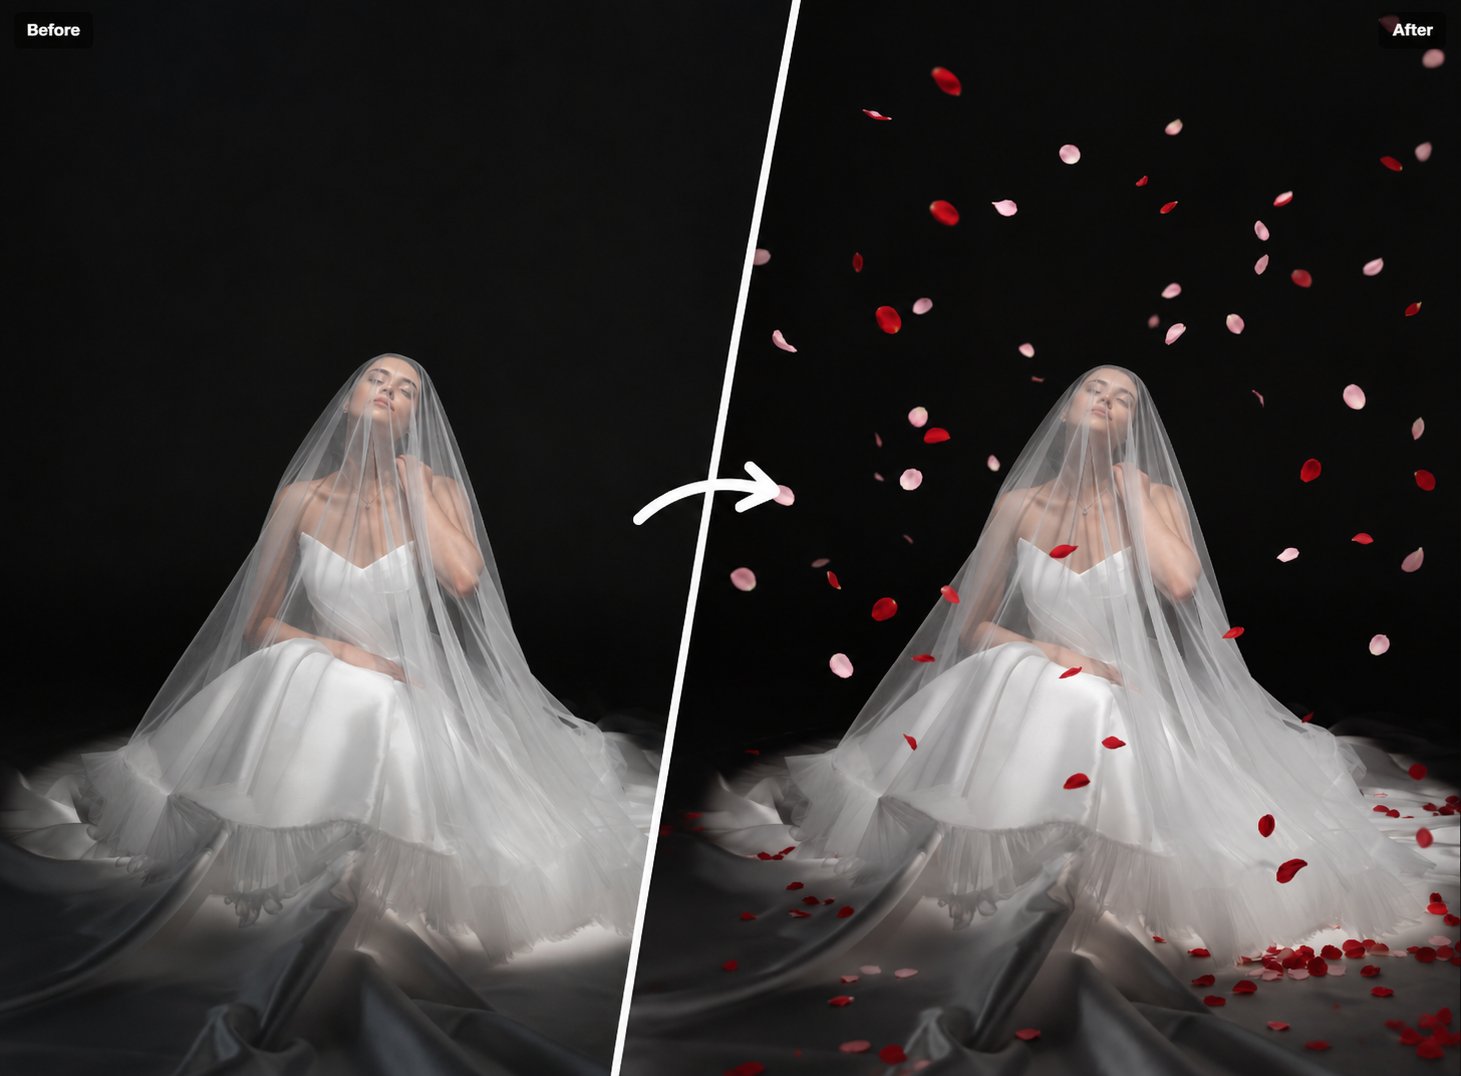
Photos can become more dynamic and visually rich when suitable motion effects are added to match the scene. With Falling Effects on Foneo, you can use AI to add falling objects such as flower petals, leaves, feathers, snowflakes, and other falling effects to your images.
Foneo provides ready-made Templates and custom Prompts, allowing you to create different effect styles without complicated editing.
You can also adjust Effect Intensity across three levels: Low, Medium, and High. Medium is selected by default, providing a balanced effect that remains visible while keeping the subject and composition clear.
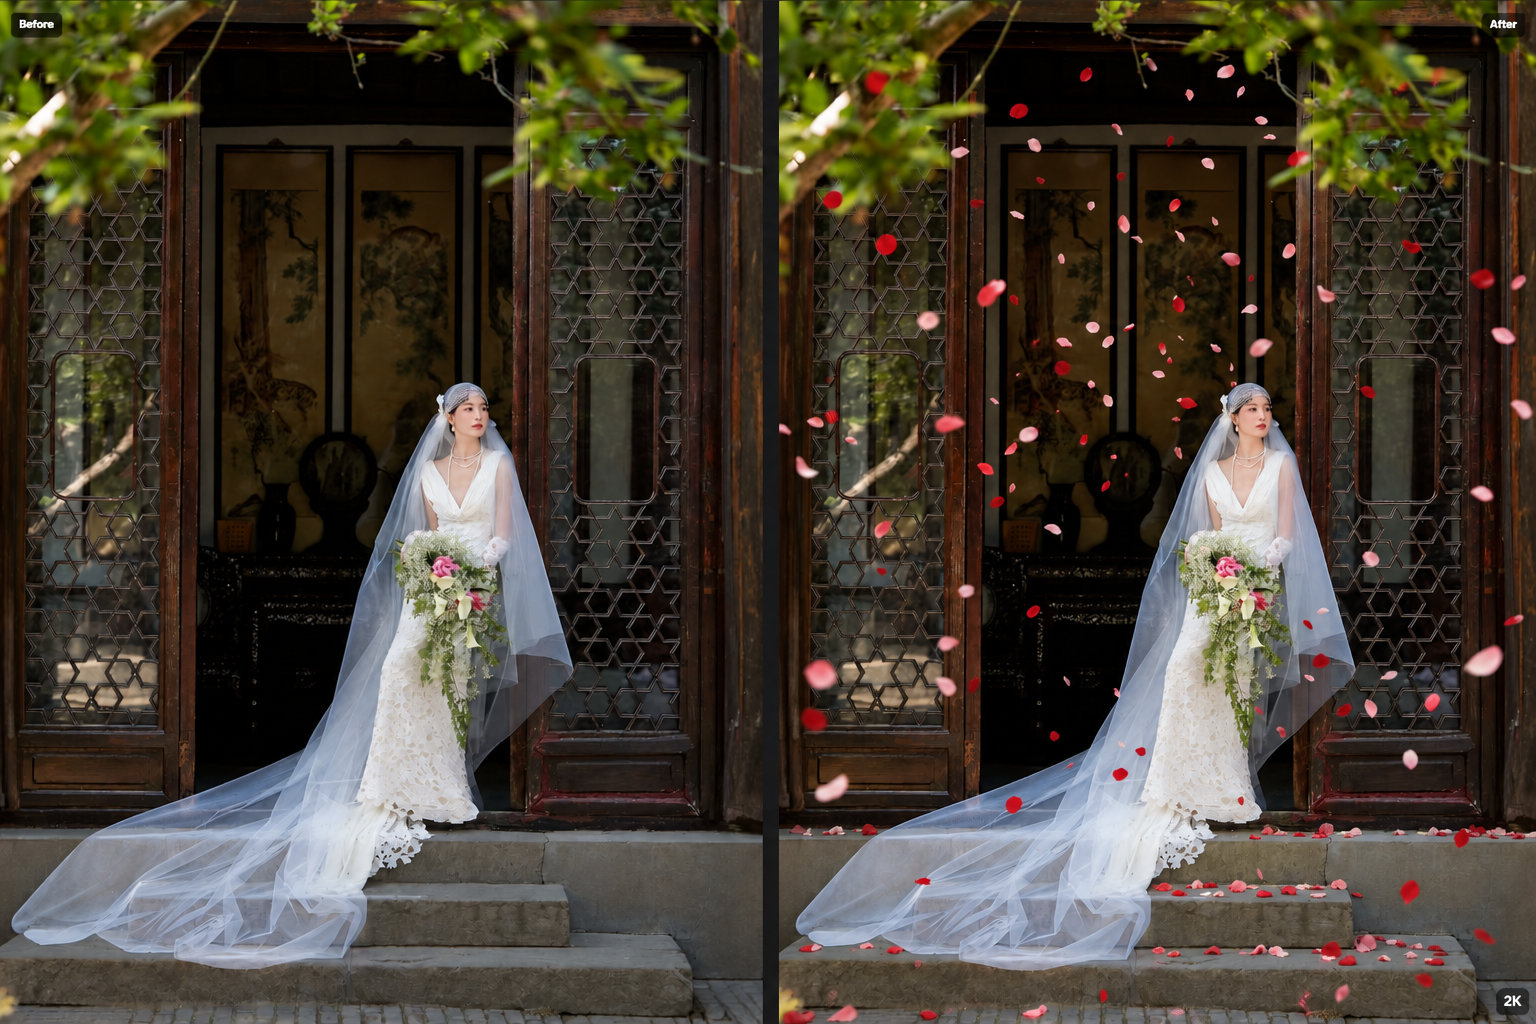
Before & After
How to Use Falling Effects
To get started, upload the image you want to edit to Foneo and open the Falling Effects feature.
1. Preview Your Image
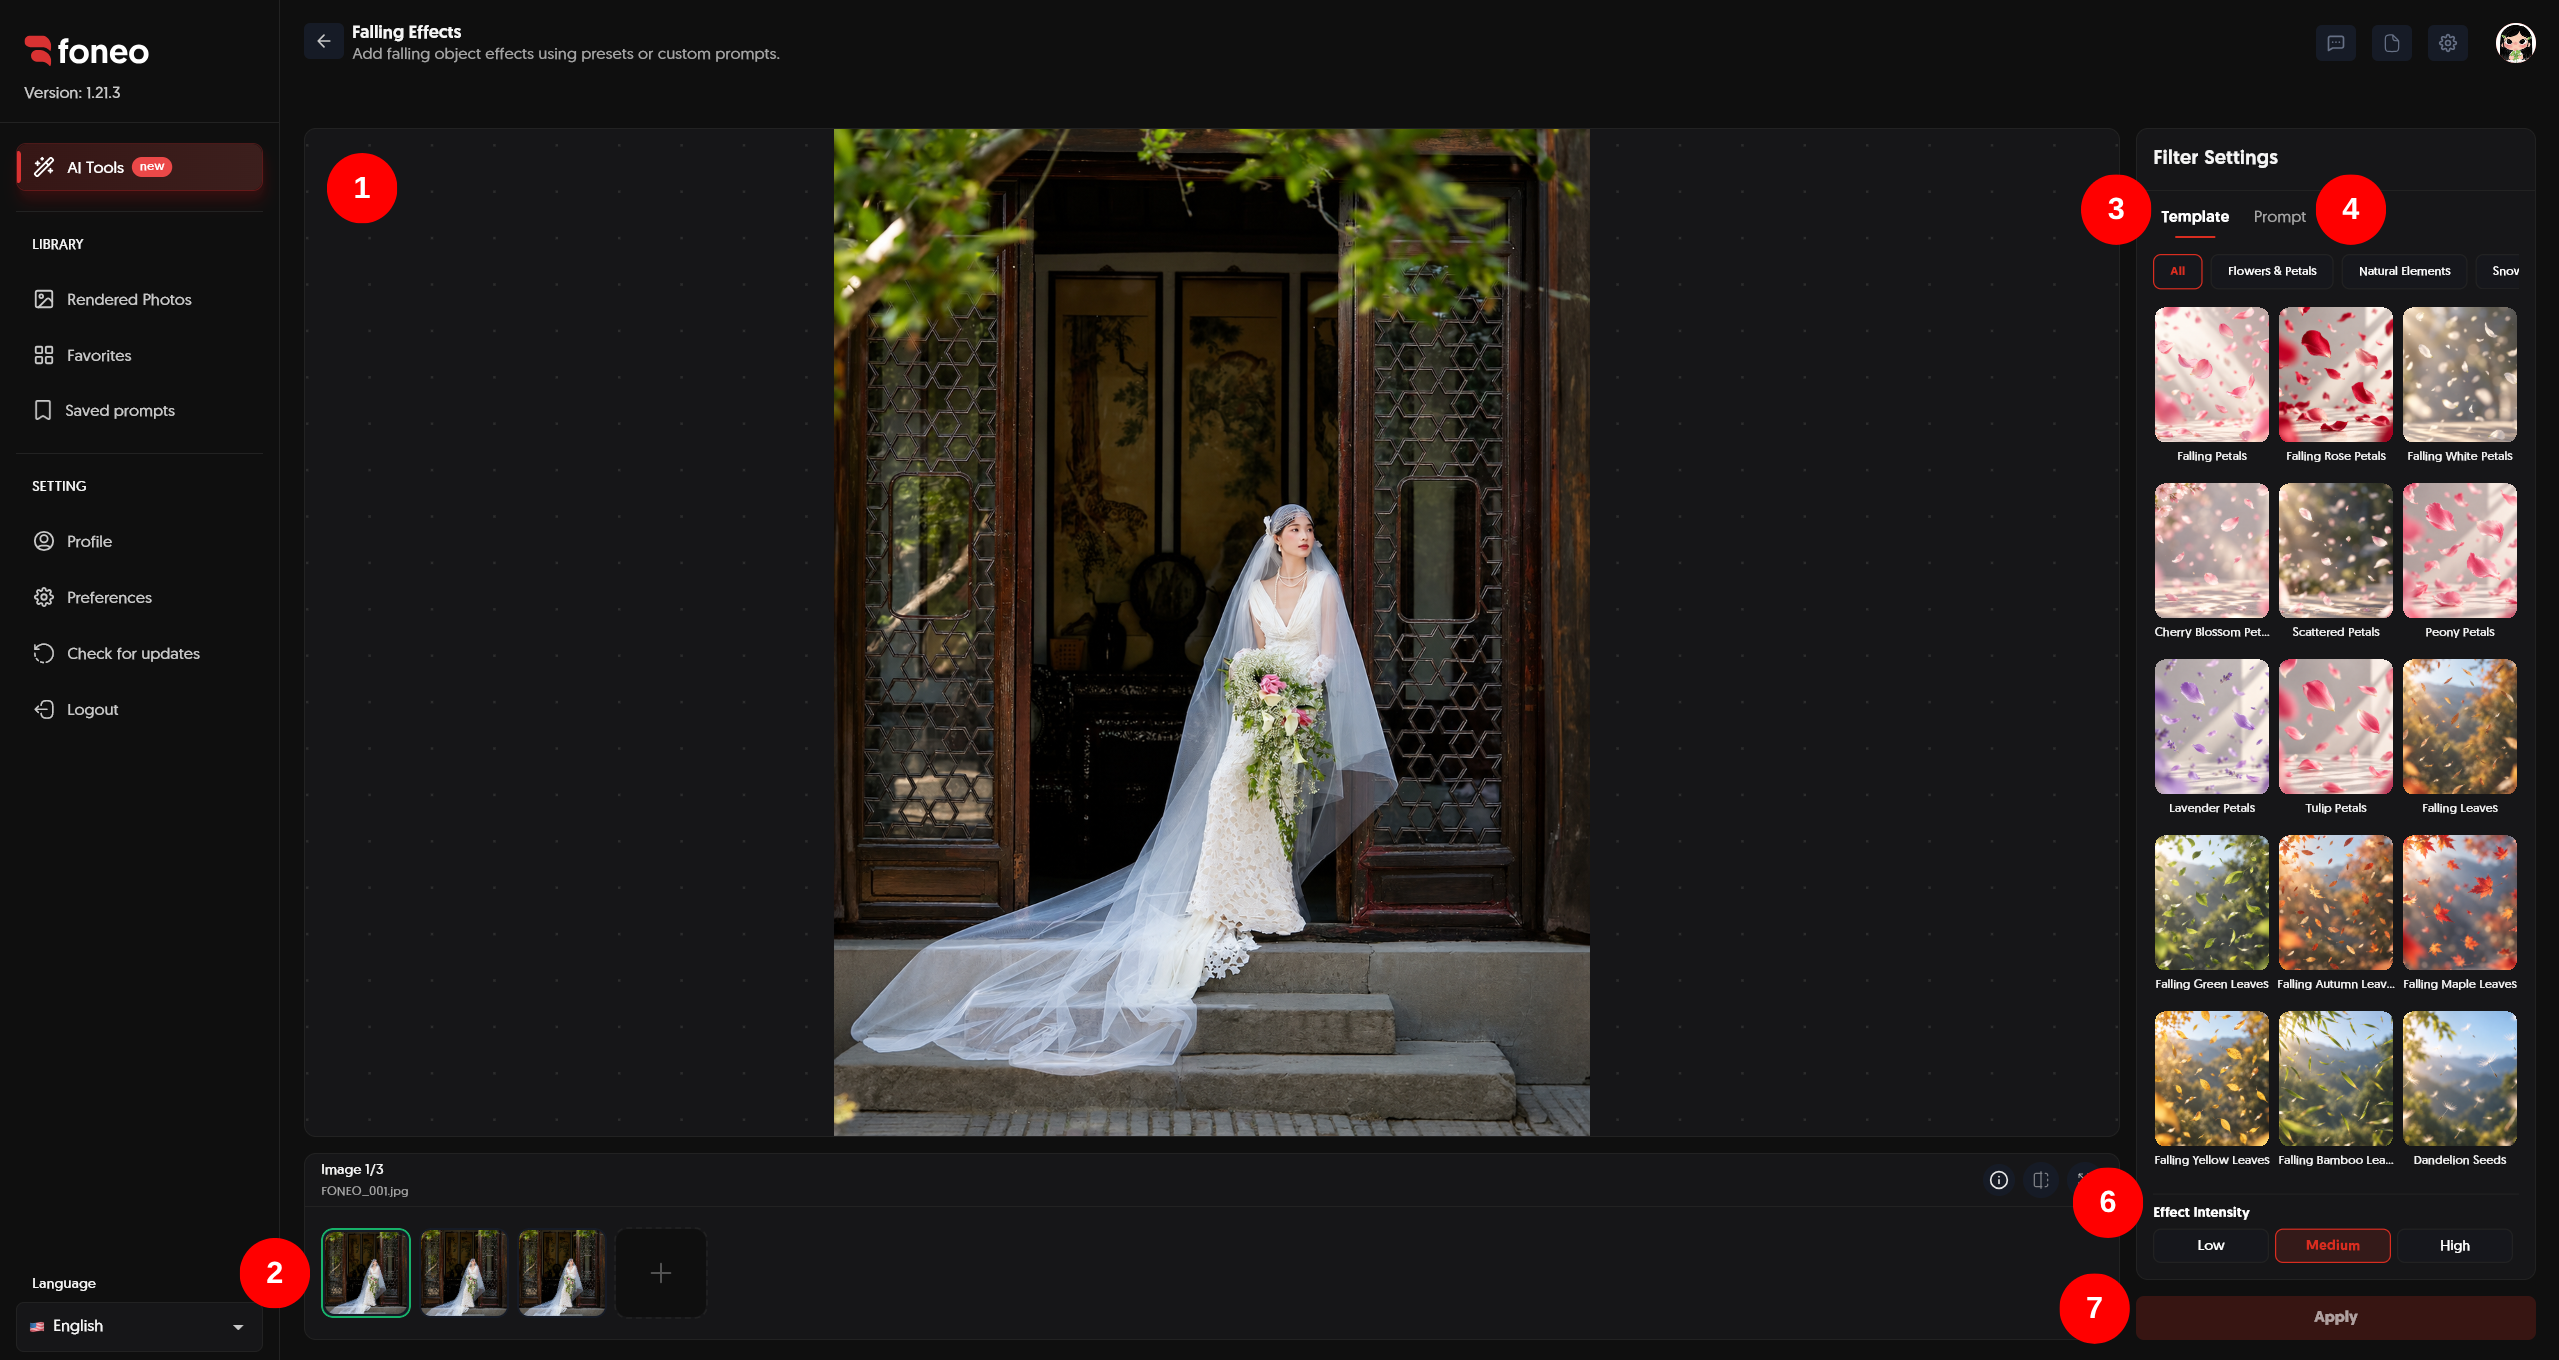
After uploading an image, it will be displayed in the preview area in the center of the screen.
This is where you can check the original image before adding the effect. After processing, Foneo also displays the result in this area so you can easily compare the changes.
Before applying the effect, check:
- The main subject in the image.
- The composition and surrounding space.
- Areas where the effect can be added.
- The overall lighting and colors of the image.
2. Select the Image to Add the Effect
Uploaded images are displayed as thumbnails below the preview area.
You can:
- Click a thumbnail to select the image you want to edit.
- Click + to add a new image.
- When working with multiple images, select each image to apply the appropriate effect.
After selecting an image, it will be displayed in the preview area so you can check it before creating the effect.
3. Choose an Effect Template
In Filter Settings, select the Template tab.
Foneo provides multiple ready-made Templates for creating different types of falling objects.
Some available effect groups include:
- Falling Petals: rose petals, cherry blossoms, peony petals, tulip petals, and more.
- Falling Leaves: green leaves, bamboo leaves, yellow leaves, maple leaves, and more.
- Natural Elements: dandelion seeds and similar natural effects.
- Decorative Effects: feathers, snowflakes, and other objects suitable for the scene.
Simply select the Template you want. Foneo uses AI to generate the falling objects and distribute them throughout the image based on the existing scene.
Templates allow you to create falling effects quickly without having to describe the effect in detail using a Prompt.
4. Create an Effect with a Prompt
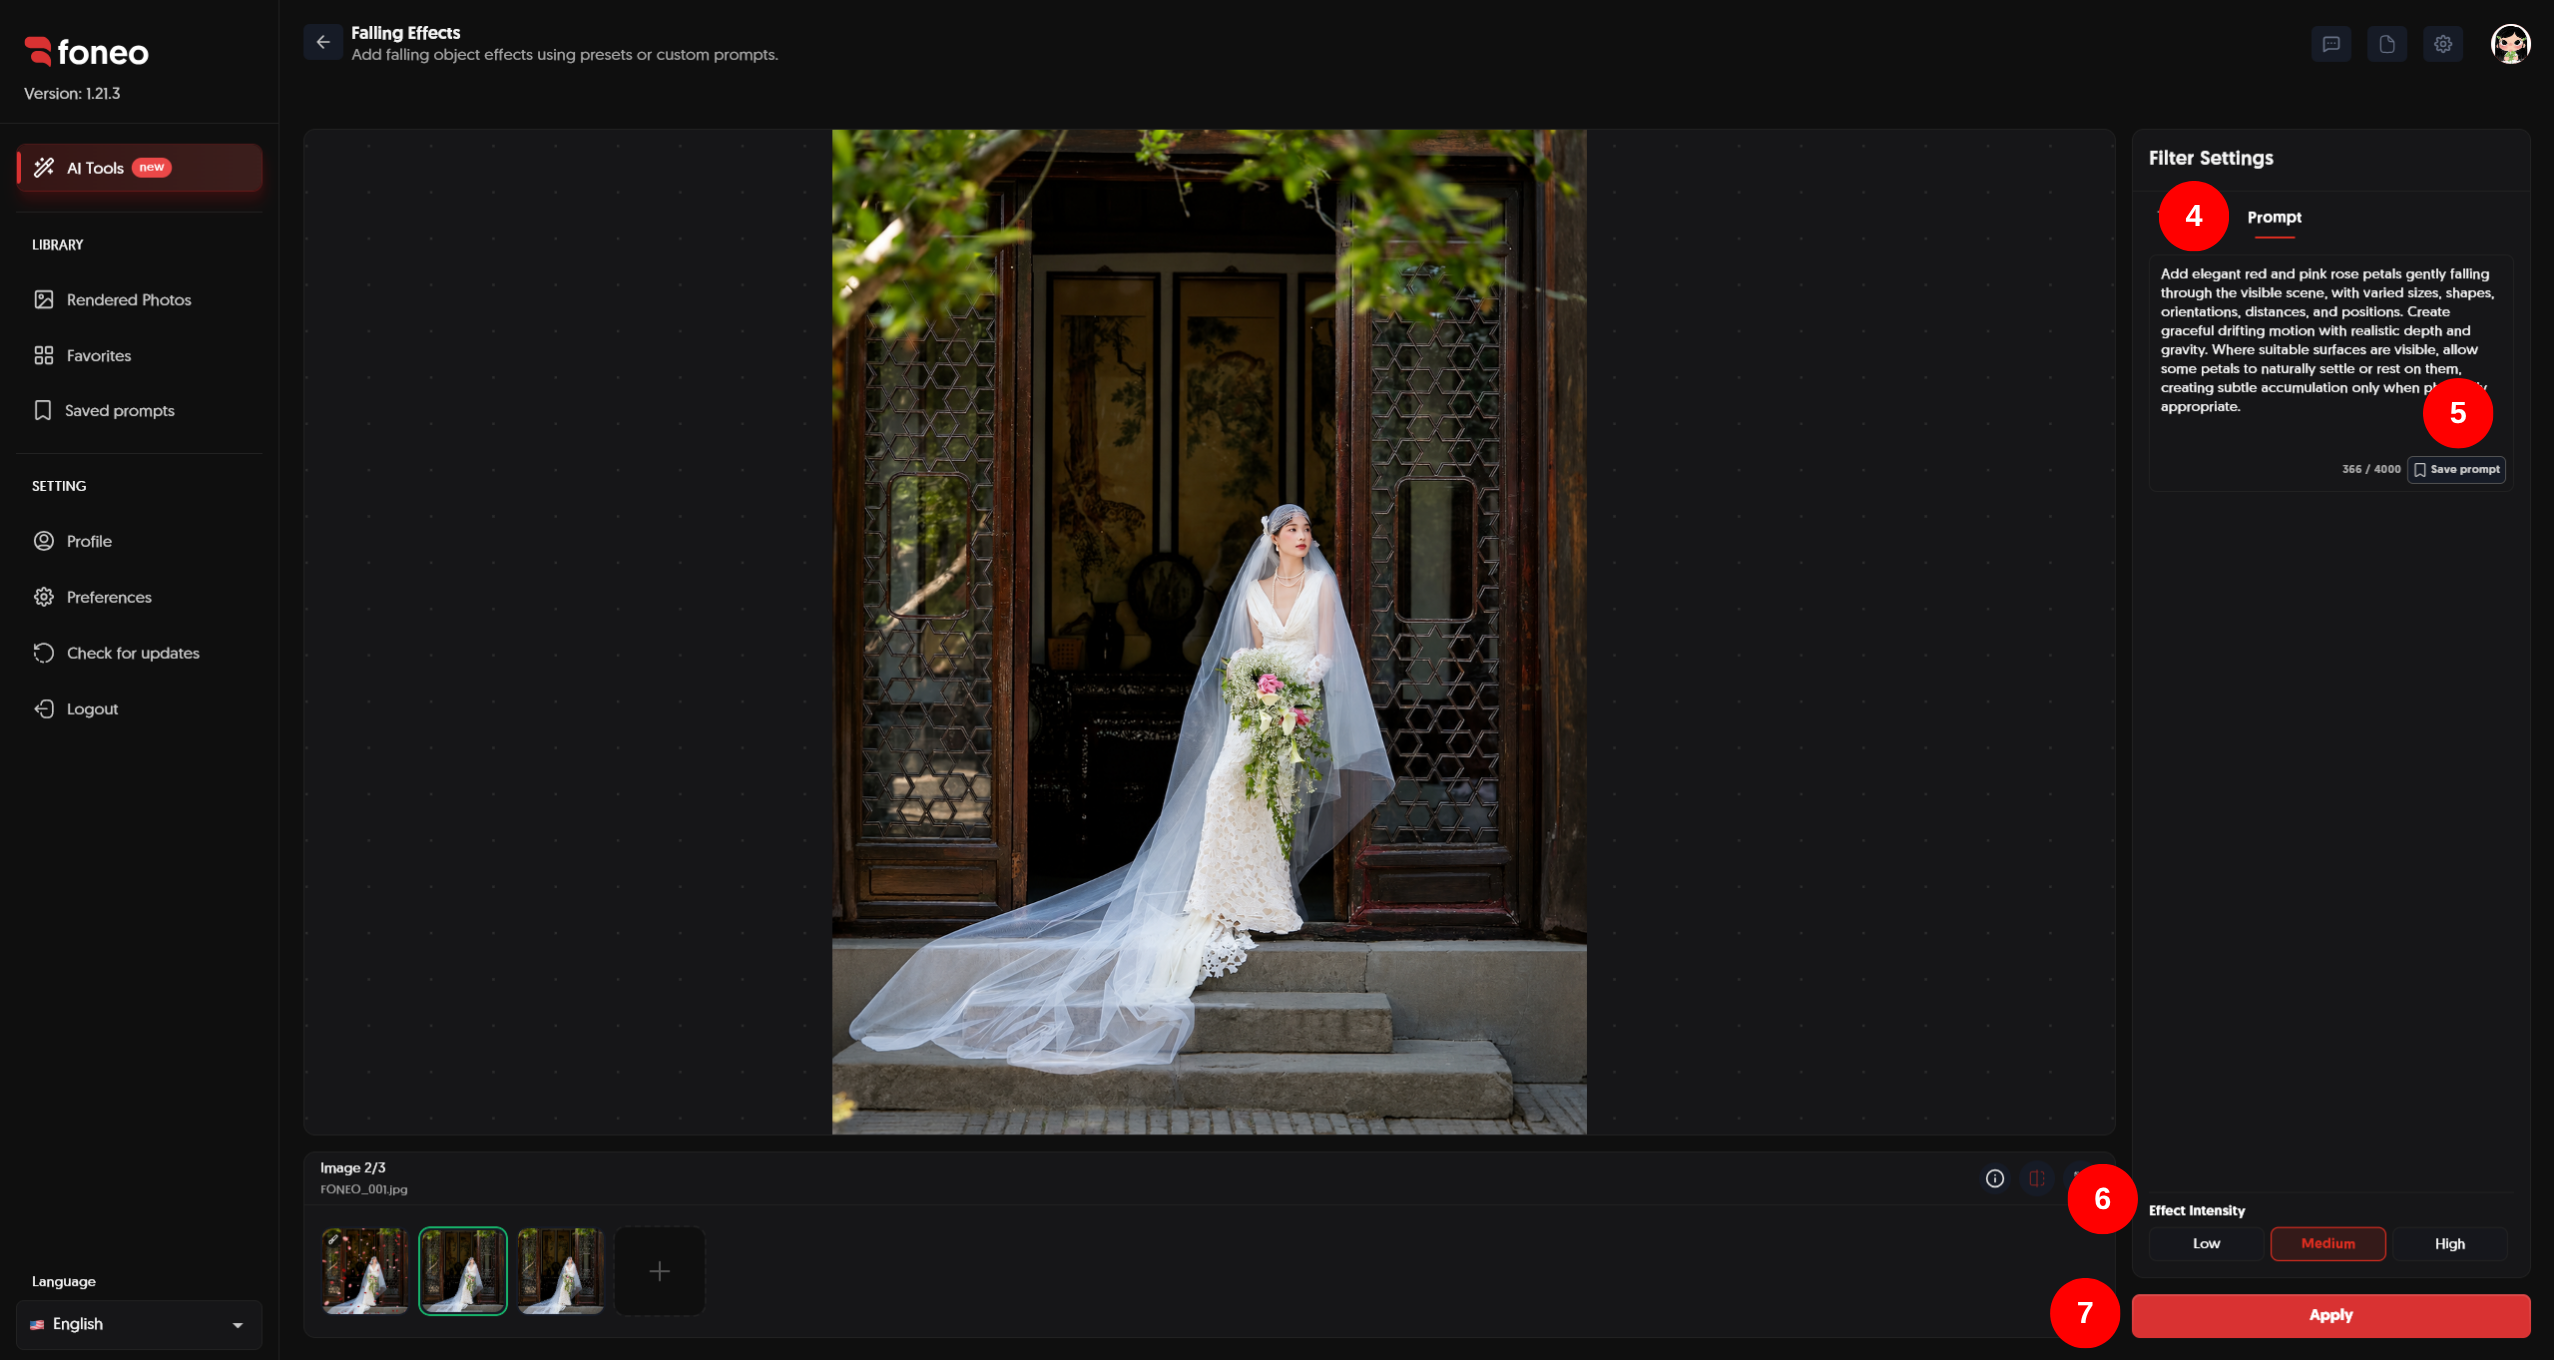
In addition to ready-made Templates, you can describe the effect you want to create using a Prompt.
Switch to the Prompt tab and enter a description of the objects and how you want them to appear in the image.
You can describe:
- The type of object you want to add.
- The object's color.
- The object's size.
- The quantity or density.
- The direction and movement of the falling objects.
- Where the objects should appear in the image.
- The distance between objects.
- The level of sharpness or blur.
- How the objects should blend into the foreground, midground, and background.
- A natural or cinematic style.
Prompt example:
Add elegant red and pink rose petals gently falling through the scene with varied sizes, shapes, orientations, distances, and positions. Create realistic depth with natural motion, subtle blur, and gravity while keeping the subject and original composition unchanged.
The more specific your Prompt is about the type of object and how it should appear, the more information Foneo has to create an effect that matches your desired result.
If you are not sure what to write, you can use Suggest Prompt to get Prompt suggestions from Foneo.
5. Save a Prompt for Later Use
If you have created a Prompt that works well, you can click Save prompt to save it.
When saving a Prompt, you can enter a Prompt name, review or edit the content, and select a category tag to make it easier to organize.
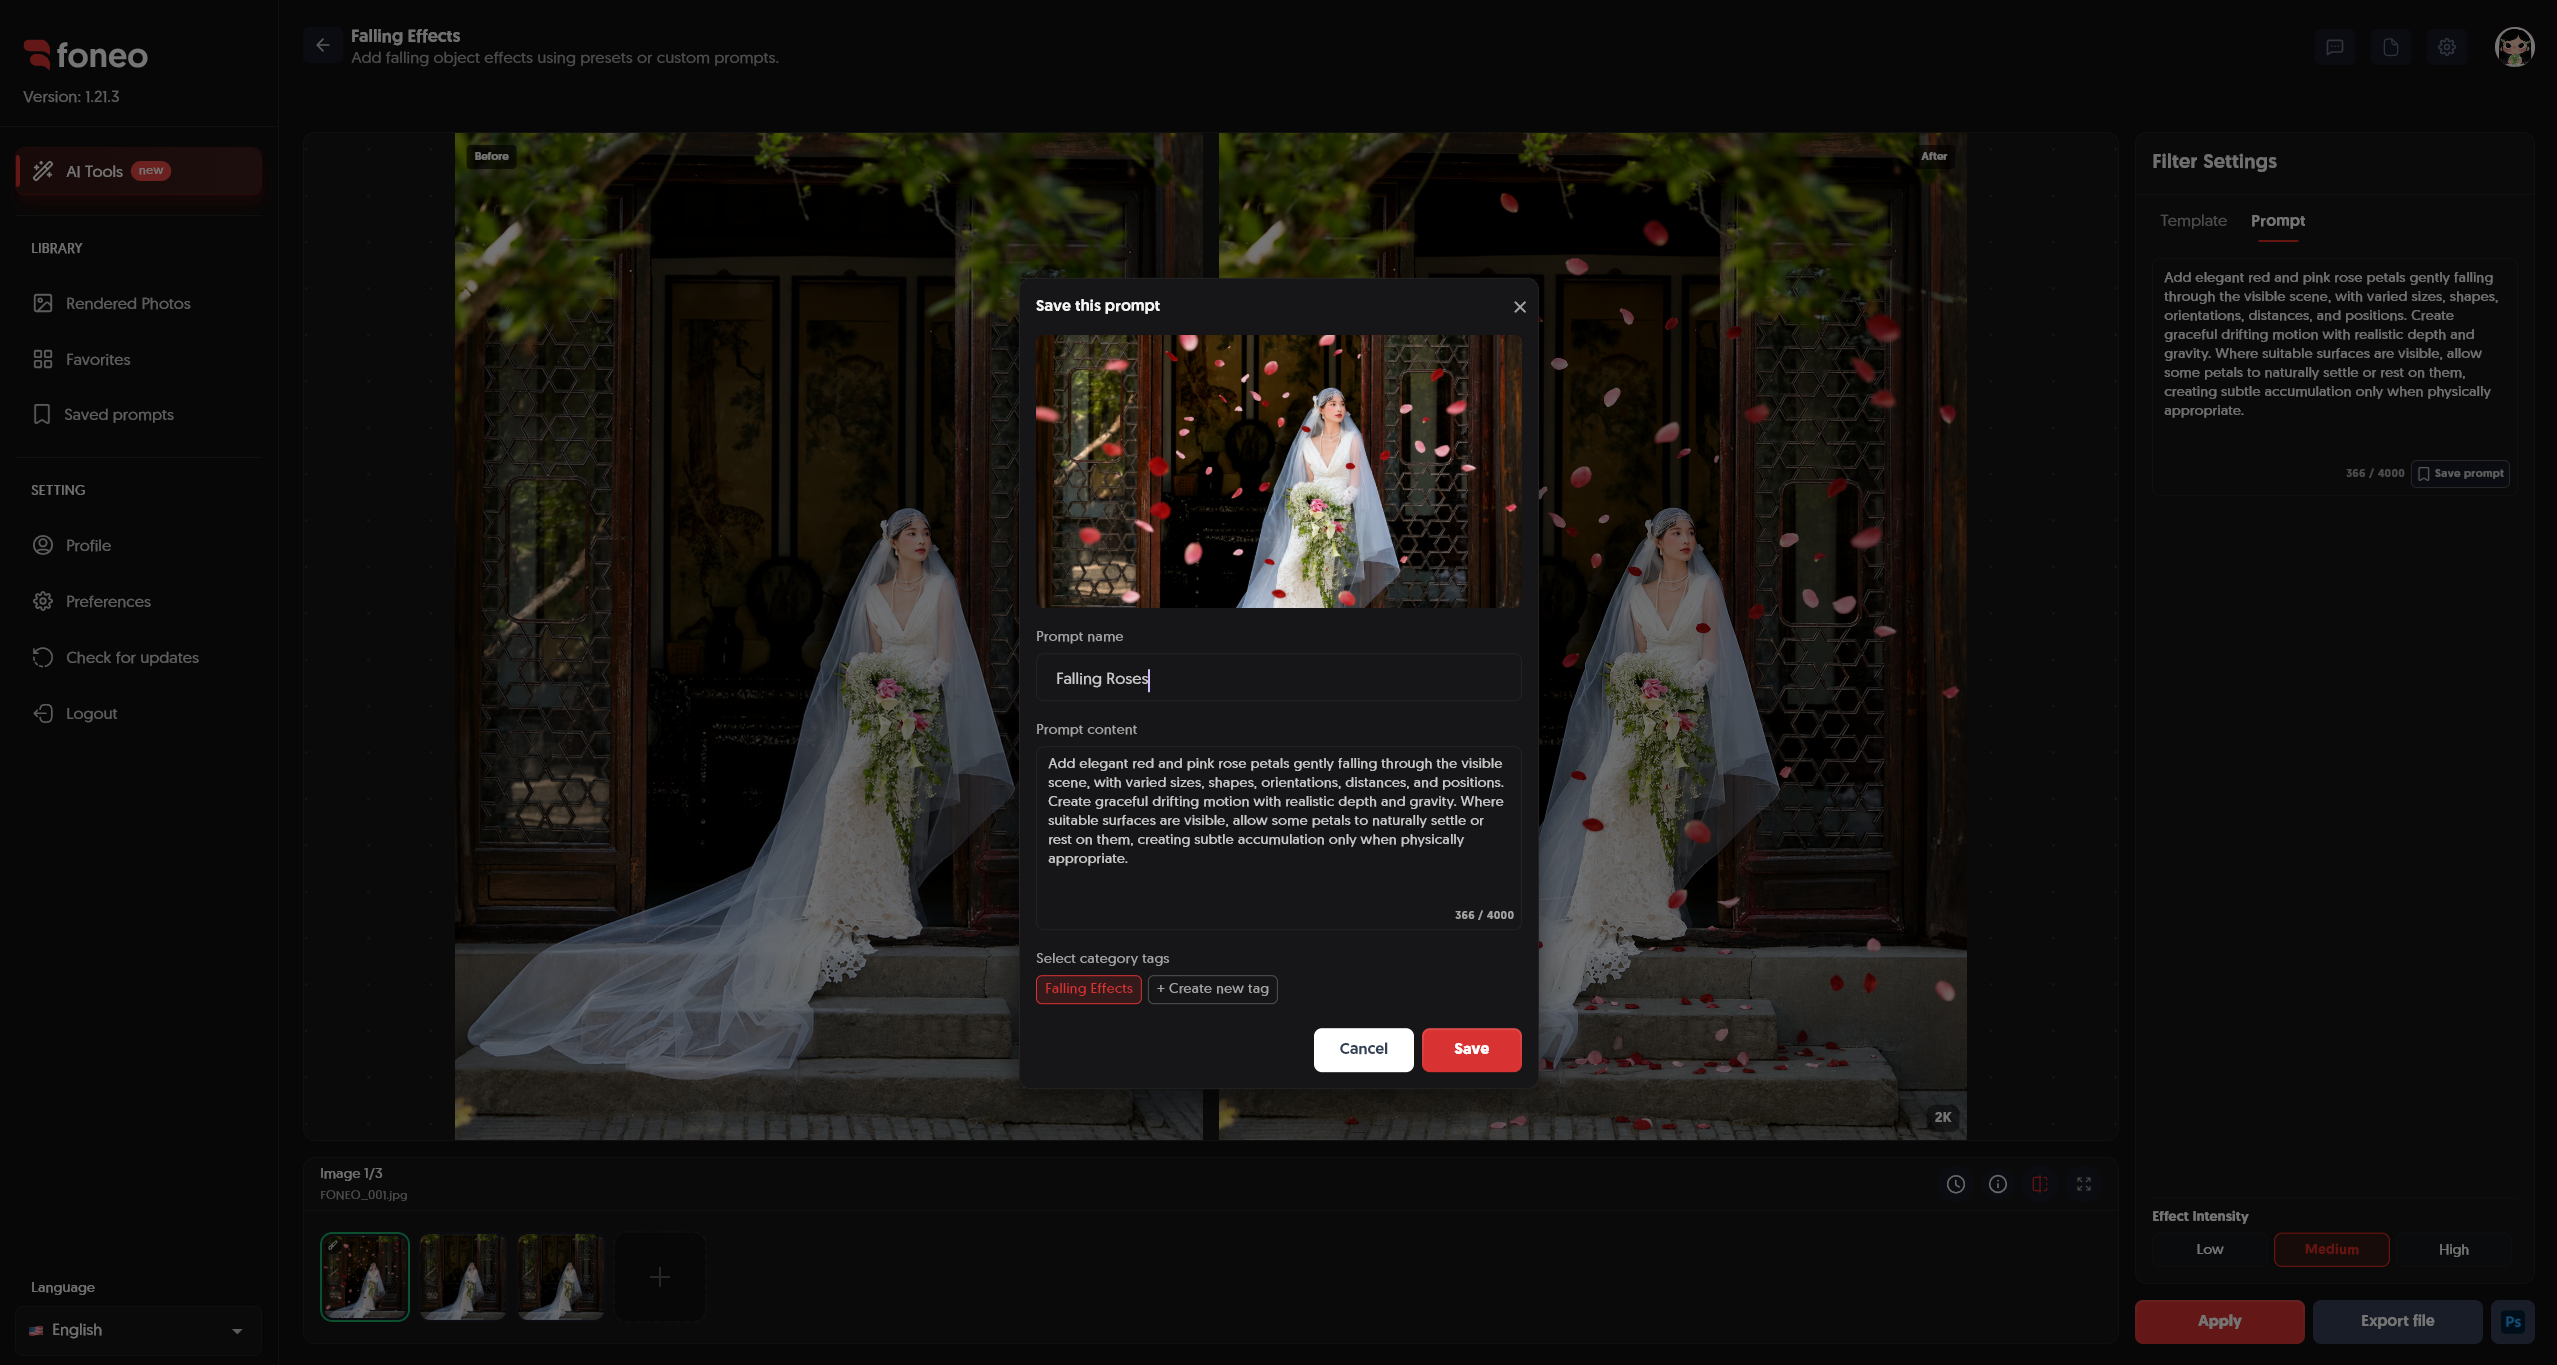
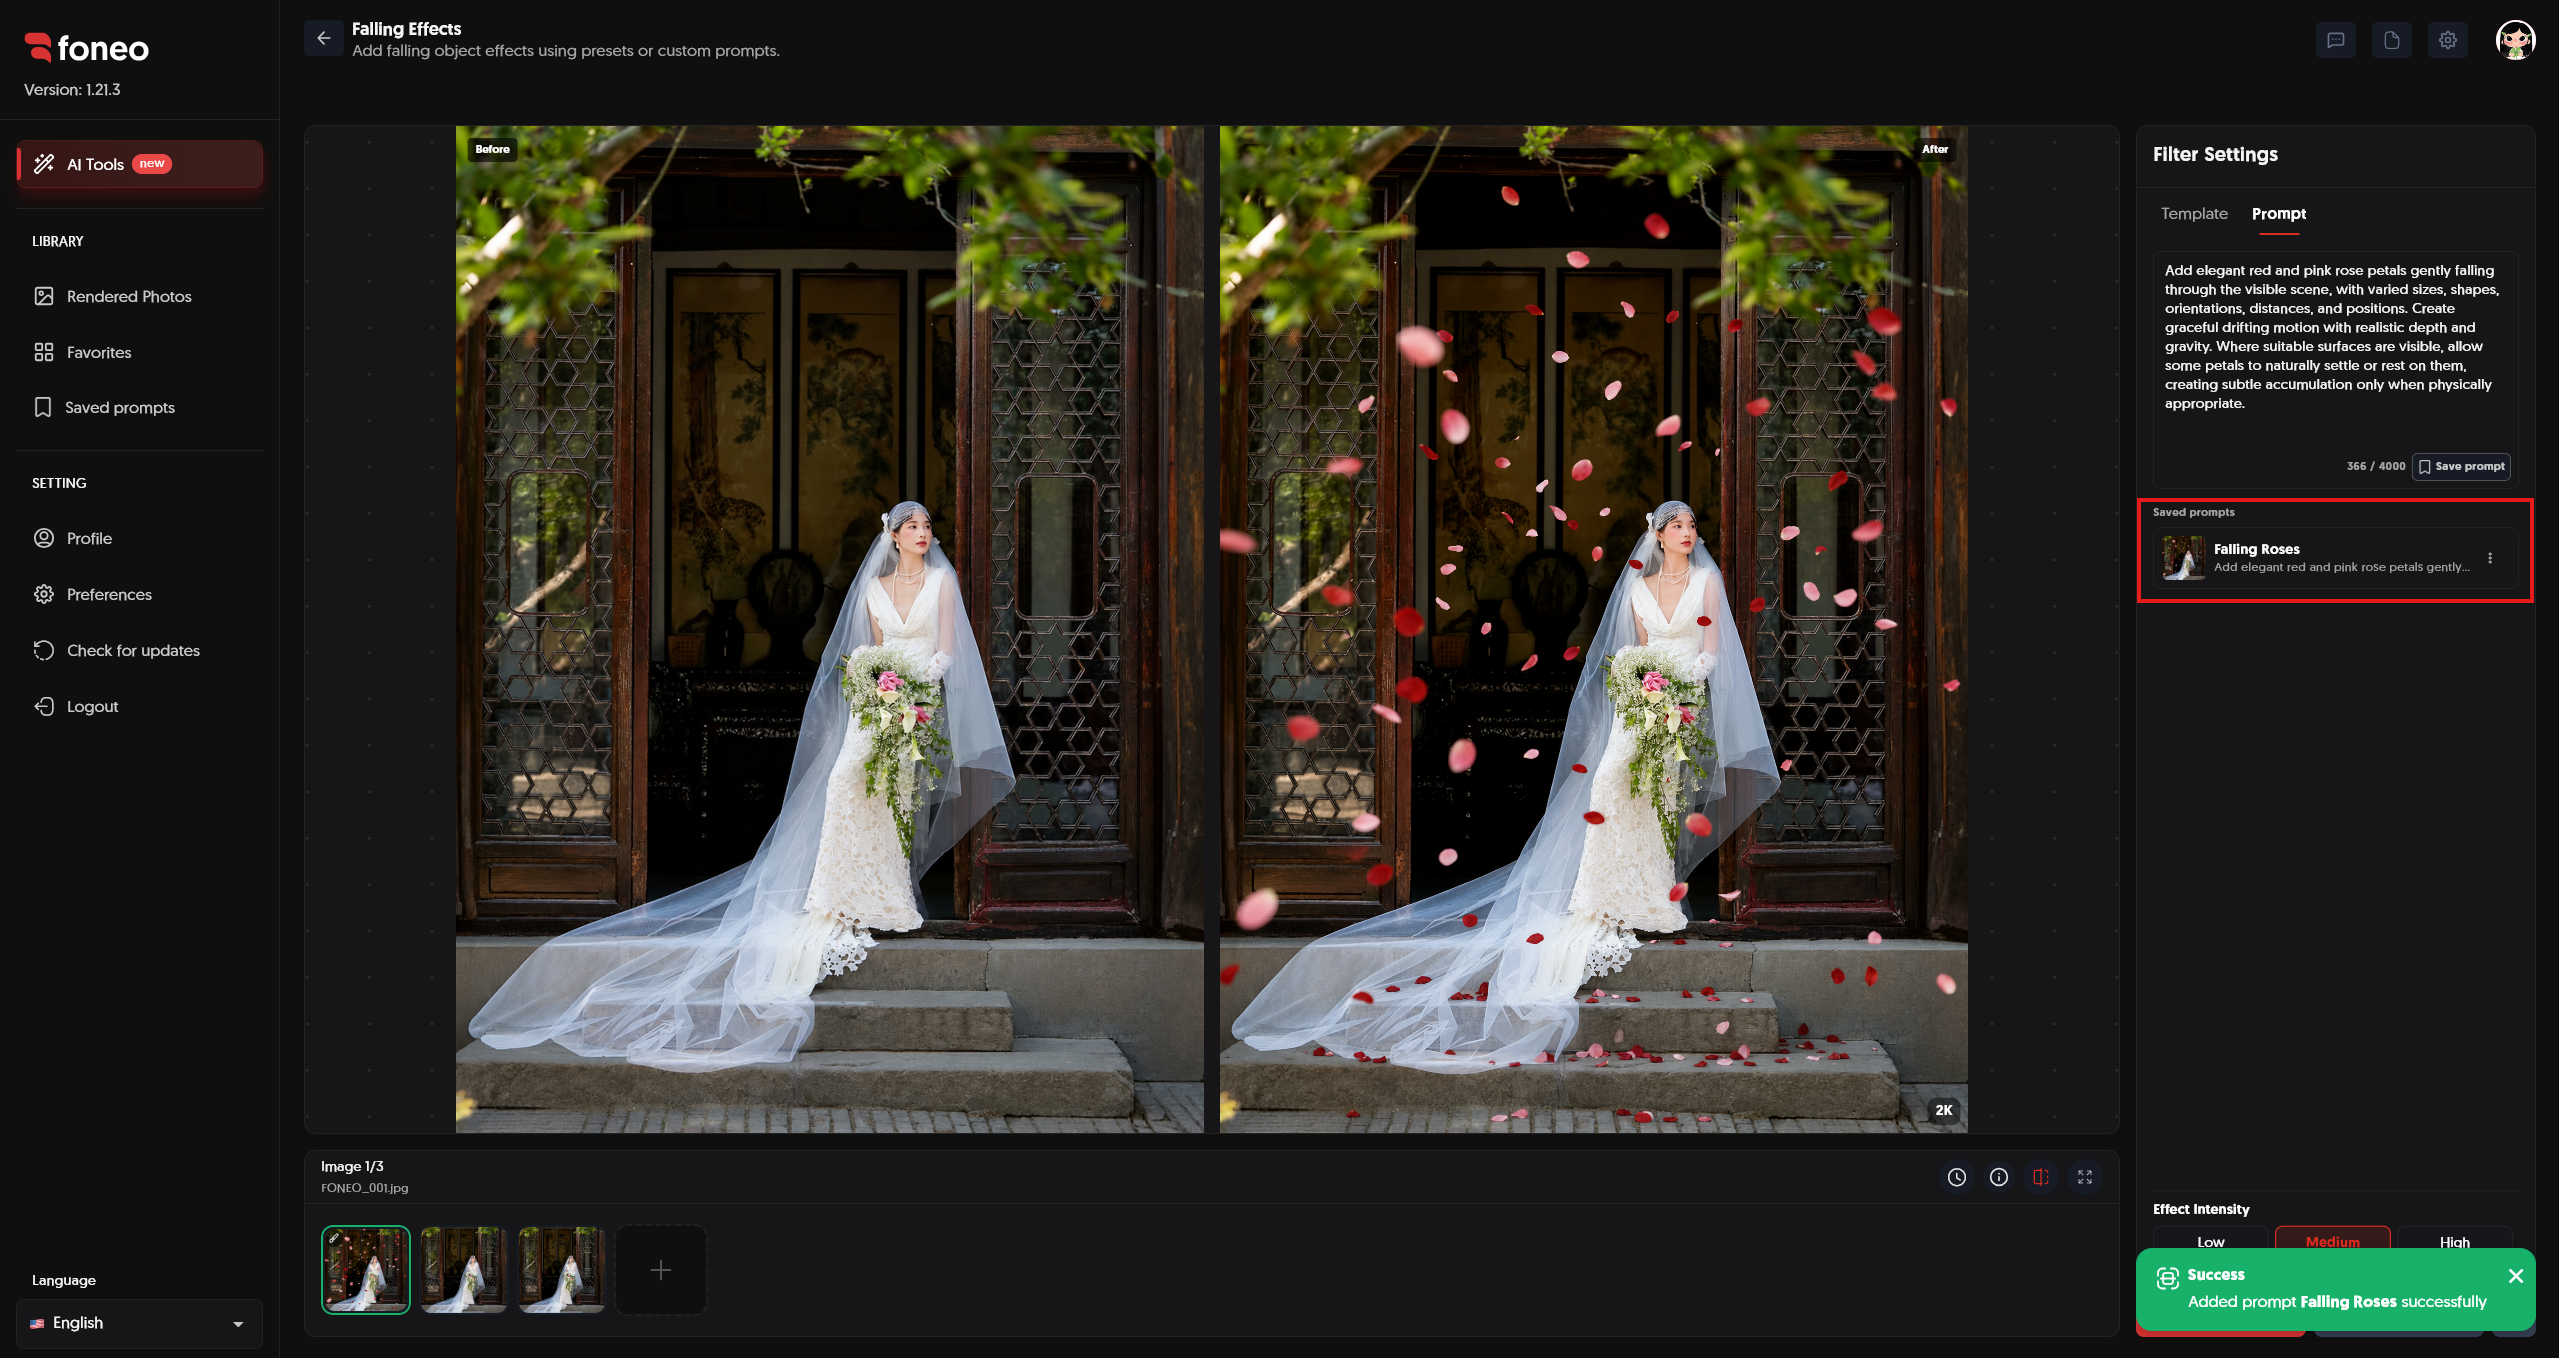
After saving, the Prompt will be added to your saved Prompt list.
You can reuse these Prompts for future edits without having to enter them again from scratch.
6. Adjust Effect Intensity
Foneo provides Effect Intensity to control how strongly the falling objects appear in the image.
There are three levels:
- Low: creates a subtle effect with fewer objects and less impact on the overall image.
- Medium: creates a balanced effect between visibility and object density.
- High: creates a more noticeable effect with a higher density of objects.
Medium is selected by default.
You can choose the intensity that best matches your image and desired style before clicking Apply.
For example, for portrait photos, Low or Medium can help prevent objects from covering the subject. For images that require a more noticeable effect, you can try High.
7. Apply the Effect
After selecting a Template or completing your Prompt, choose the desired Effect Intensity and click Apply to start AI processing.
Foneo will analyze the image and generate falling objects based on your selections.
The processing may create objects with:
- Different sizes.
- Different falling directions.
- Different positions.
- Different distances.
- Appropriate levels of sharpness and blur based on distance.
- Different distributions across the foreground, midground, and background.
Once processing is complete, the result will appear in the preview area.
If the effect is not suitable, you can:
- Choose another Template.
- Edit the Prompt.
- Change Effect Intensity.
- Click Apply to process the image again.
8. Review the Result Before Exporting
After Foneo finishes processing, use the preview area to compare the Before and After images.
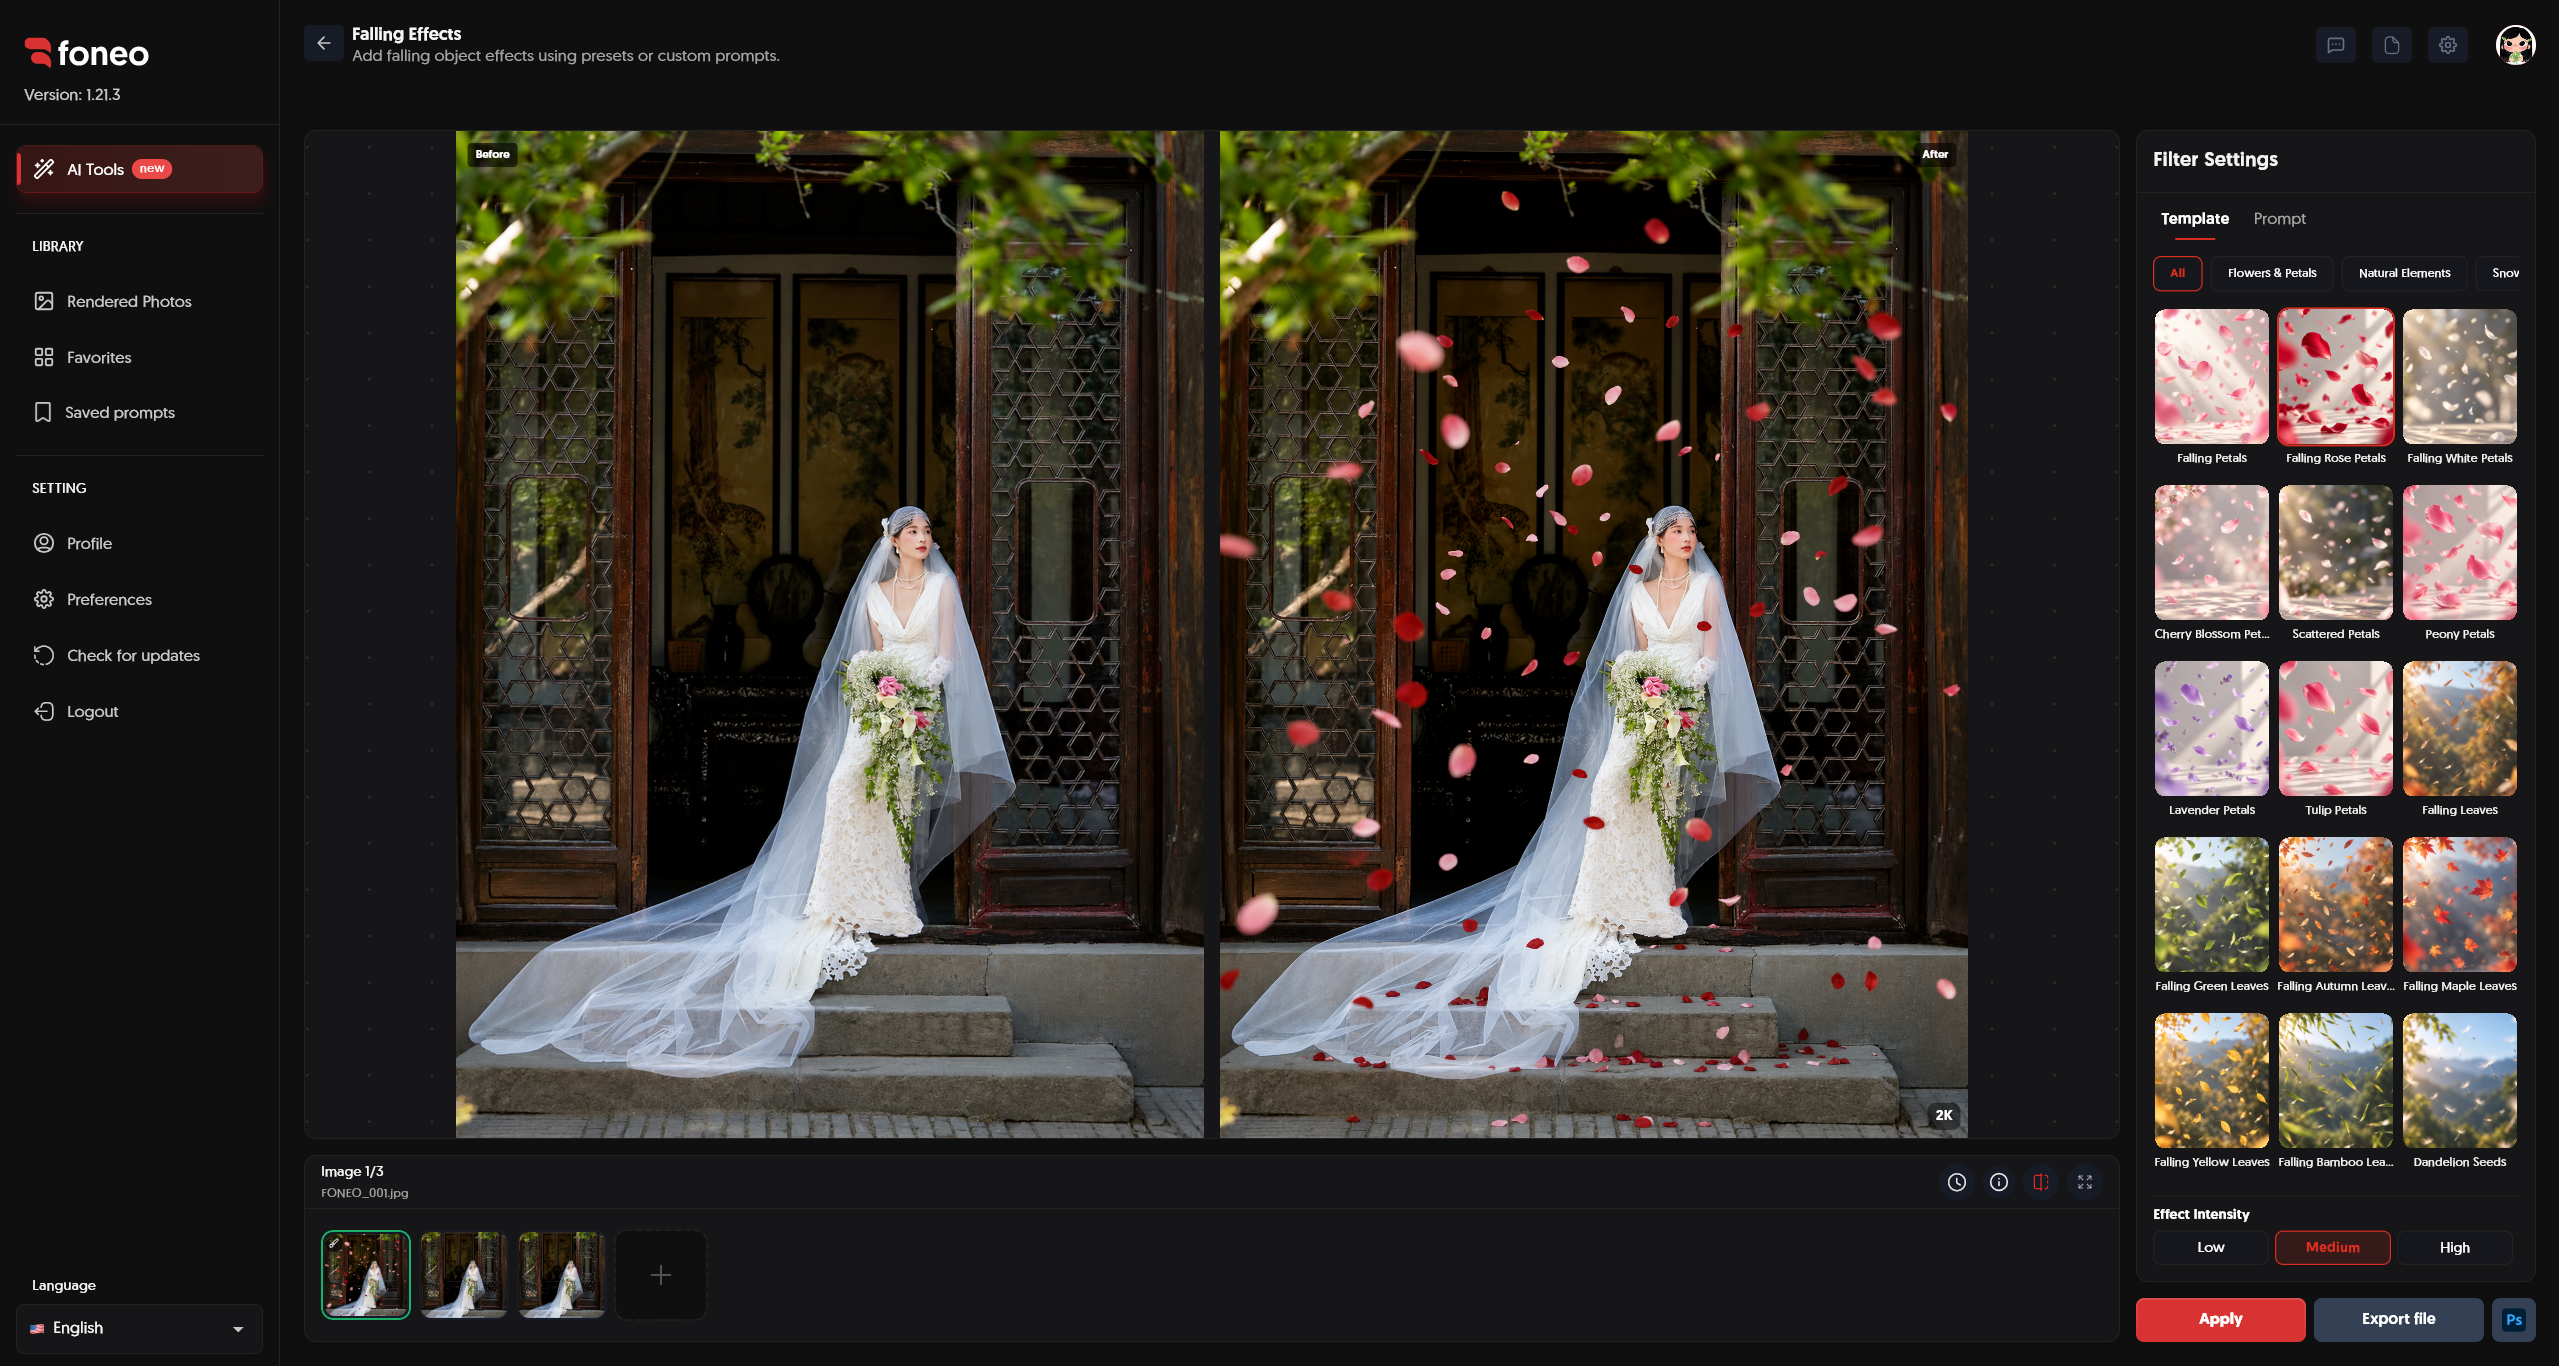
Check the following:
- Naturalness: Do the objects blend naturally into the scene?
- Density: Are there too many or too few objects?
- Distribution: Are the objects distributed appropriately throughout the frame?
- Depth: Do objects at different distances create a natural sense of space?
- Sharpness: Do objects at different distances have an appropriate level of clarity?
- Subject: Does the effect cover the face or other important details?
- Overall appearance: Does the effect match the style and context of the image?
If the effect is too strong or does not look suitable, try changing the Template, Prompt, or Effect Intensity, then process the image again.
9. Export the Image
When you are satisfied with the result, click Export file to export the image.
If you want to continue editing in Photoshop, you can use the Ps button to open the image and continue making adjustments.
How Does Falling Effects Work?
Falling Effects uses AI to add moving objects to an image based on the Template or Prompt you select.
Foneo does not simply add objects uniformly. It can create variations in size, shape, direction, distance, and position to make the effect feel more natural.
For example, when creating a falling petal effect, petals can be distributed at different distances throughout the frame. Objects closer to the camera may appear sharper, while objects farther away may appear smaller or more blurred to create a stronger sense of depth.
You can combine Template/Prompt + Effect Intensity to control the style and strength of the effect.
When Should You Use Falling Effects?
1. Wedding and Fashion Photos
You can use effects such as rose petals, cherry blossoms, peony petals, or tulips to create a more atmospheric look for wedding and fashion photos.
2. Outdoor Photos
Effects such as falling leaves, yellow leaves, maple leaves, or bamboo leaves can add a natural feeling and complement outdoor environments.
3. Portrait Photos
For portrait photos, you can use effects with a moderate density to add depth while keeping the face and main subject clearly visible.
4. Concept Photos
For creative or cinematic images, you can use Prompt to create custom falling-object effects based on your own concept.
5. Photos That Need More Depth
Objects distributed at different distances can help create a stronger sense of space and depth in an image.
Tips for Creating Natural-Looking Falling Effects
1. Use a High-Quality Image
Use an image with a clear subject and enough detail in the surrounding environment.
Images with more visual information can help Foneo analyze the space and create a more suitable effect.
2. Choose a Template That Matches the Scene
Choose the type of falling object based on the background, lighting, clothing, and overall style of the image.
For example:
- Wedding photos: rose petals, white petals, or cherry blossoms.
- Autumn photos: yellow leaves, maple leaves, or falling leaves.
- Nature photos: leaves, dandelion seeds, or other natural objects.
- Fashion photos: petals or feathers can be used to create a more artistic look.
3. Choose the Appropriate Effect Intensity
If you want to keep the subject clear, start with Medium or Low.
If you want a stronger and more noticeable effect, try High.
You can preview the result and adjust the intensity if the effect does not look right.
4. Write a Specific Prompt
When using a Prompt, describe the key elements such as:
Object type + color + movement + size + density + position + depth
For example, instead of simply writing:
Rose petals.
You can describe:
Add soft red and pink rose petals gently falling through the scene, with varied sizes, natural spacing, different orientations, subtle motion blur, and realistic depth while keeping the subject unchanged.
5. Keep Your Prompt Concise but Complete
You do not need to write an extremely long Prompt. Focus on the important changes you want to create.
A simple structure can be:
Object + movement + size + density + position + depth
This makes it easier to adjust your Prompt when the result does not match your expectations.
6. Avoid Covering the Subject
Especially for portrait photos, check the face, hair, clothing, and other important details after processing.
If too many objects appear in the image, try reducing Effect Intensity or adjusting the Prompt.
7. Try Multiple Options Before Exporting
You do not have to use the first result immediately.
Try different Templates, Prompts, or Effect Intensity levels and compare the results. Then check the Before / After images and choose the result that best suits your purpose.
Frequently Asked Questions
What is Falling Effects used for?
Falling Effects uses AI to add moving objects such as flower petals, leaves, feathers, and similar effects to images.
Do I need a Prompt to use Falling Effects?
No.
You can select a ready-made Template directly.
If you want to create a custom effect, switch to the Prompt tab and enter your desired description.
Can I create my own custom falling effect?
Yes.
You can use a Prompt to describe the type of object, color, size, density, falling direction, position, and depth of the effect.
What is Effect Intensity?
Effect Intensity is an option that controls how strongly the effect appears in the image.
Foneo provides three levels:
- Low
- Medium
- High
Medium is selected by default.
Can I change the effect intensity after selecting a Template?
Yes.
You can choose Low, Medium, or High before clicking Apply to adjust the effect according to your needs.
Can I save a Prompt for later use?
Yes.
After creating a suitable Prompt, you can click Save prompt to save it.
You can enter a Prompt name, edit the content, and select a category tag to make it easier to organize and reuse in future edits.
Can I use multiple images with Falling Effects?
Yes.
You can add multiple images using the + button in the thumbnail area, then select each image to edit.
Can I use Falling Effects for portrait photos?
Yes.
You can add effects such as petals, leaves, or feathers to portrait photos. Choose an appropriate effect intensity to avoid covering the face and main subject.
Does Foneo keep the original subject in the image?
The effect is generated based on the original image and is intended to add objects to the existing scene. When using a Prompt, you can clearly describe requirements such as “keep the subject and original composition unchanged” to guide the result.
Can I edit the image after creating the effect?
Yes.
After processing, you can click Export file to export the image or use the Ps button to continue editing in Photoshop.
Related Articles
- How to Use Skin Retouching on Foneo AI Photo Editing App
- How to Use Portrait Effects on Foneo AI Photo Editing App
- How to Use Upscale on Foneo AI Photo Editing App
- How to Use Glass Reflection Removal on Foneo AI Photo Editing App
- How to Use Old Photo Restoration & Colorization on Foneo AI Photo Editing App
- How to Use ID Photo on Foneo AI Photo Editing App
Foneo · AI Photo Editing
Ready to try it on your own photos?
Download the Foneo app to edit photos with AI in just a few taps, or see the plan that fits your needs.