How to Use Weather Effects on the Foneo AI Photo Editing App
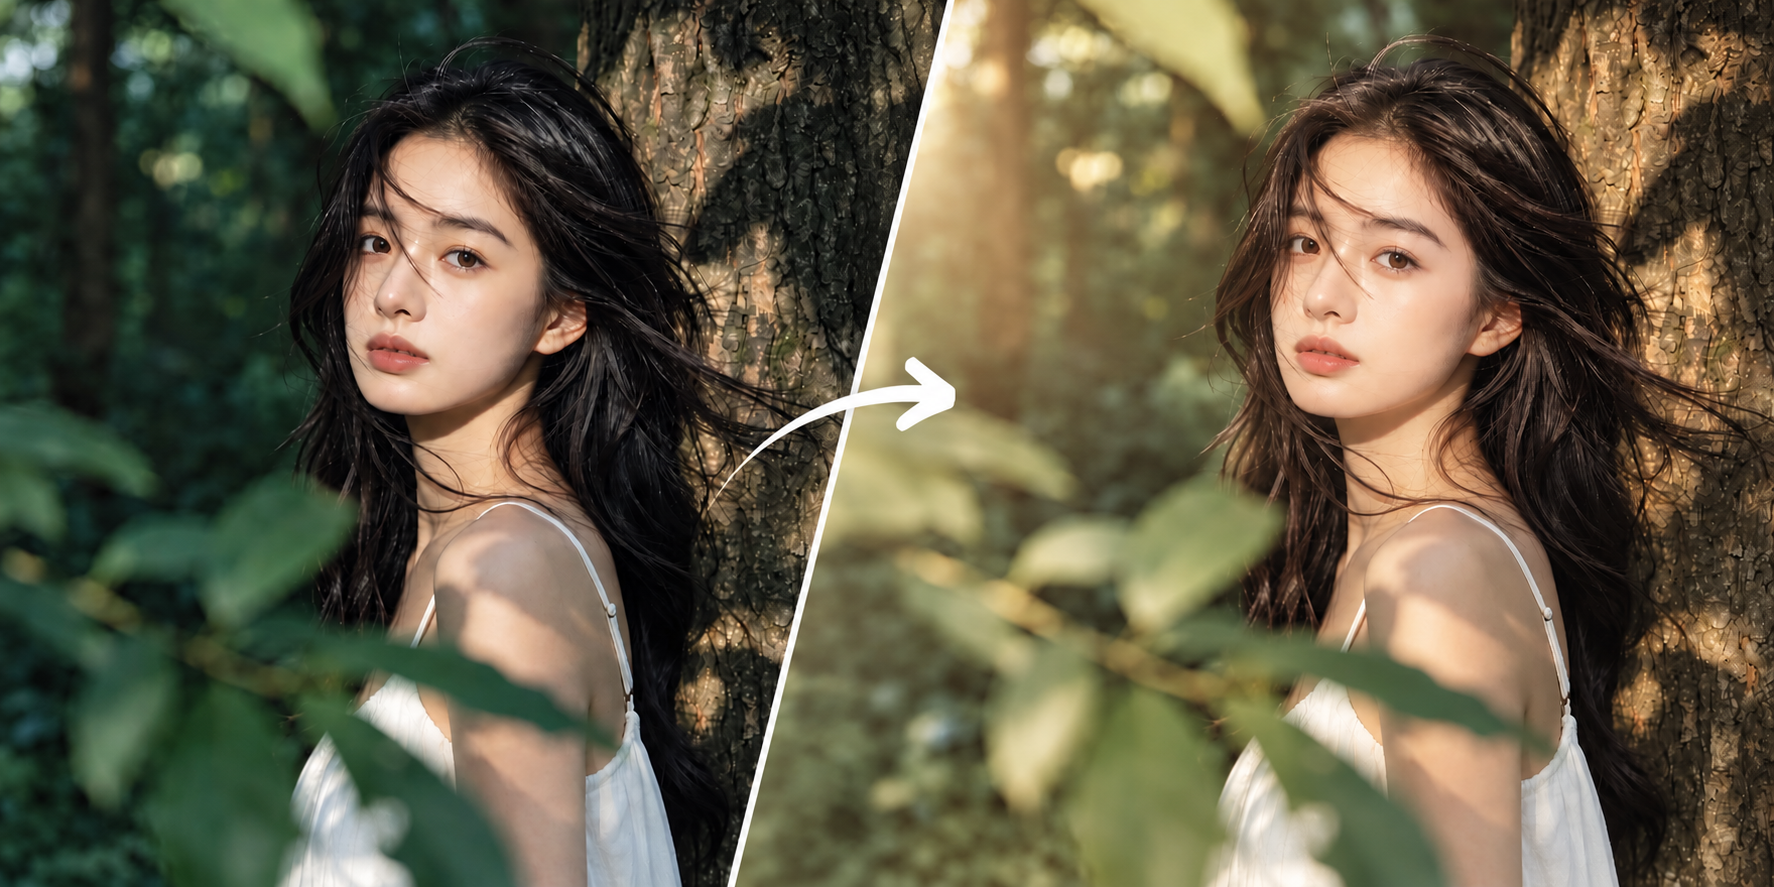
Weather Effects can make photos more dynamic, add depth, and create an atmosphere that fits different scenes. With the Weather Effects feature on Foneo, you can add or transform weather conditions in your photos with AI in just a few simple steps.
Foneo provides ready-made Templates and custom Prompts, making it easy to create different weather conditions such as snow, rain, mist, sunlight, or other weather effects that match your desired visual style.
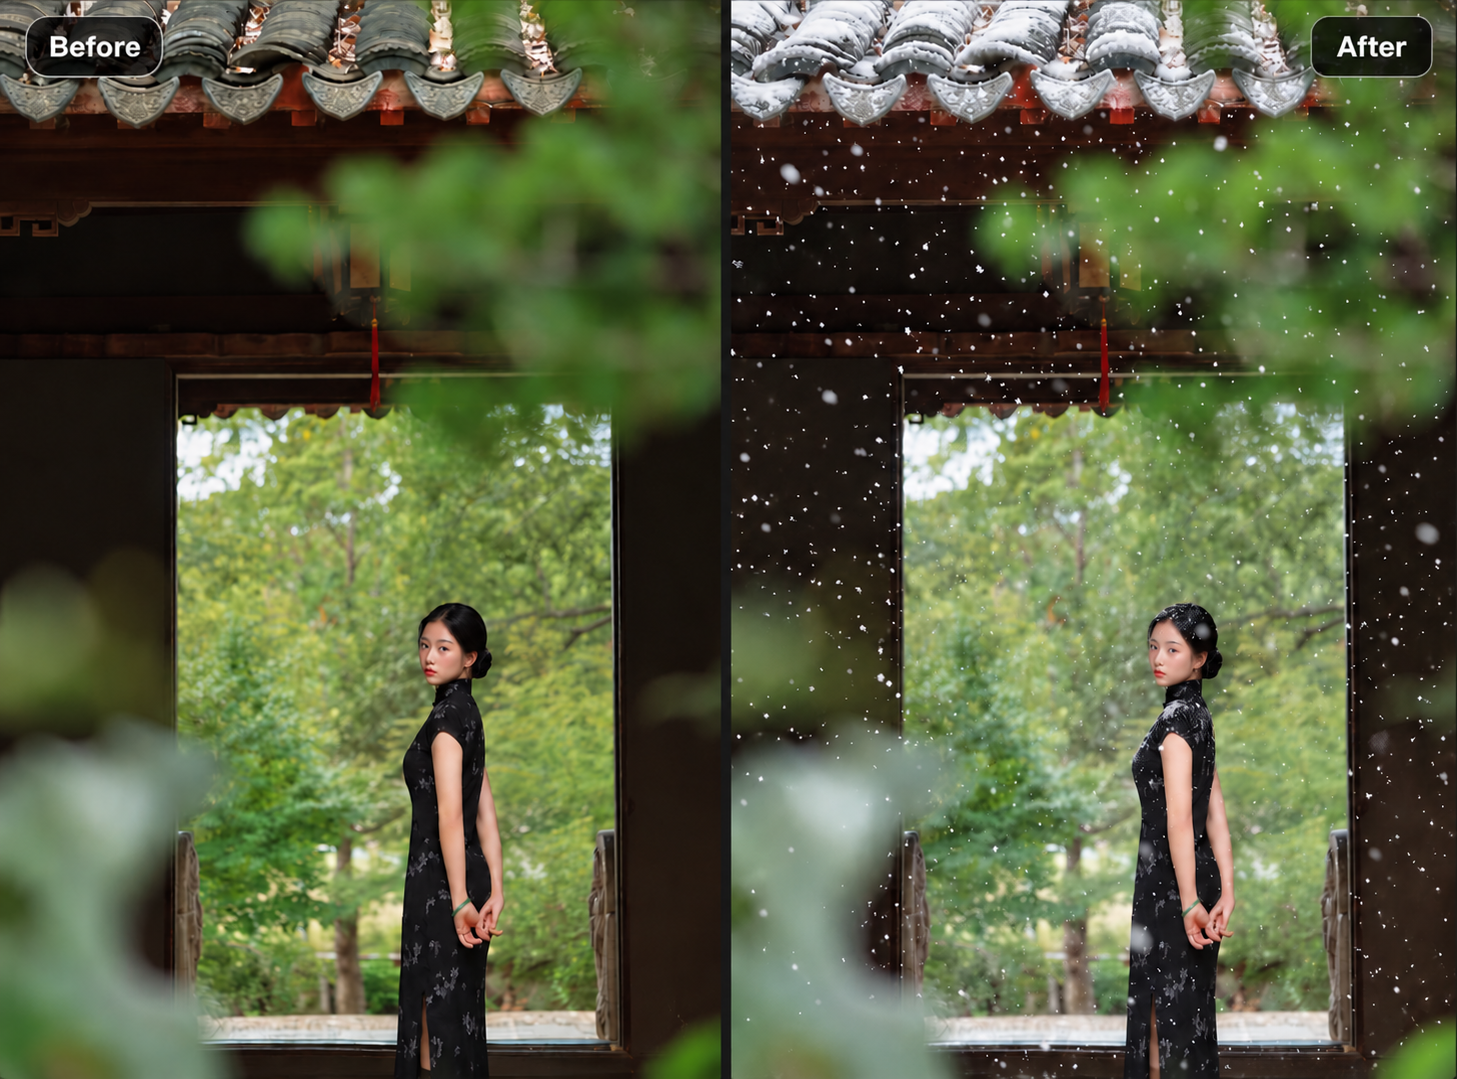
Before & After
How to Use Weather Effects
To get started, upload the photo you want to edit to Foneo and open the Weather Effects feature.
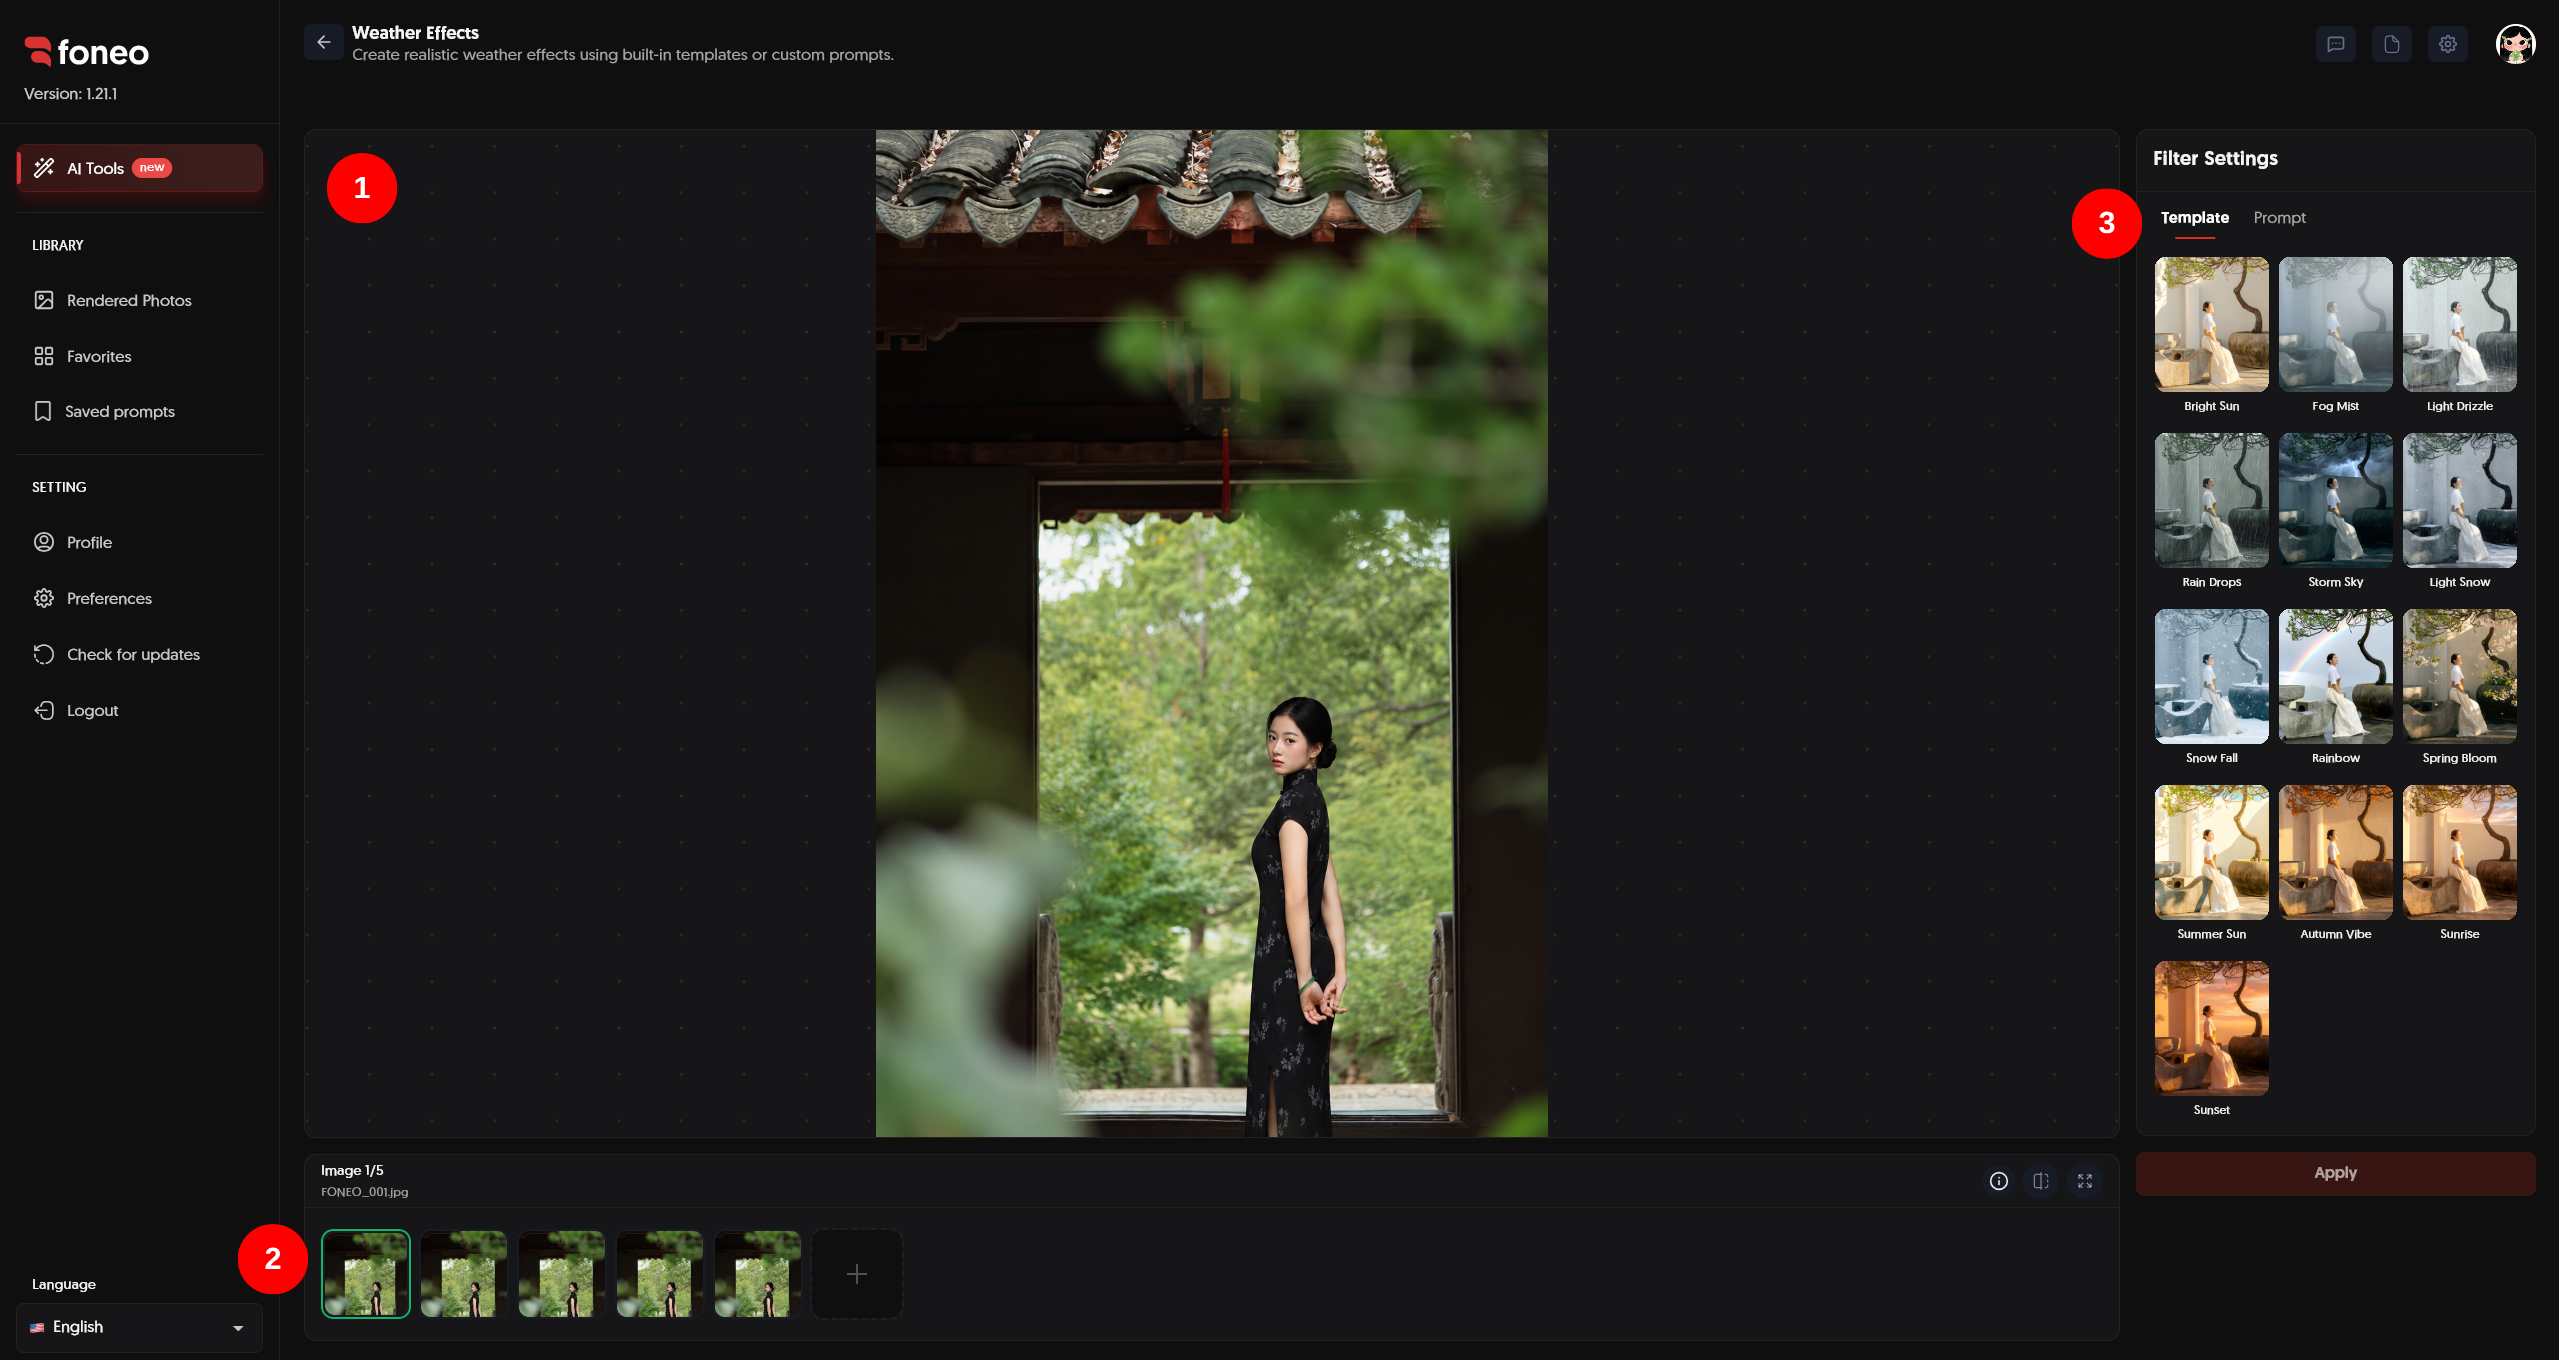
1. Preview Your Photo
After uploading the photo, it will be displayed in the preview area in the center of the screen.
This is where you can check the original image and view the result after Foneo finishes processing.
After applying the effect, Foneo displays the Before and After images so you can easily compare the changes.
2. Select the Photo to Edit
Uploaded photos will be displayed as thumbnails below the preview area.
- Click a thumbnail to select the photo you want to edit.
- Click + to add a new photo.
- When multiple photos are available, you can select each photo individually and apply the appropriate effect.
3. Choose a Weather Effects Template
In Filter Settings, select the Template tab.
Here, Foneo provides various ready-made weather effect Templates with different weather conditions and visual styles.
Simply choose the Template that matches the result you want. Foneo will use the original image to generate the weather effect with AI.
Templates help you quickly change the atmosphere of a photo without having to describe the effect yourself or configure multiple settings.
4. Create a Weather Effect with a Prompt
In addition to ready-made Templates, you can describe the weather effect you want using a Prompt.
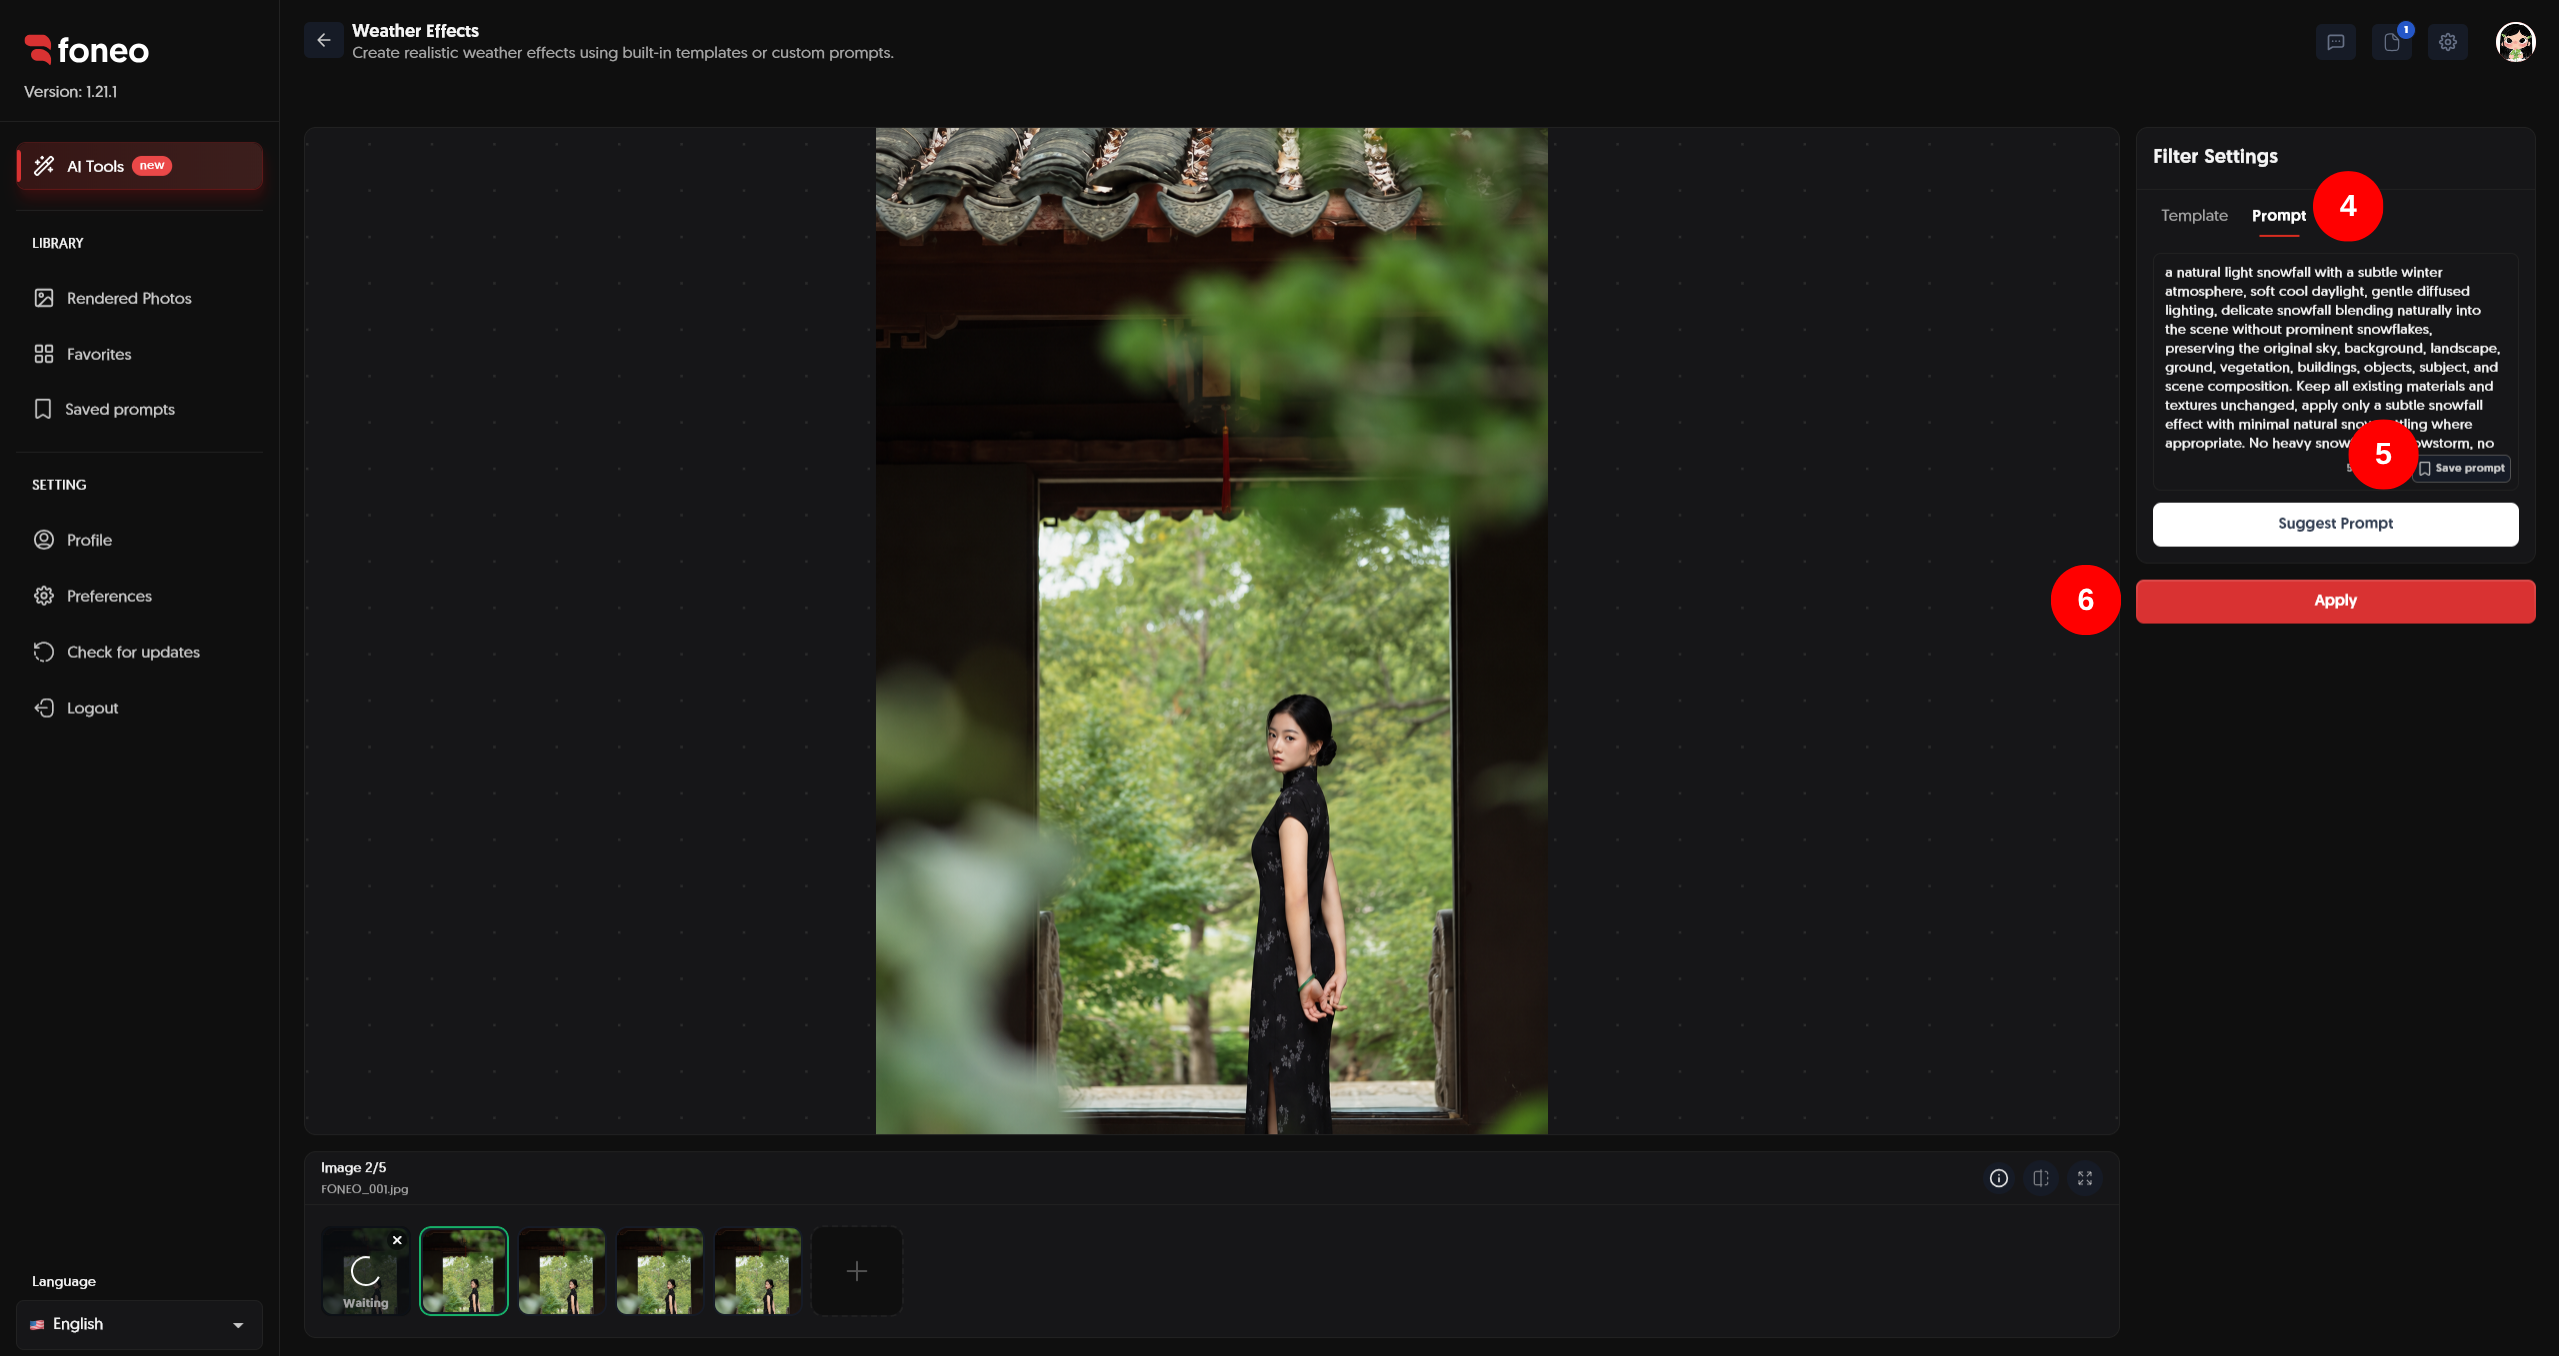
Switch to the Prompt tab, then enter a description of the weather condition or atmosphere you want to create.
You can describe elements such as:
- The desired weather type.
- The intensity of the effect.
- The time of day.
- Overall lighting and colors.
- The atmosphere and mood of the photo.
- Weather details appearing in the environment.
- The desired level of natural or cinematic appearance.
Prompt example:
Add a gentle snowfall to the scene with soft falling snowflakes, a cool winter atmosphere, subtle mist, and natural overcast lighting. Keep the subject and original composition unchanged.
If you do not have an idea yet, you can click Suggest Prompt to get Prompt suggestions from Foneo.
5. Save a Prompt for Later Use
After creating a Prompt that works well, you can click Save prompt to save it.
When saving a Prompt, Foneo allows you to enter a Prompt name, review or edit the Prompt content, and select a category tag for easier management.
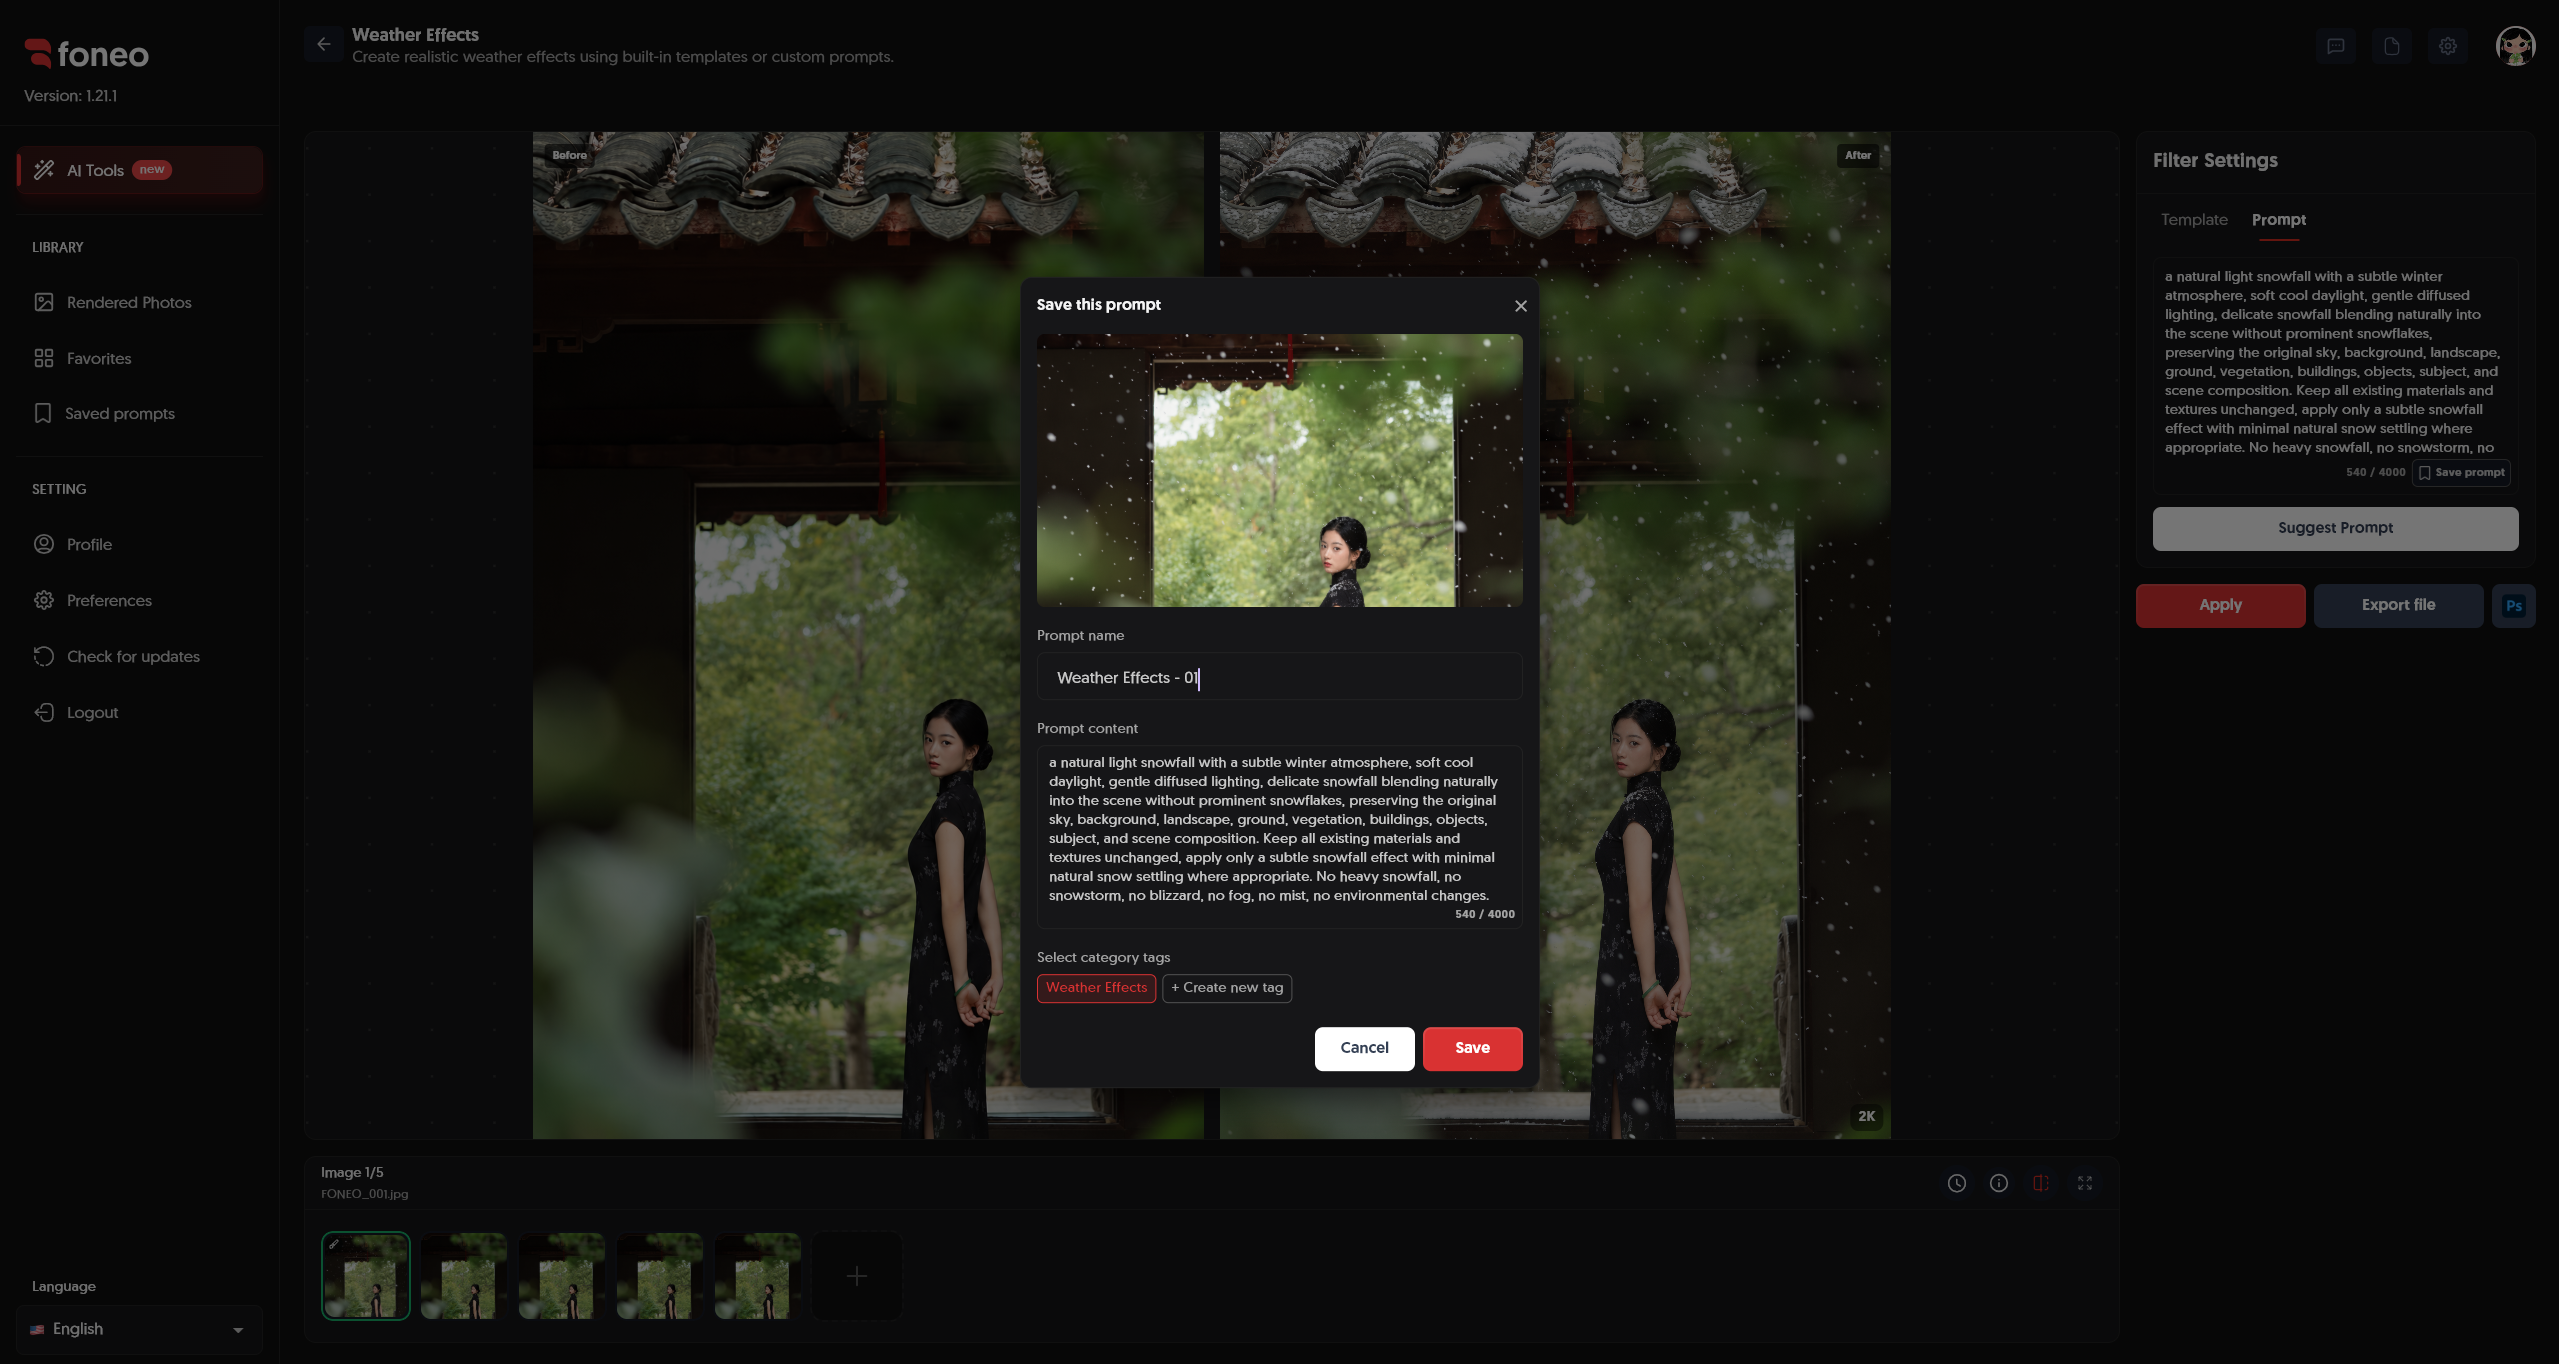
After clicking Save, the Prompt will be added to your saved Prompt list.
You can reuse these Prompts for future edits without having to enter the content again from scratch.
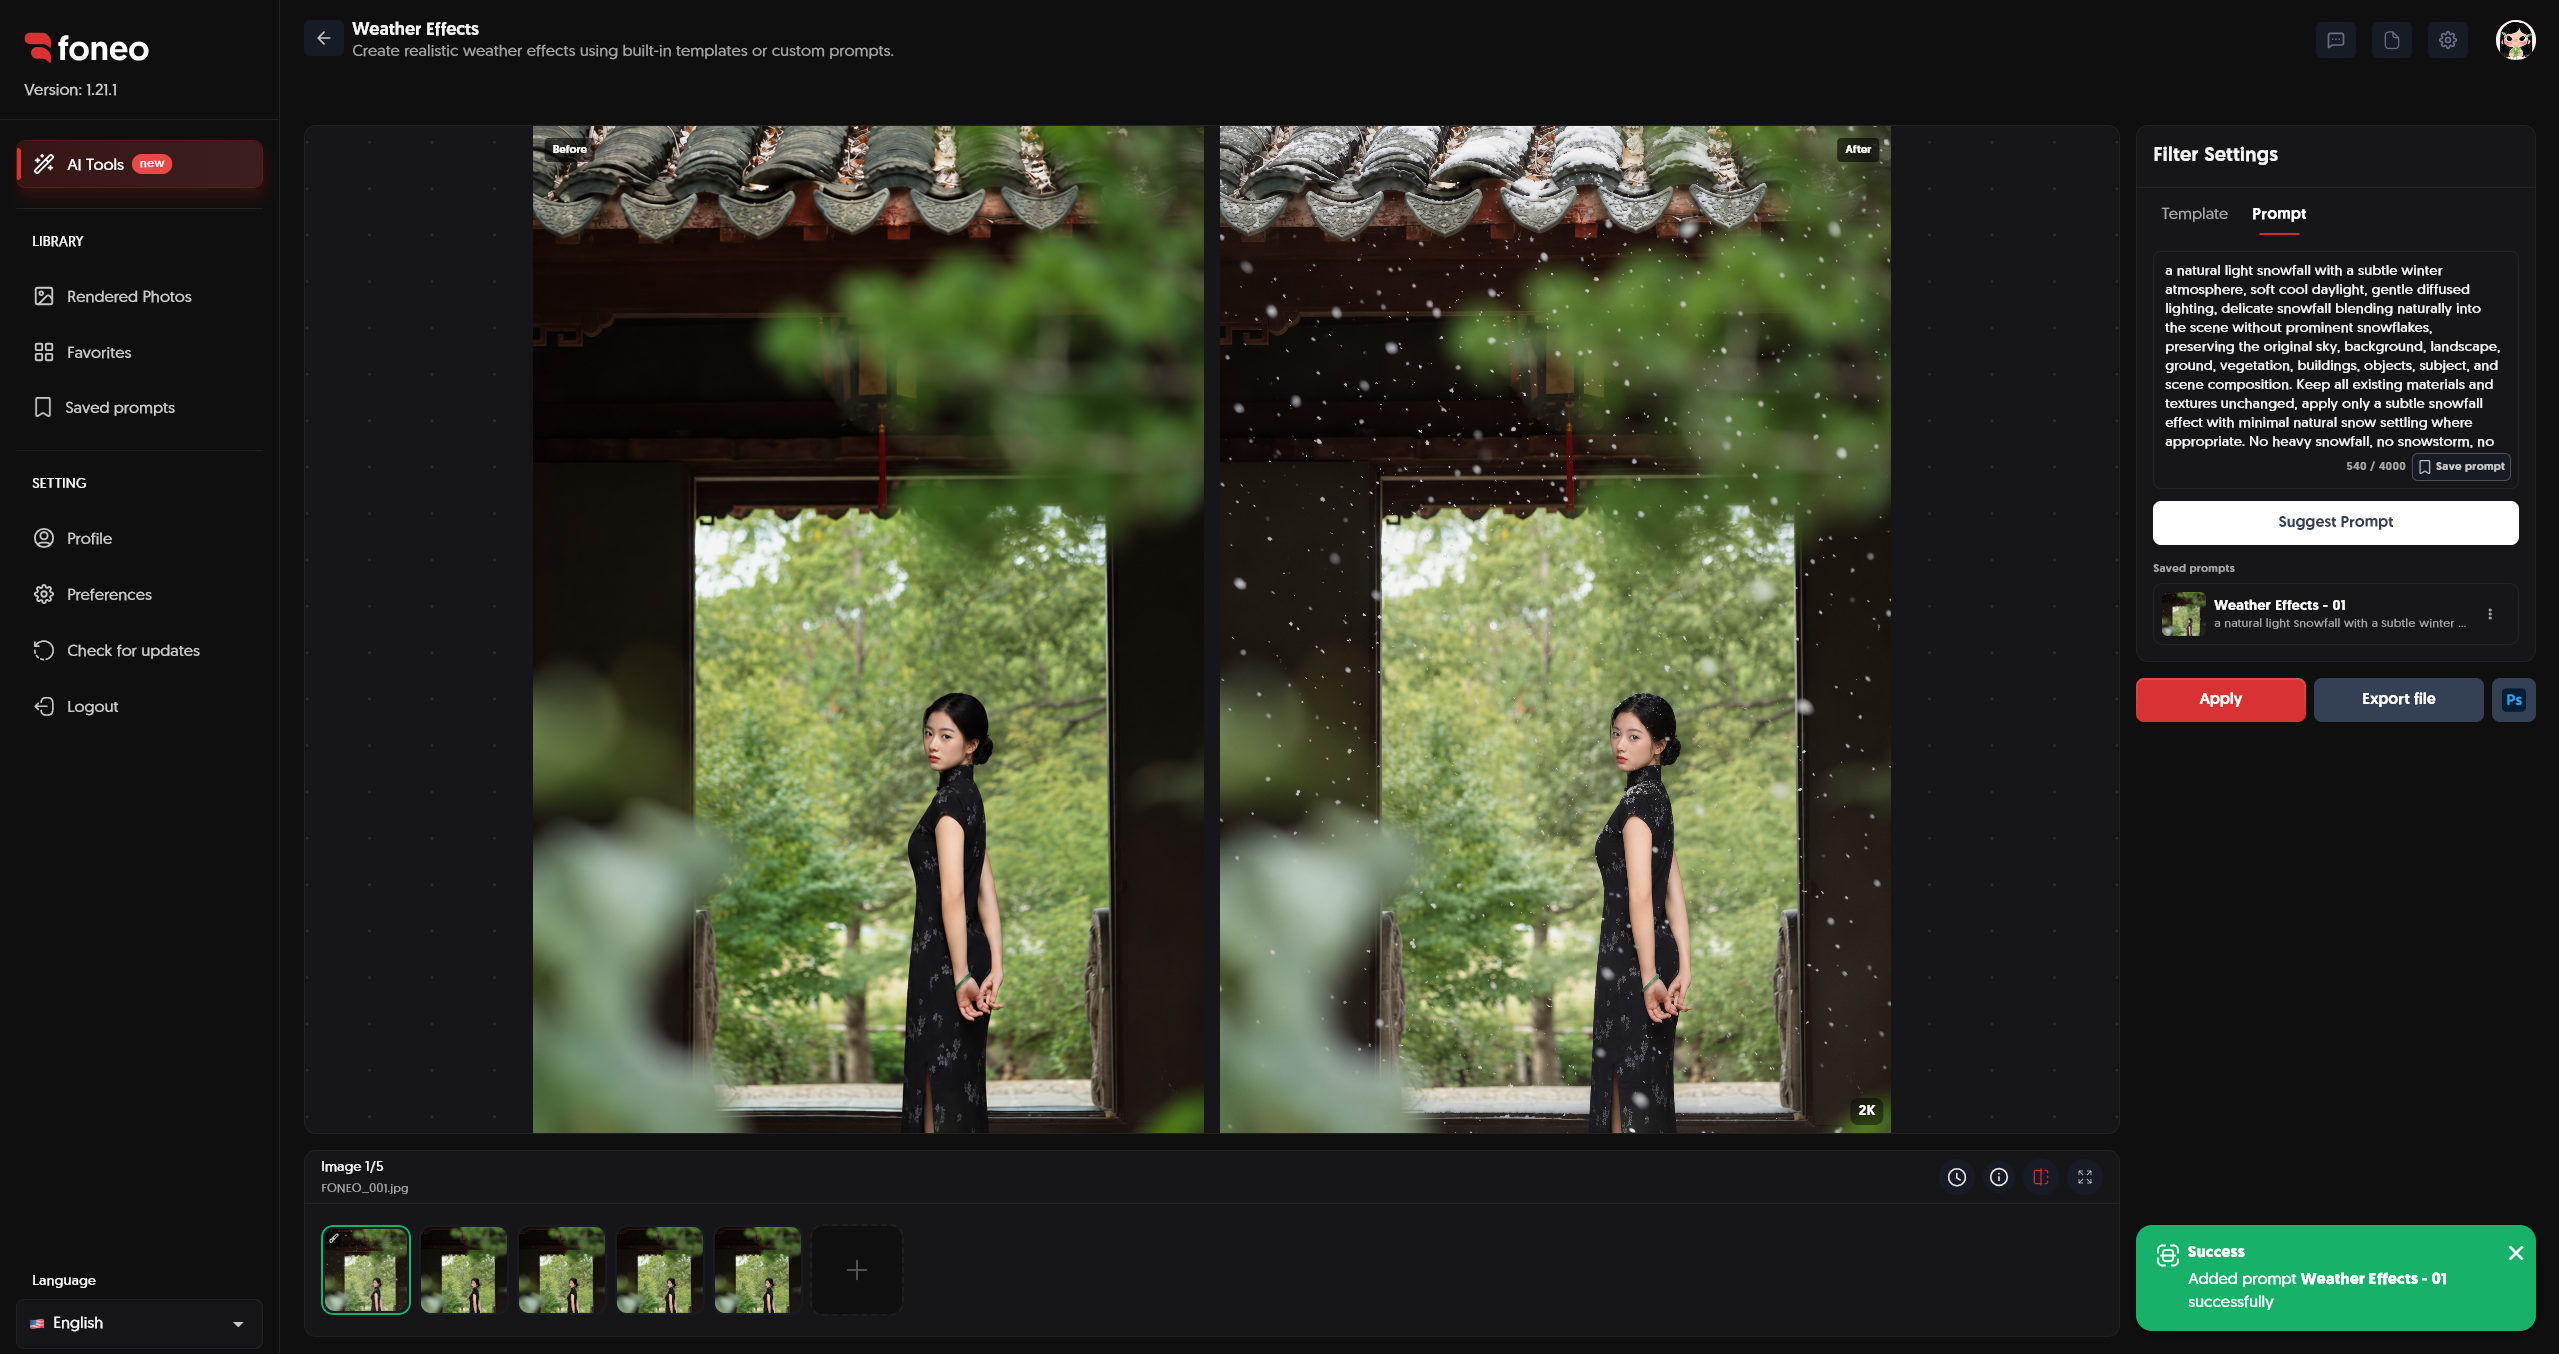
6. Apply the Effect
After selecting a Template or completing your Prompt, click Apply to let Foneo process the image with AI.
Wait for the processing to finish and check the result in the preview area.
If the effect is not suitable, you can:
- Choose another Template.
- Adjust the Prompt.
- Change the type or intensity of the weather effect.
- Click Apply to process the image again.
You can try different options to find the effect that best matches the original image.
7. Review the Result Before Exporting
After Foneo finishes processing, use the preview area to compare the Before and After images.
Check whether the weather effect, lighting, and overall appearance are suitable for the original subject and scene.
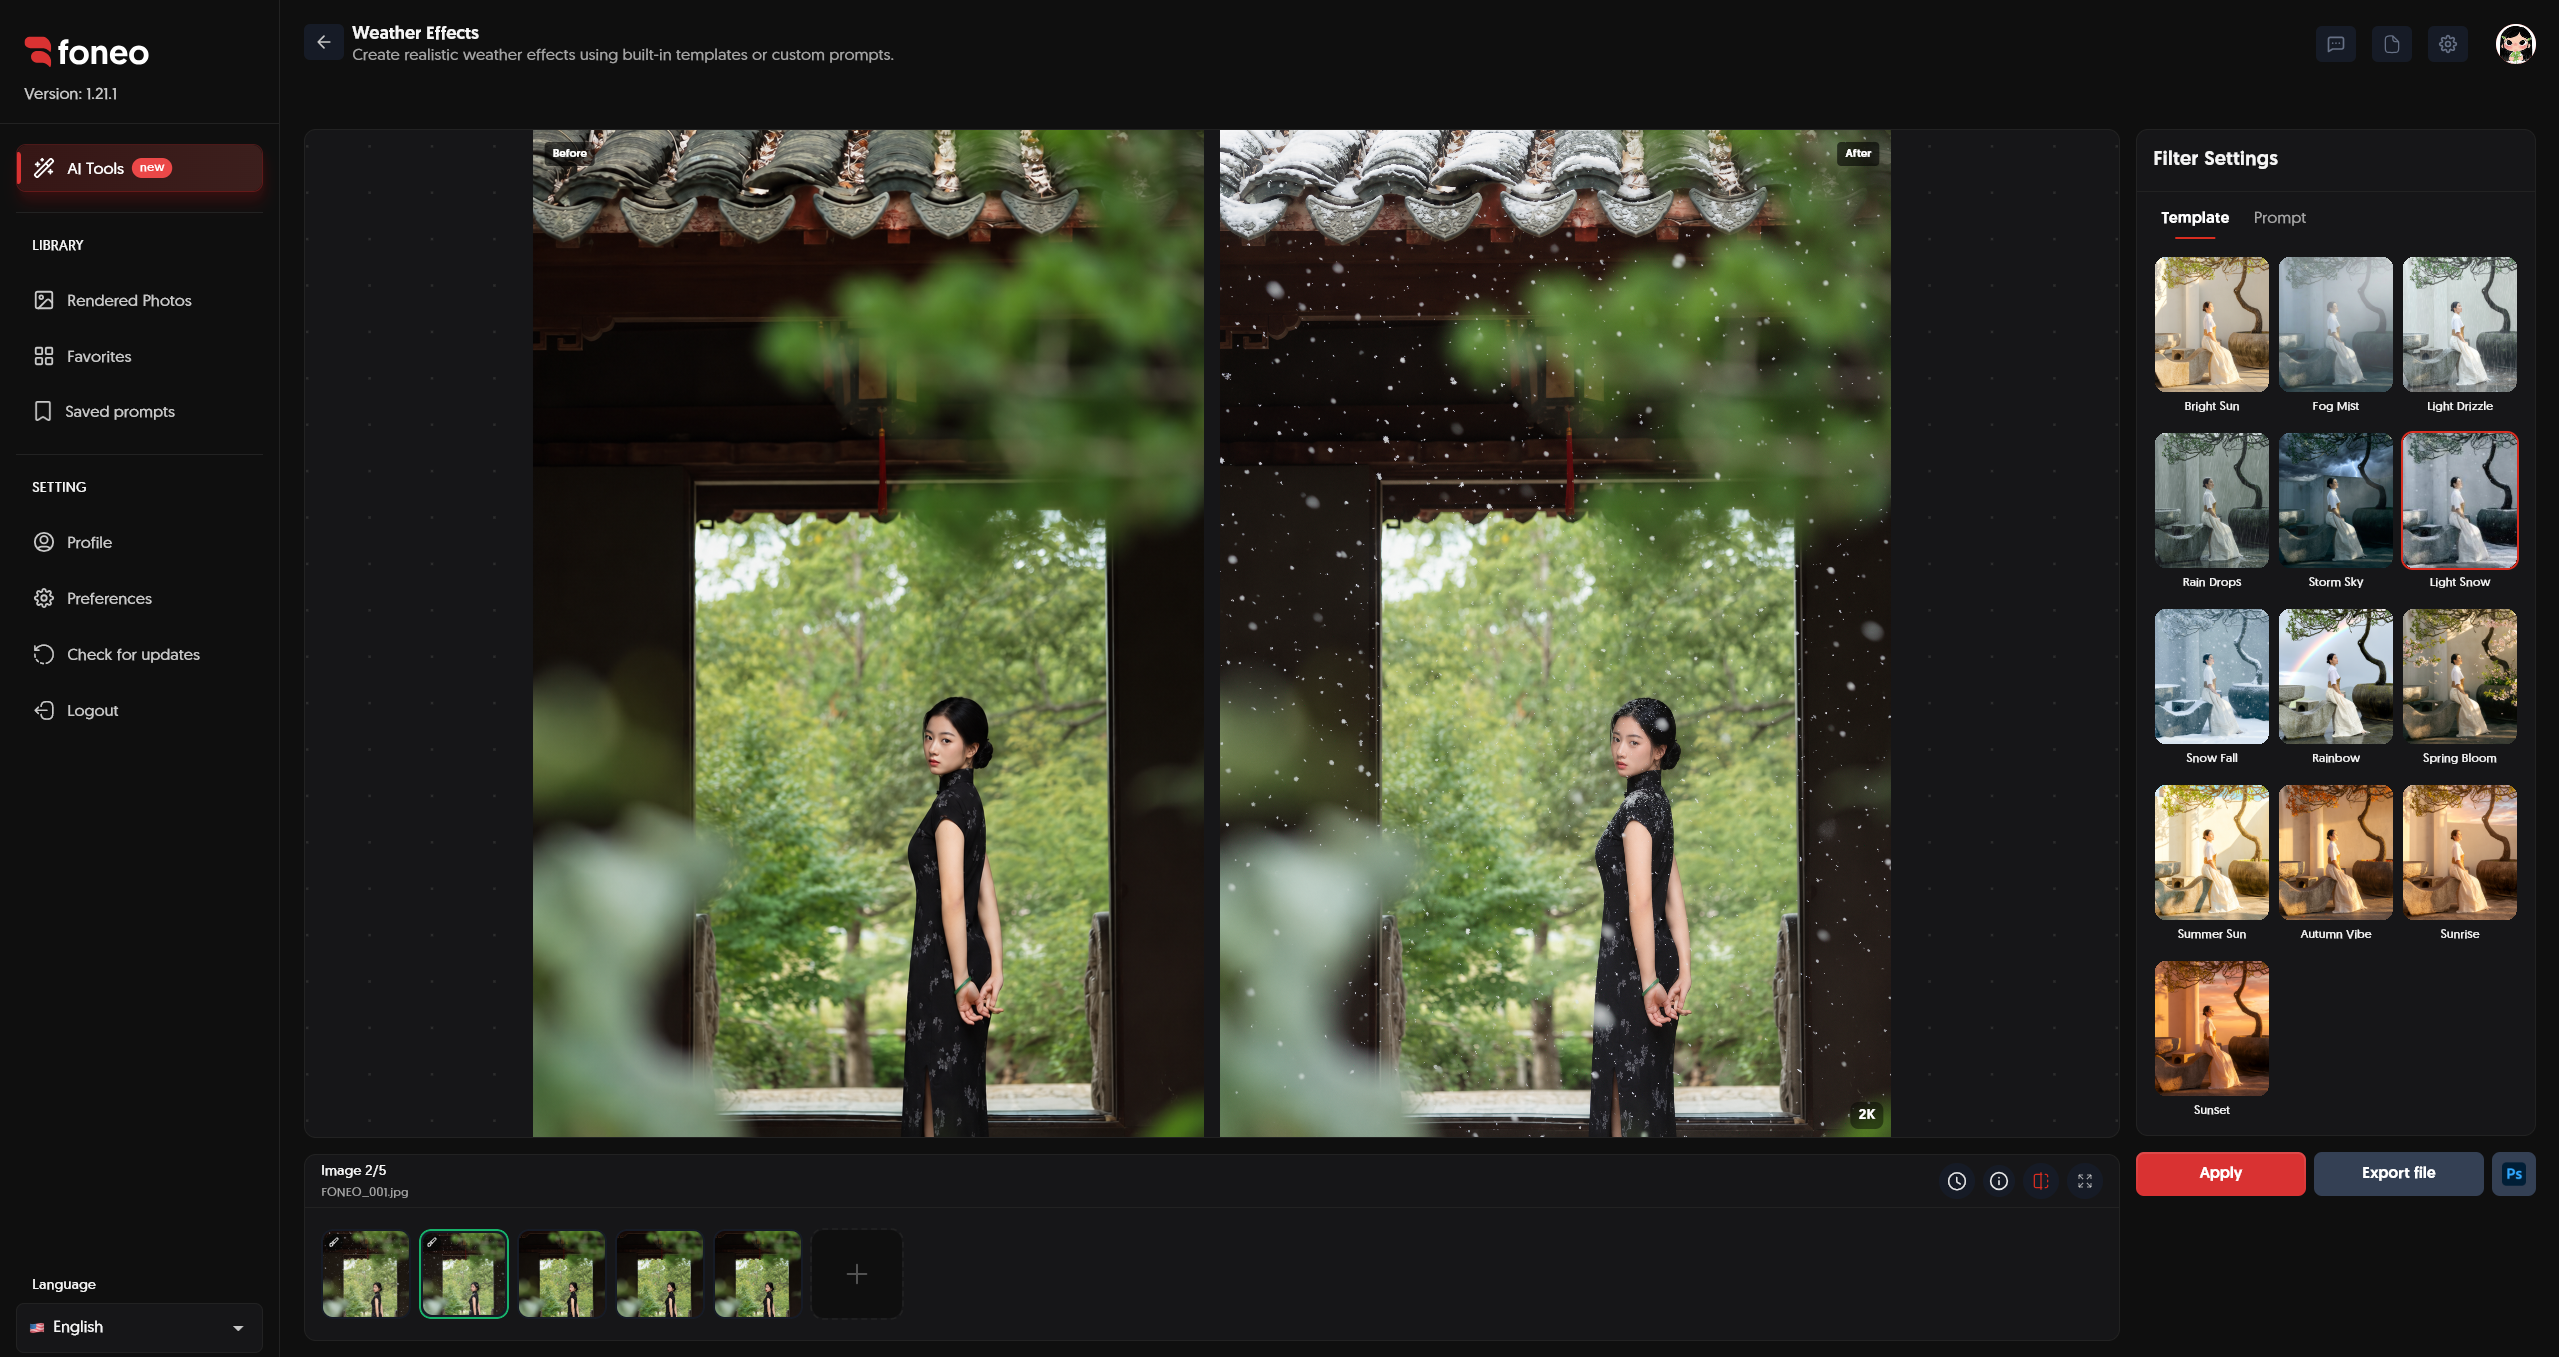
If the result is not what you want, you can return to Template or Prompt to change the effect and process the image again.
8. Export the Image
Once you are satisfied with the result, click Export file to export the image.
If you want to continue editing in Photoshop, you can use the Ps button to open the image and continue editing.
How to Evaluate the Result
After applying the weather effect, check the changes between the original image and the processed image.
Pay attention to:
- Natural appearance: Does the weather effect blend naturally with the environment and subject?
- Effect density: Are rain, snow, mist, or other effects too dense or too sparse?
- Lighting: Does the lighting on the subject match the new weather conditions?
- Scene: Does the weather effect fit the space and composition of the image?
- Details: Are the effects distributed naturally across the foreground, midground, and background?
- Overall appearance: Does the effect create a harmonious and convincing image?
If the effect is too strong or does not fit the image, try another Template or adjust the Prompt to describe the desired weather conditions more clearly.
Tips for Creating Natural Weather Effects
1. Use a Clear, High-Quality Image
Use an image with good quality, a clearly visible subject, and avoid images that are too dark or noisy.
Images with more visible details help Foneo better recognize the subject and environment, allowing it to create weather effects that better match the scene.
2. Choose an Effect That Matches the Scene
Choose the weather effect based on the scene, lighting, clothing, and style of the original image.
For example:
- Outdoor photos: You can use rain, snow, mist, or other natural weather effects.
- Portrait photos: Prefer effects with moderate density so they do not cover the face or main subject.
- Fashion photos: You can use cinematic weather effects while keeping the clothing clearly visible.
- Landscape photos: You can use effects with a wider range to create a more noticeable change in the atmosphere.
3. Adjust the Effect Intensity
Avoid creating weather effects that are too dense if you still want to keep the subject and key details clearly visible.
When using a Prompt, clearly describe the intensity using terms such as light, subtle, gentle, moderate, or heavy to guide the desired effect strength.
4. Write a Specific Prompt
When using a Prompt, focus on important elements such as weather type, intensity, lighting, colors, and atmosphere.
For example, instead of simply writing:
Snow.
You can provide a more specific description:
Add gentle snowfall with small and softly blurred snowflakes, cool winter tones, subtle mist and natural overcast lighting while keeping the subject clear.
The clearer your Prompt is about the desired weather conditions, the easier it is to control the result.
5. Keep Your Prompt Concise but Complete
You do not need to write an overly long Prompt. Focus on the key changes you want to create.
A simple Prompt structure such as:
Weather type + intensity + lighting + colors + atmosphere
can help you build and adjust Prompts more easily.
6. Save Frequently Used Prompts
If you frequently use a particular weather condition or visual style, click Save prompt to save it.
You can give the Prompt an easy-to-recognize name and add a category tag so it is easier to find in future edits.
7. Try Multiple Effects Before Choosing the Final Result
You do not have to use the first result immediately.
Try several Templates or adjust the Prompt to compare different weather conditions. Then choose the result that best fits your intended use.
Frequently Asked Questions
What is Weather Effects on Foneo used for?
The Weather Effects feature uses AI to add or change weather conditions in photos, creating an atmosphere and visual style that fits different scenes.
Do I need a Prompt to use Weather Effects?
No. You can directly choose a ready-made Template.
If you want to create an effect based on your own idea, switch to the Prompt tab and enter your desired description.
Can I create my own custom weather effect?
Yes. You can use a Prompt to describe the weather type, intensity, lighting, colors, atmosphere, and desired visual style.
What is Suggest Prompt used for?
Suggest Prompt provides Prompt suggestions when you do not have an idea yet or want to reference different ways of describing a weather effect.
Can I save a Prompt for later use?
Yes. After creating a suitable Prompt, click Save prompt to save it.
You can name the Prompt, edit its content, and select a category tag for easier management. Saved Prompts can be reused for future edits.
Does Weather Effects require a Reference image?
No. You only need to upload the photo you want to edit to Foneo. You do not need to upload an additional Reference image.
Can I use multiple photos with Weather Effects?
Yes. You can add multiple photos to the thumbnail area using the + button, then select each photo individually for editing.
Can I edit the image after creating the effect?
Yes. After processing, you can export the image using Export file or use the Ps button to continue editing in Photoshop.
Related Articles
Foneo · AI Photo Editing
Ready to try it on your own photos?
Download the Foneo app to edit photos with AI in just a few taps, or see the plan that fits your needs.