How to Use ID Photo on the Foneo AI Photo Editing App
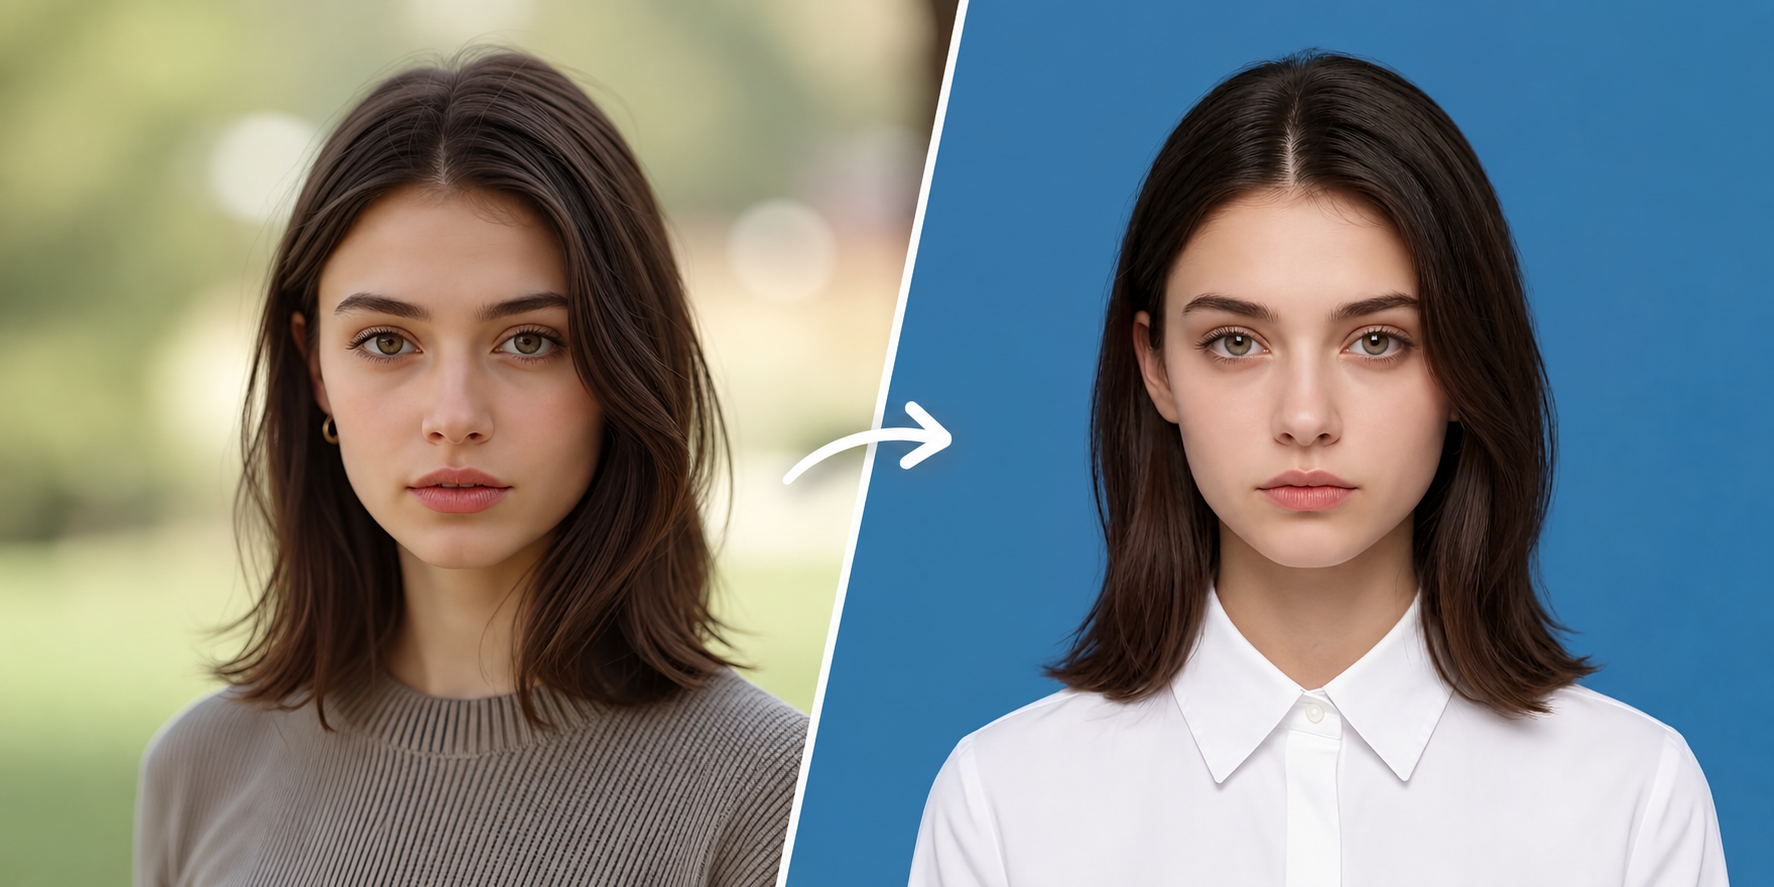
ID photos require a suitable composition, a clear face, a uniform background, and a natural appearance. With the ID Photo feature on Foneo, you can quickly create professional ID photos from existing images using AI in just a few simple steps.
Foneo provides ready-made Templates and custom Prompts, while also allowing you to configure the Aspect ratio, Background color, and additional options related to clothing, glasses, and facial features.
These additional options are optional, so you can use the default settings or customize them based on your needs.
Before & After
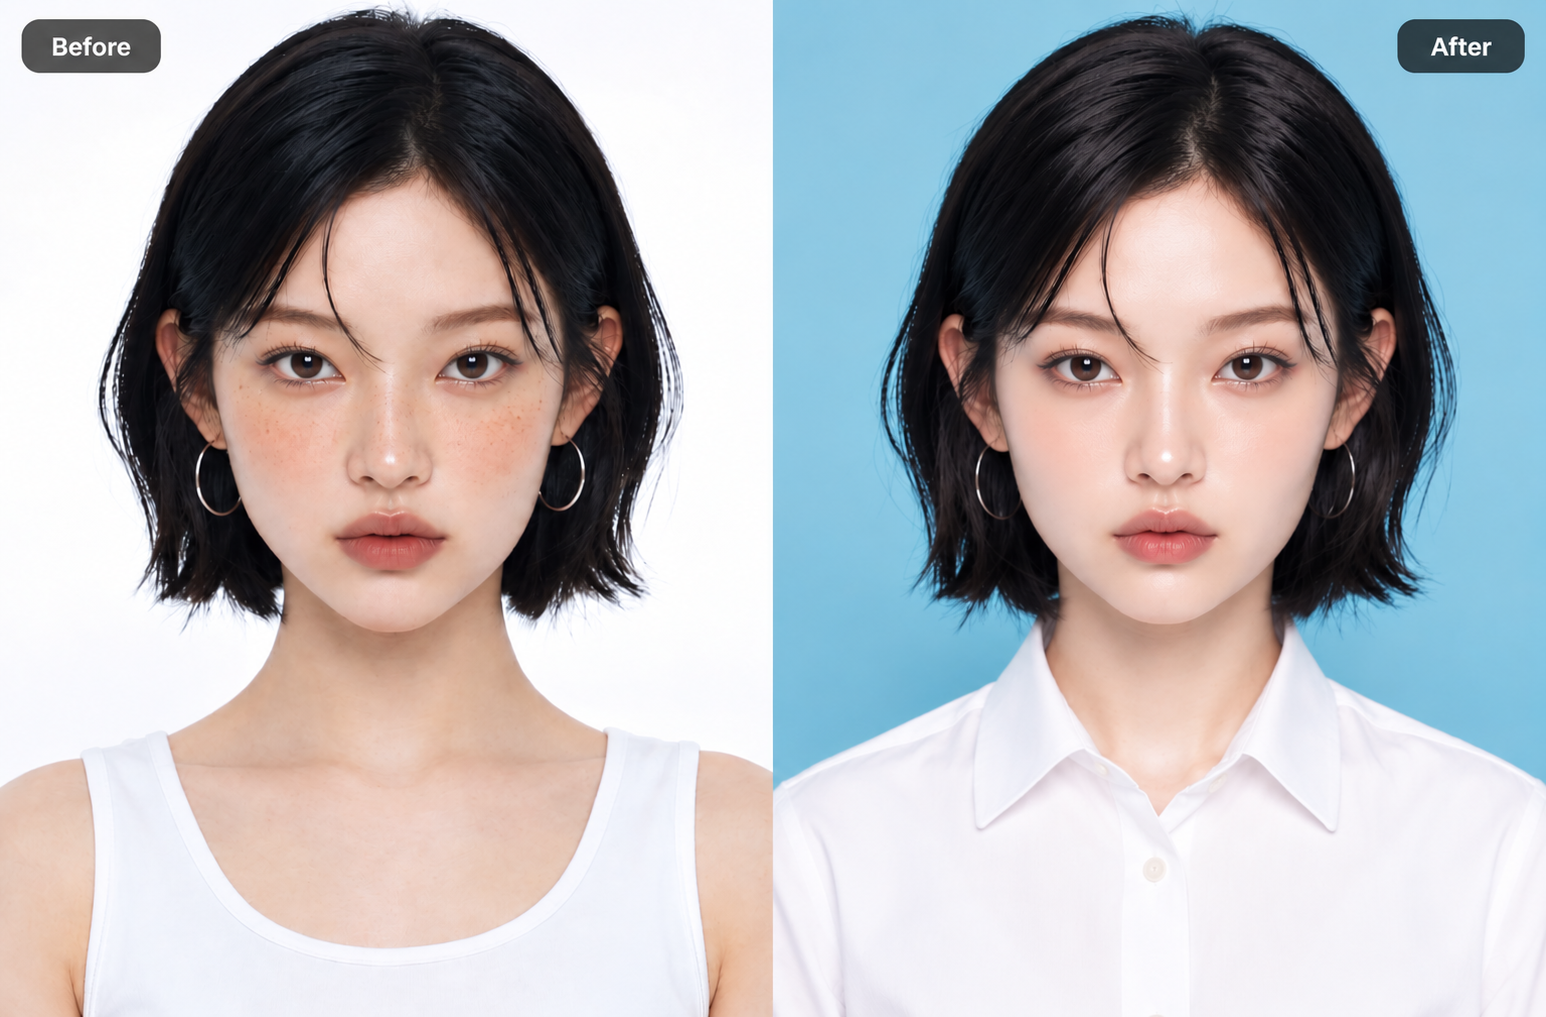
How to Use ID Photo
After uploading an image to Foneo and opening the ID Photo feature, follow these 9 steps.
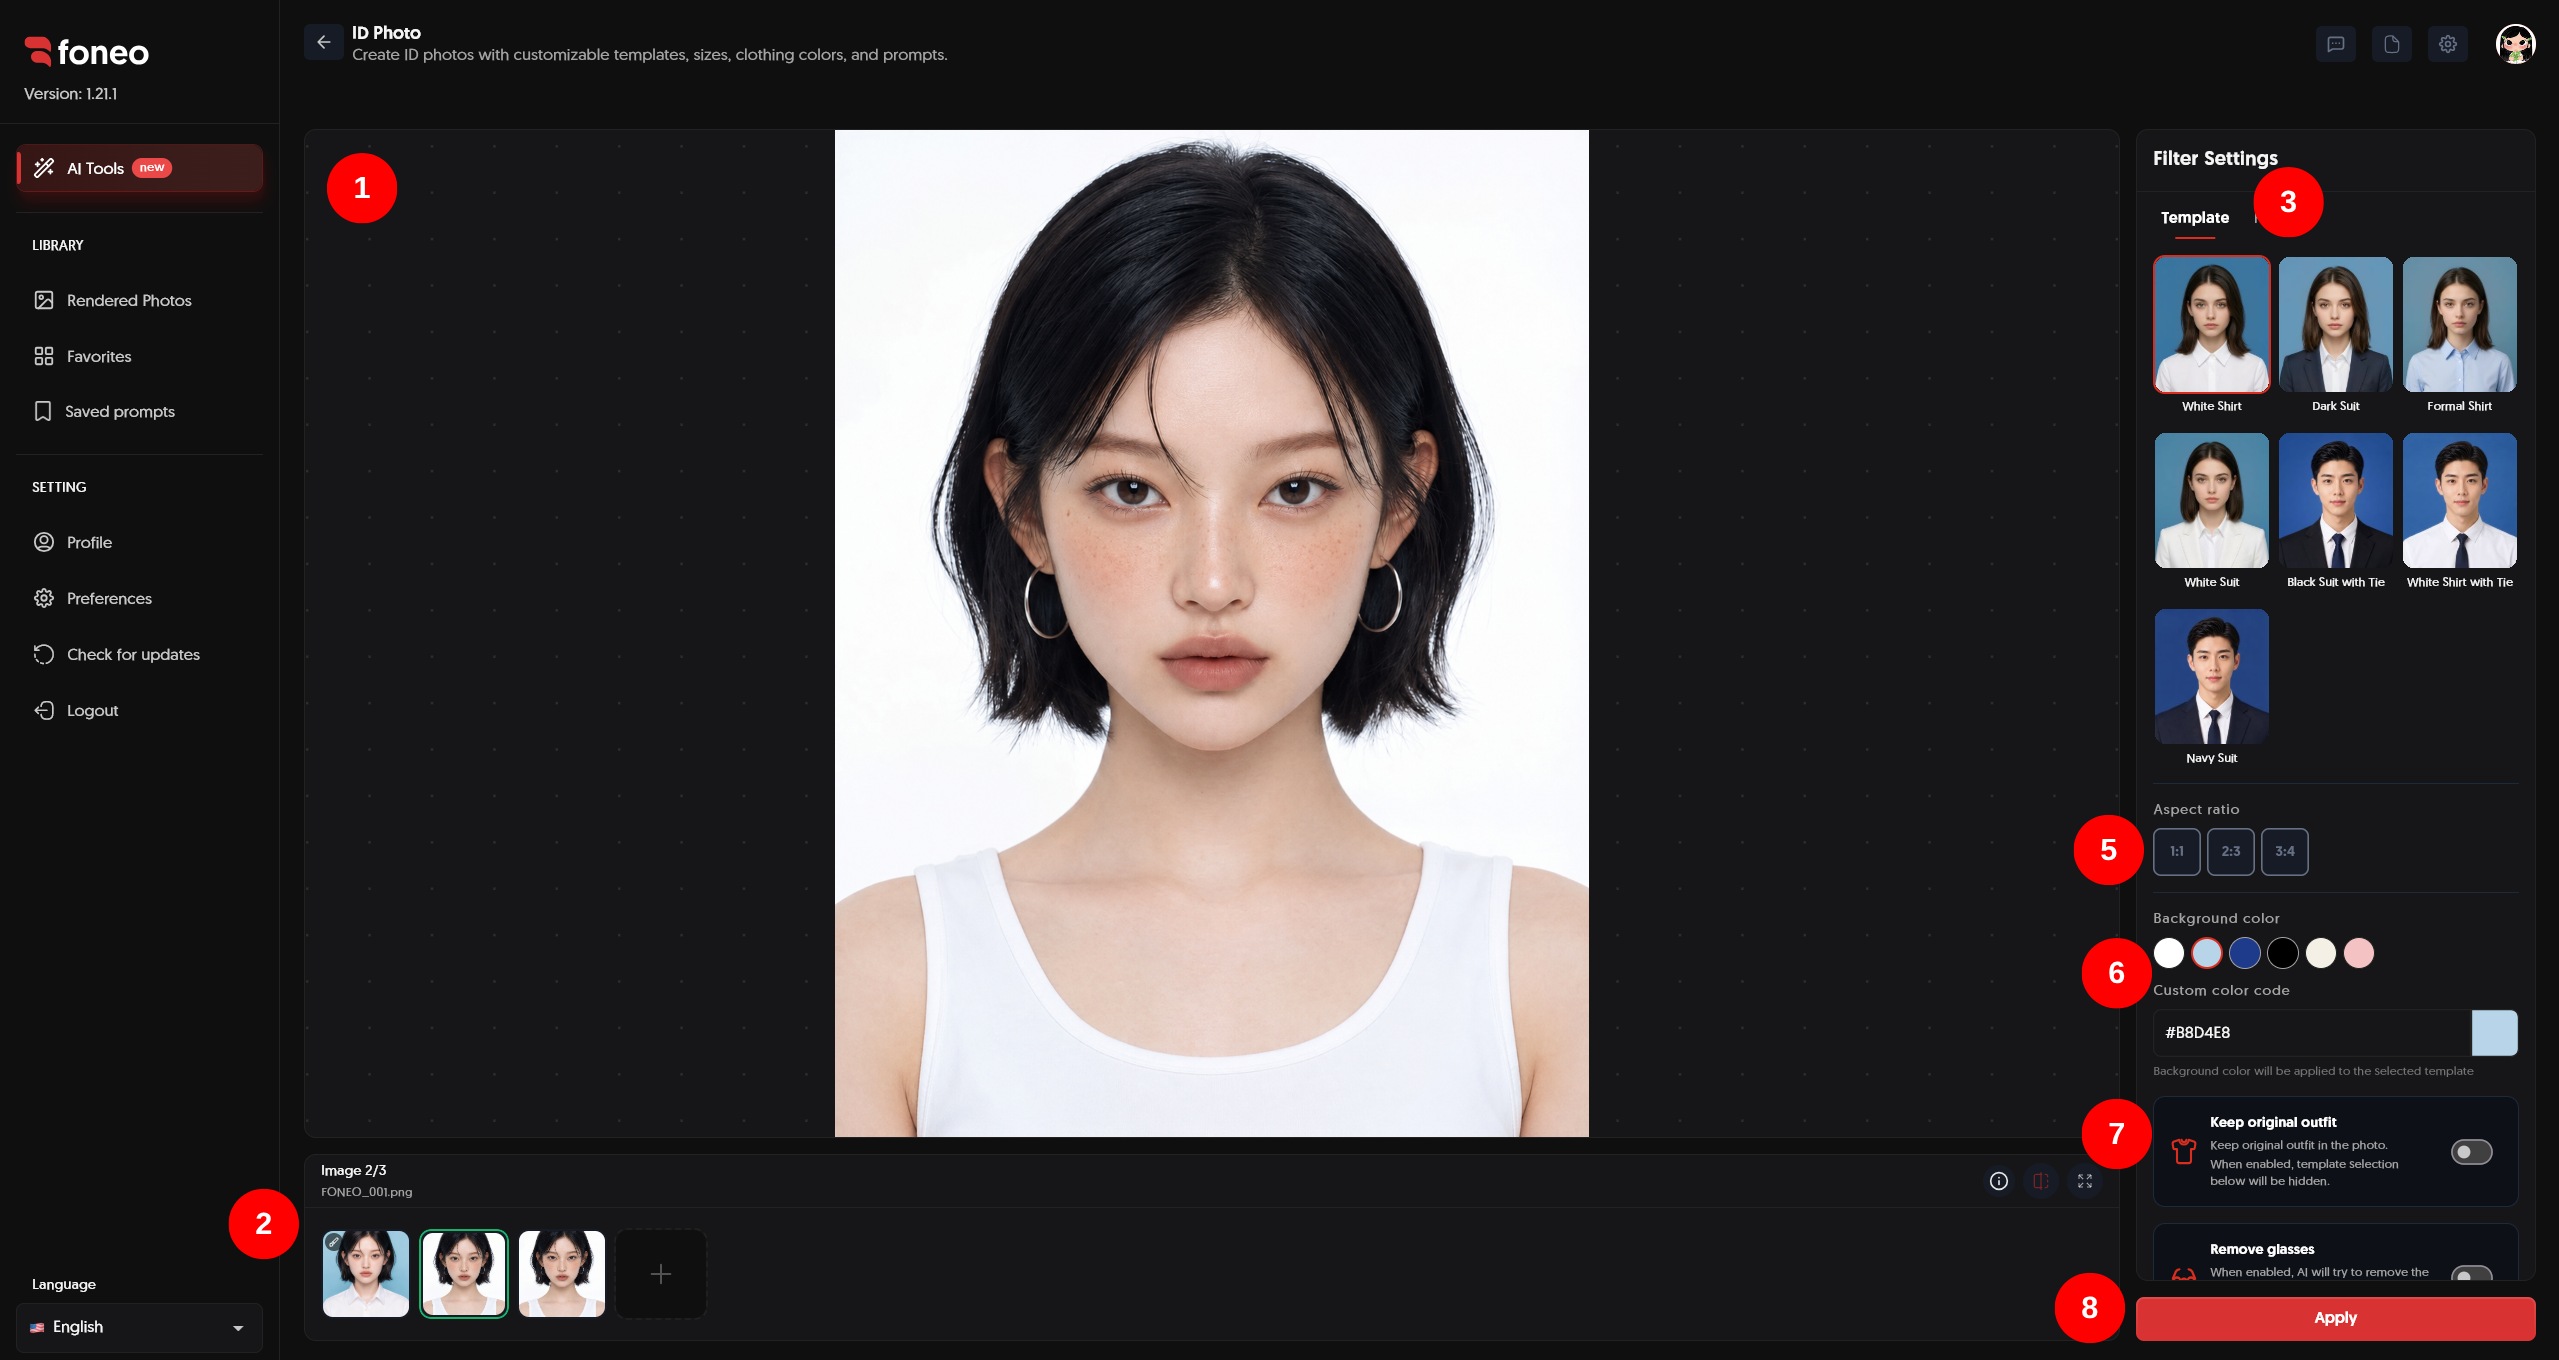
1. Preview Your Photo
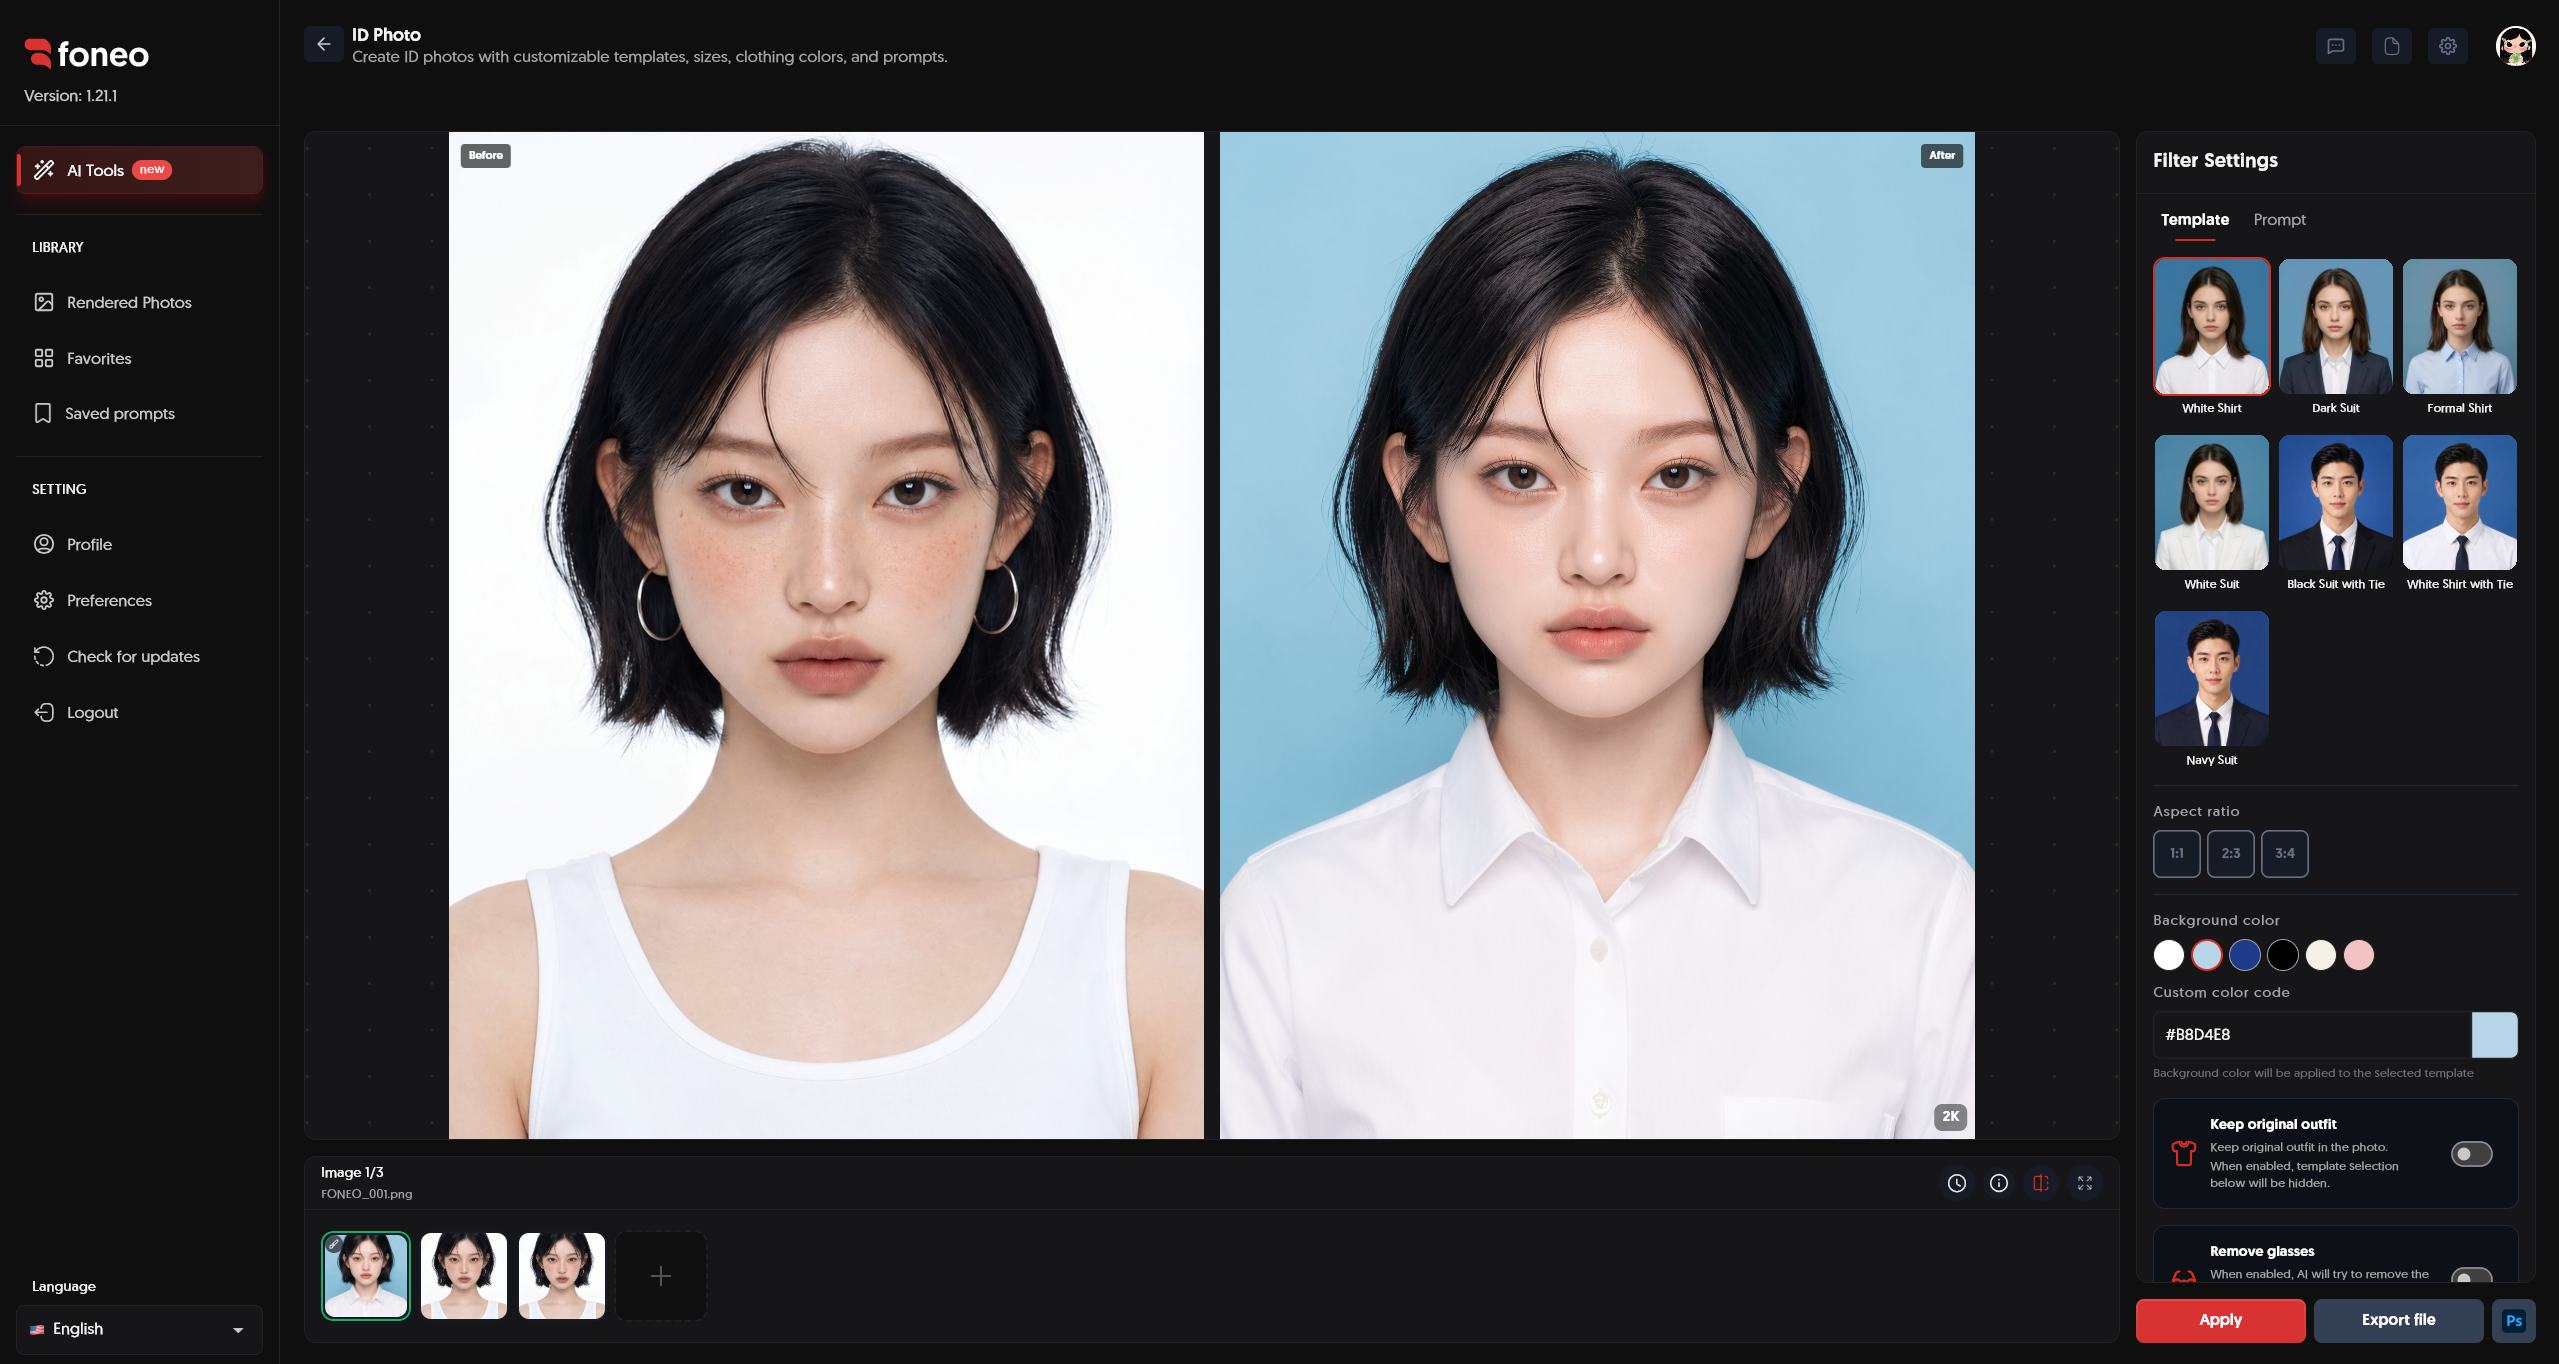
After selecting an image, it will be displayed in the preview area in the center of the screen.
Here, you can check the original image before creating the ID photo and review the result after Foneo finishes processing.
It is recommended to use an image with:
- A clearly visible face.
- A suitable face angle.
- Sufficient lighting.
- Minimal obstruction of the face.
The clearer the original image, the more information AI has to process the face and preserve important details.
2. Select Your Photo
Uploaded images are displayed in the image area at the bottom of the screen.
You can:
- Select a thumbnail to choose the image you want to create an ID photo from.
- Click + to add a new image.
- Select each image to preview it and process it individually.
After selecting an image, you can continue configuring the Template, Prompt, and additional options.
3. Choose a Template
In Filter Settings, select the Template tab.
Foneo provides ready-made ID Photo Templates with different clothing styles.
Simply select a suitable Template, and Foneo will use AI to create an ID photo based on your selection.
Templates are useful when you want to create an ID photo quickly without having to describe the clothing in detail.
Note: If you enable Keep original outfit, the Template selection will be hidden. You cannot use a Template in this case, but you can switch to Prompt or use the remaining options.
4. Switch to Prompt and Enter a Description
If you want to describe your ID photo requirements manually, switch to the Prompt tab.
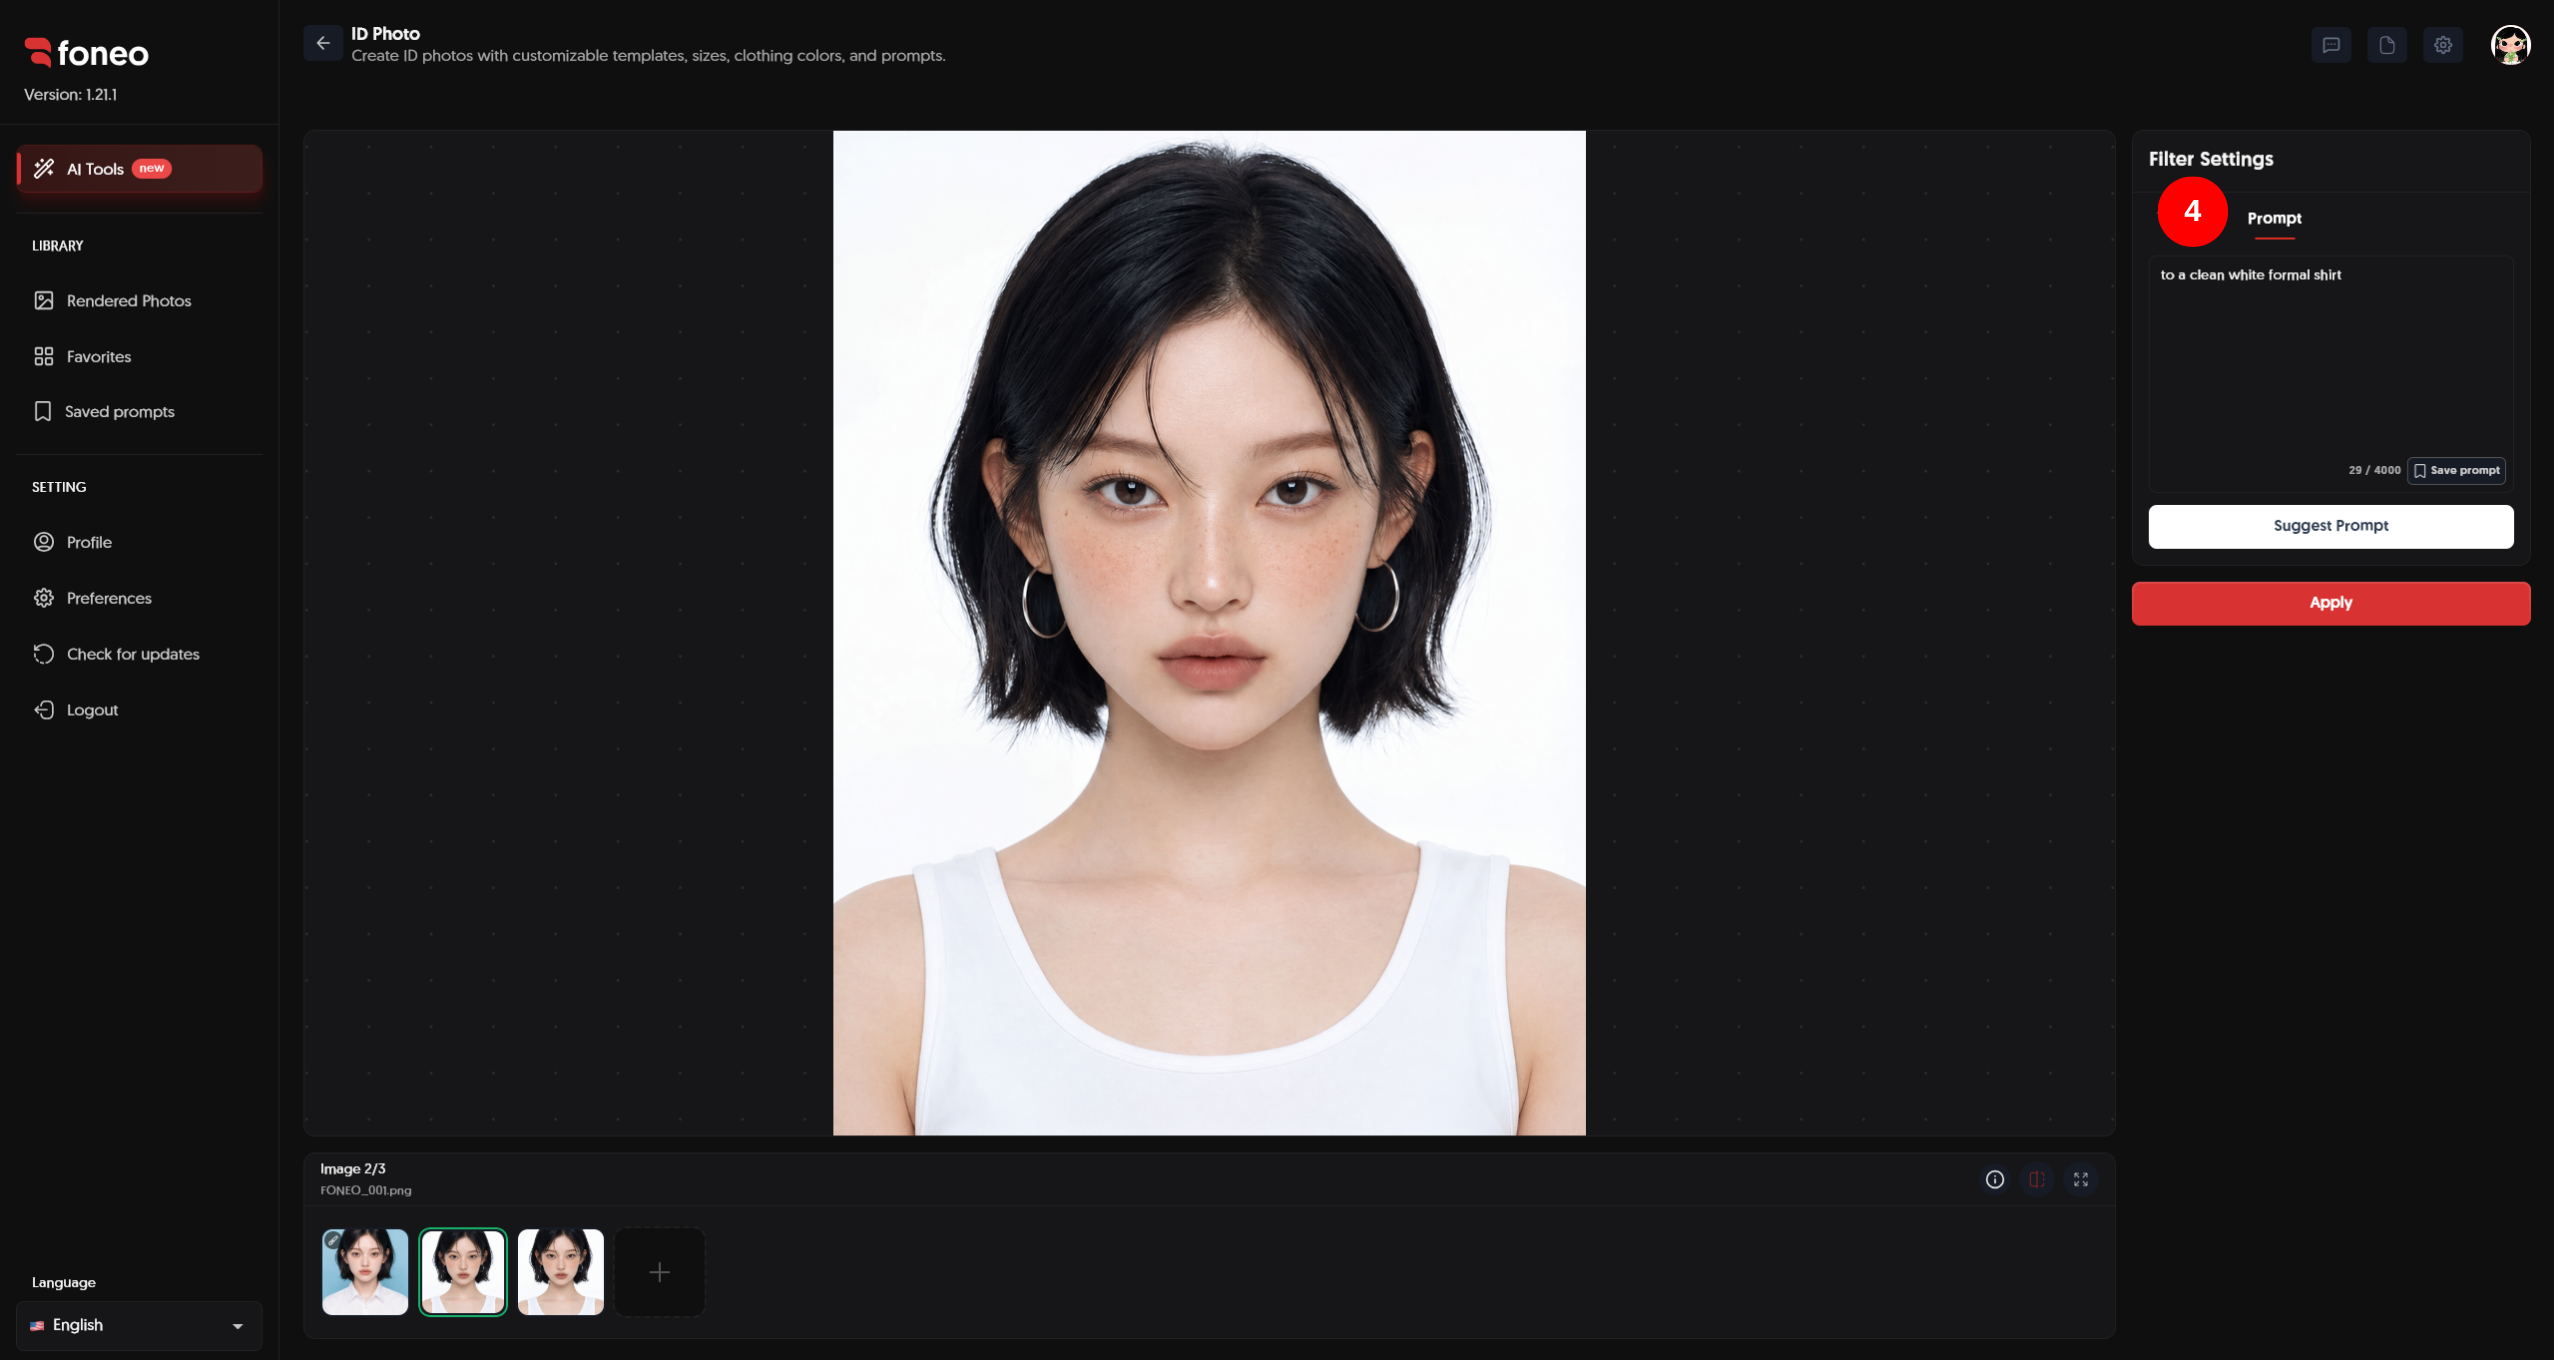
Here, you can enter a description of the ID photo you want to create, such as:
- Clothing style.
- Clothing color.
- Photo composition.
- Photo style.
- Facial features that should be preserved.
Prompt example:
Create a professional ID photo with a clean white formal shirt, centered face, even lighting, natural skin tone, plain background, and realistic facial features.
If you are not sure how to write a Prompt, click Suggest Prompt to get suggestions from Foneo.
Save a Prompt
If you create a Prompt that works well and want to reuse it later, click Save prompt.
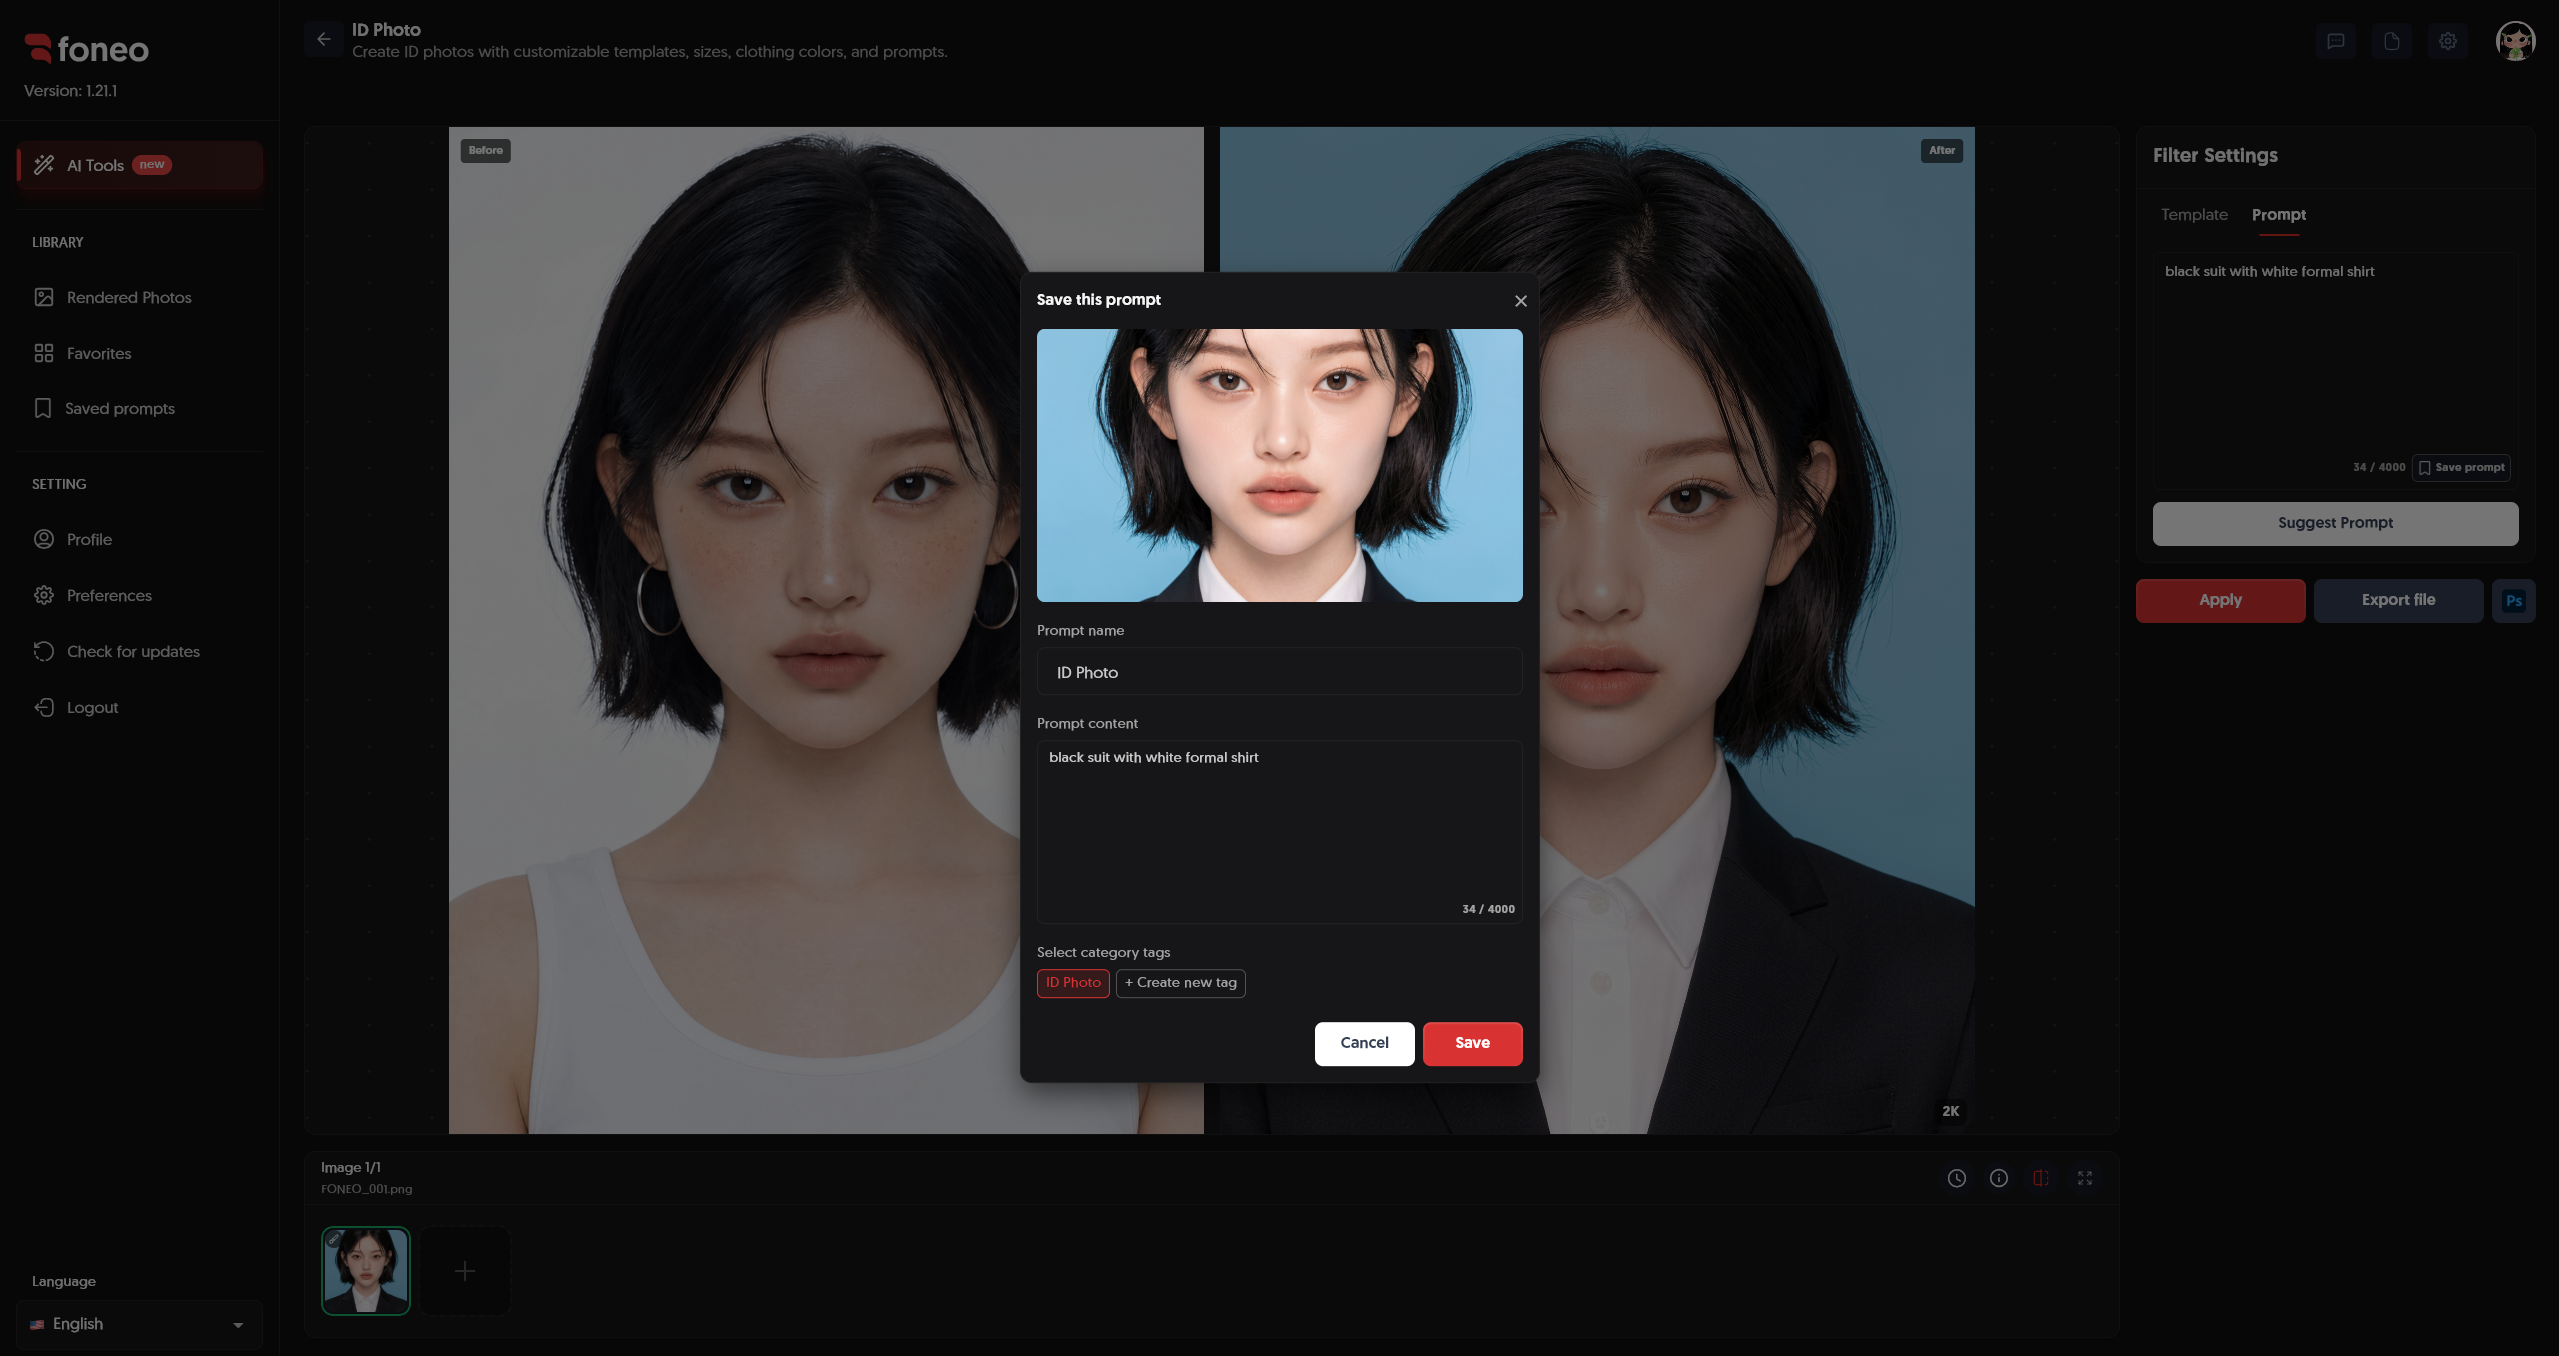
In the Prompt saving window, you can:
- Enter a Prompt name.
- Review or edit the Prompt content.
- Select a category tag.
- Click Create new tag to create a new tag if needed.
- Click Save to save the Prompt.
Saved Prompts can be reused when creating ID photos later without having to enter them again.
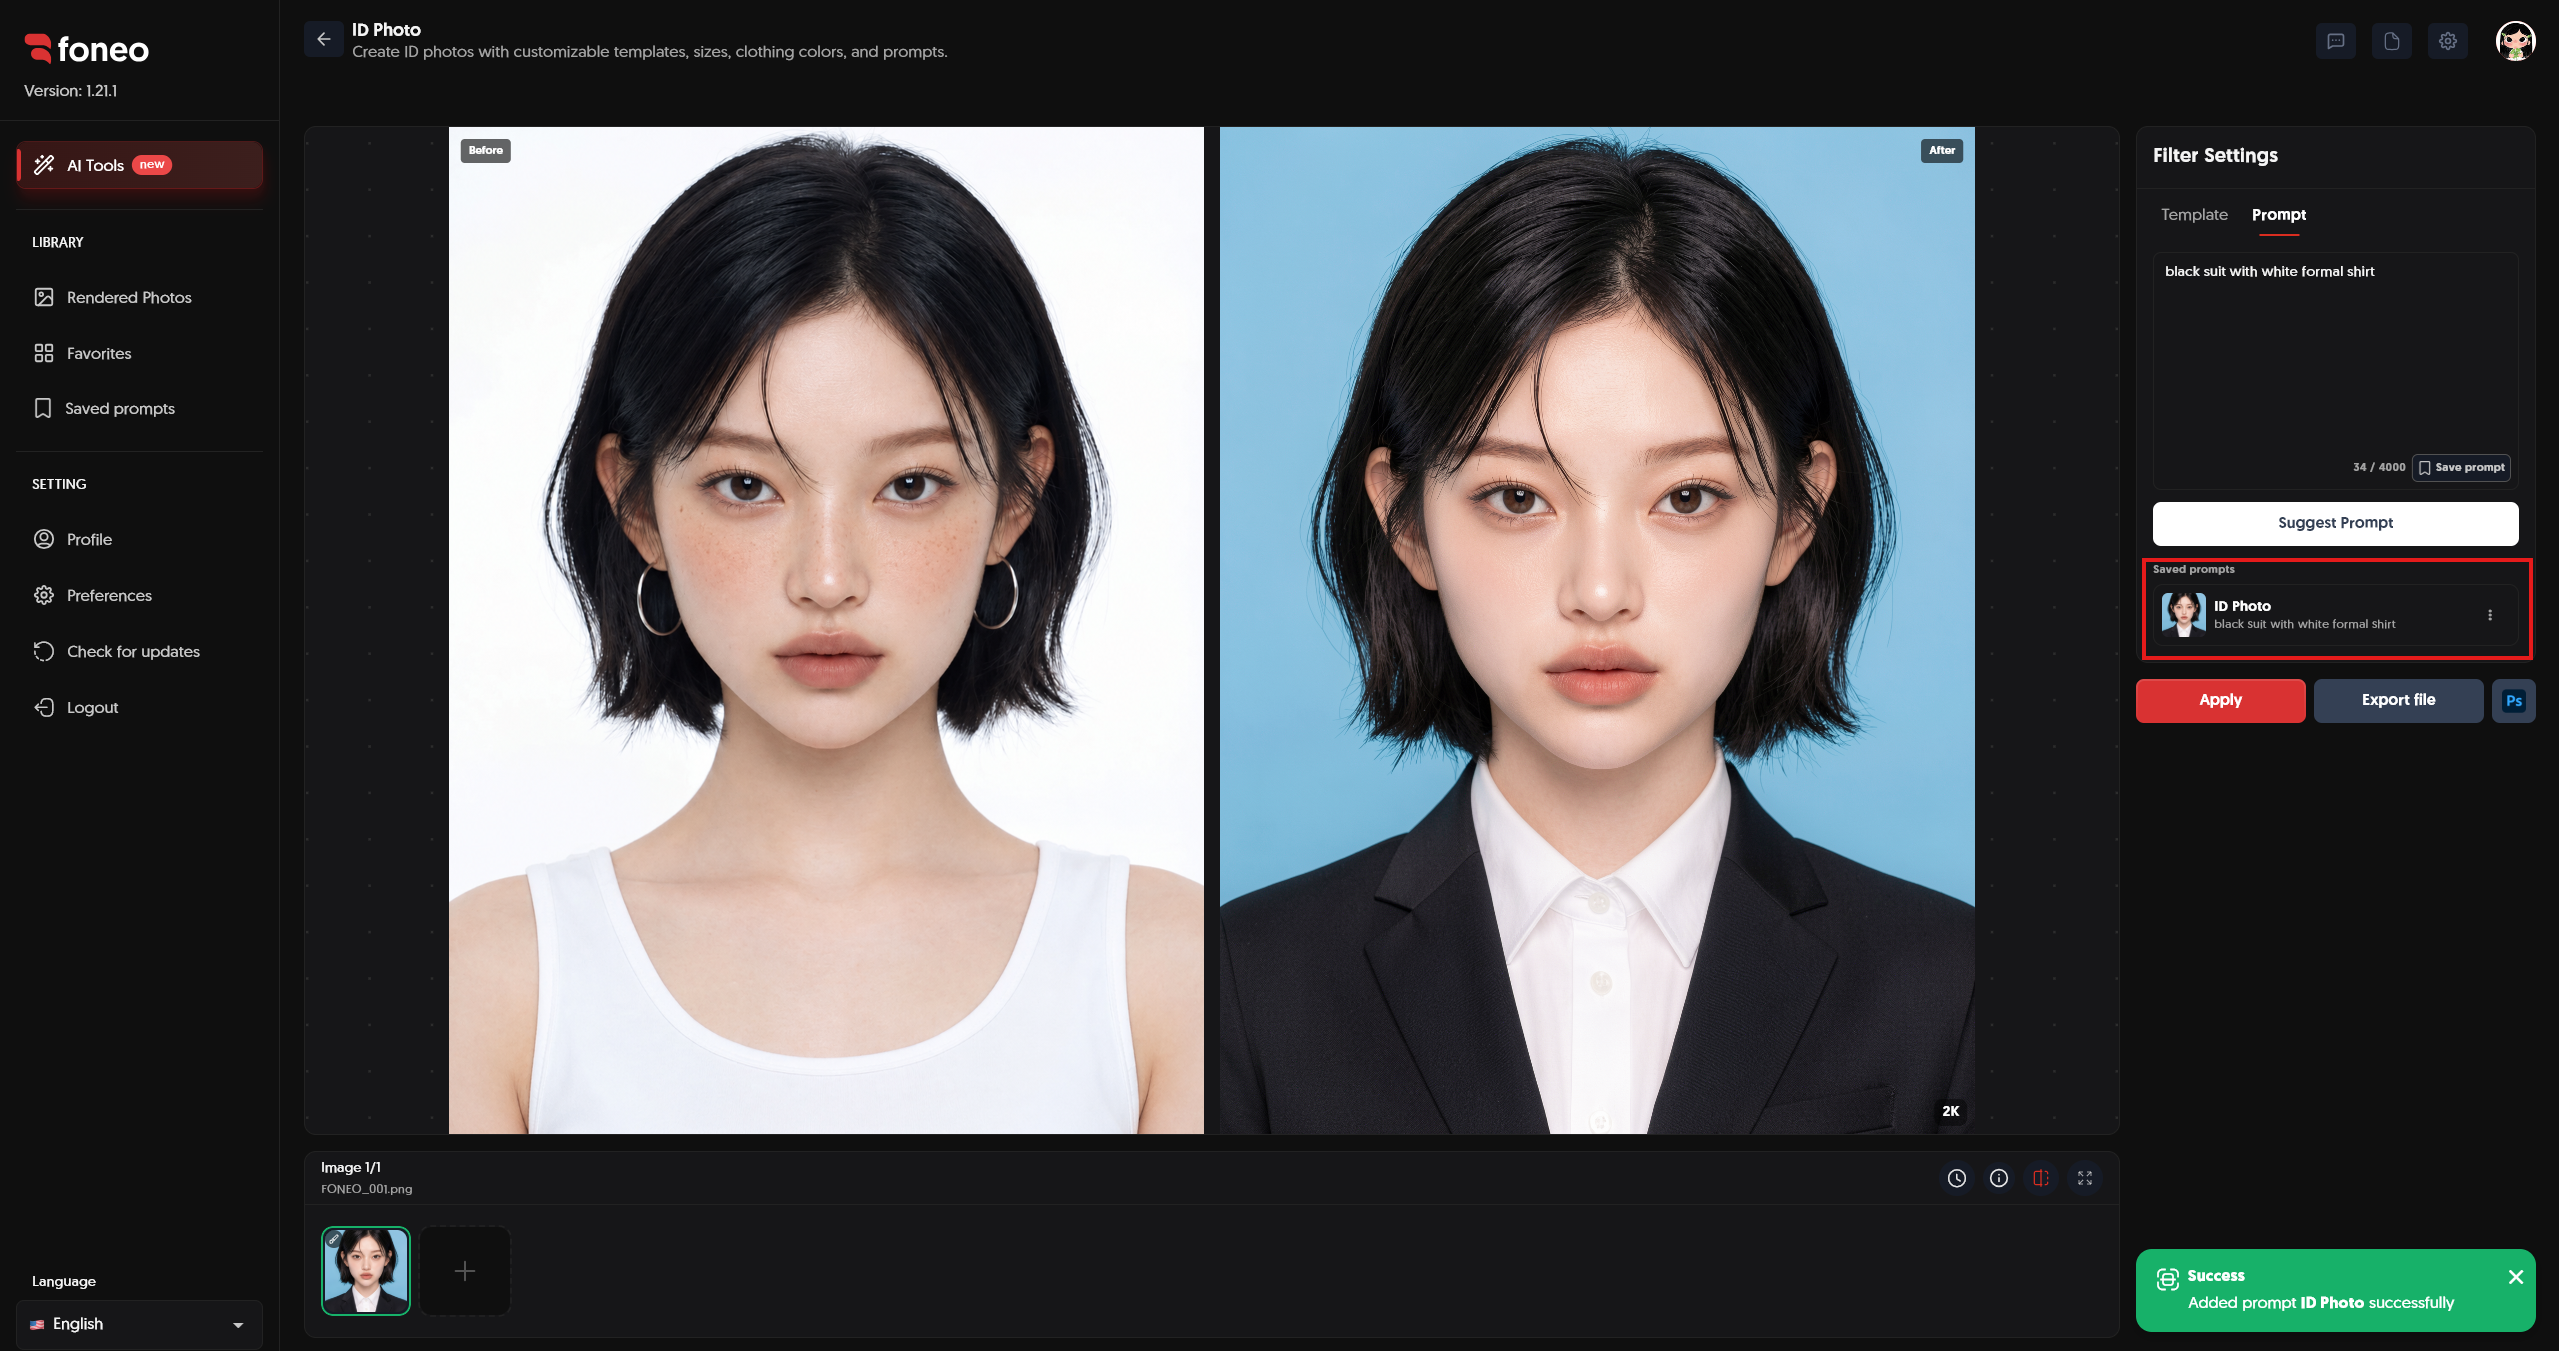
Note: Entering and saving a Prompt are optional. If you want to use a ready-made Template, you can skip this step.
5. Choose the Aspect Ratio
Foneo provides 3 Aspect ratio options:
- 1:1
- 2:3
- 3:4
Choose the aspect ratio that best fits your intended use of the ID photo.
This is an optional setting. If you do not need to customize it, you can keep the default setting.
6. Choose the Background Color
In Background color, you can select a preset background color for the ID photo.
In addition to the available colors, Foneo also supports entering a Custom color code to select a specific color.
For example:#FFFFFF
The selected background color will be applied to the chosen Template.
The background color setting is also optional.
7. Configure Additional Options
Foneo provides 3 additional options to control clothing, glasses, and facial features.
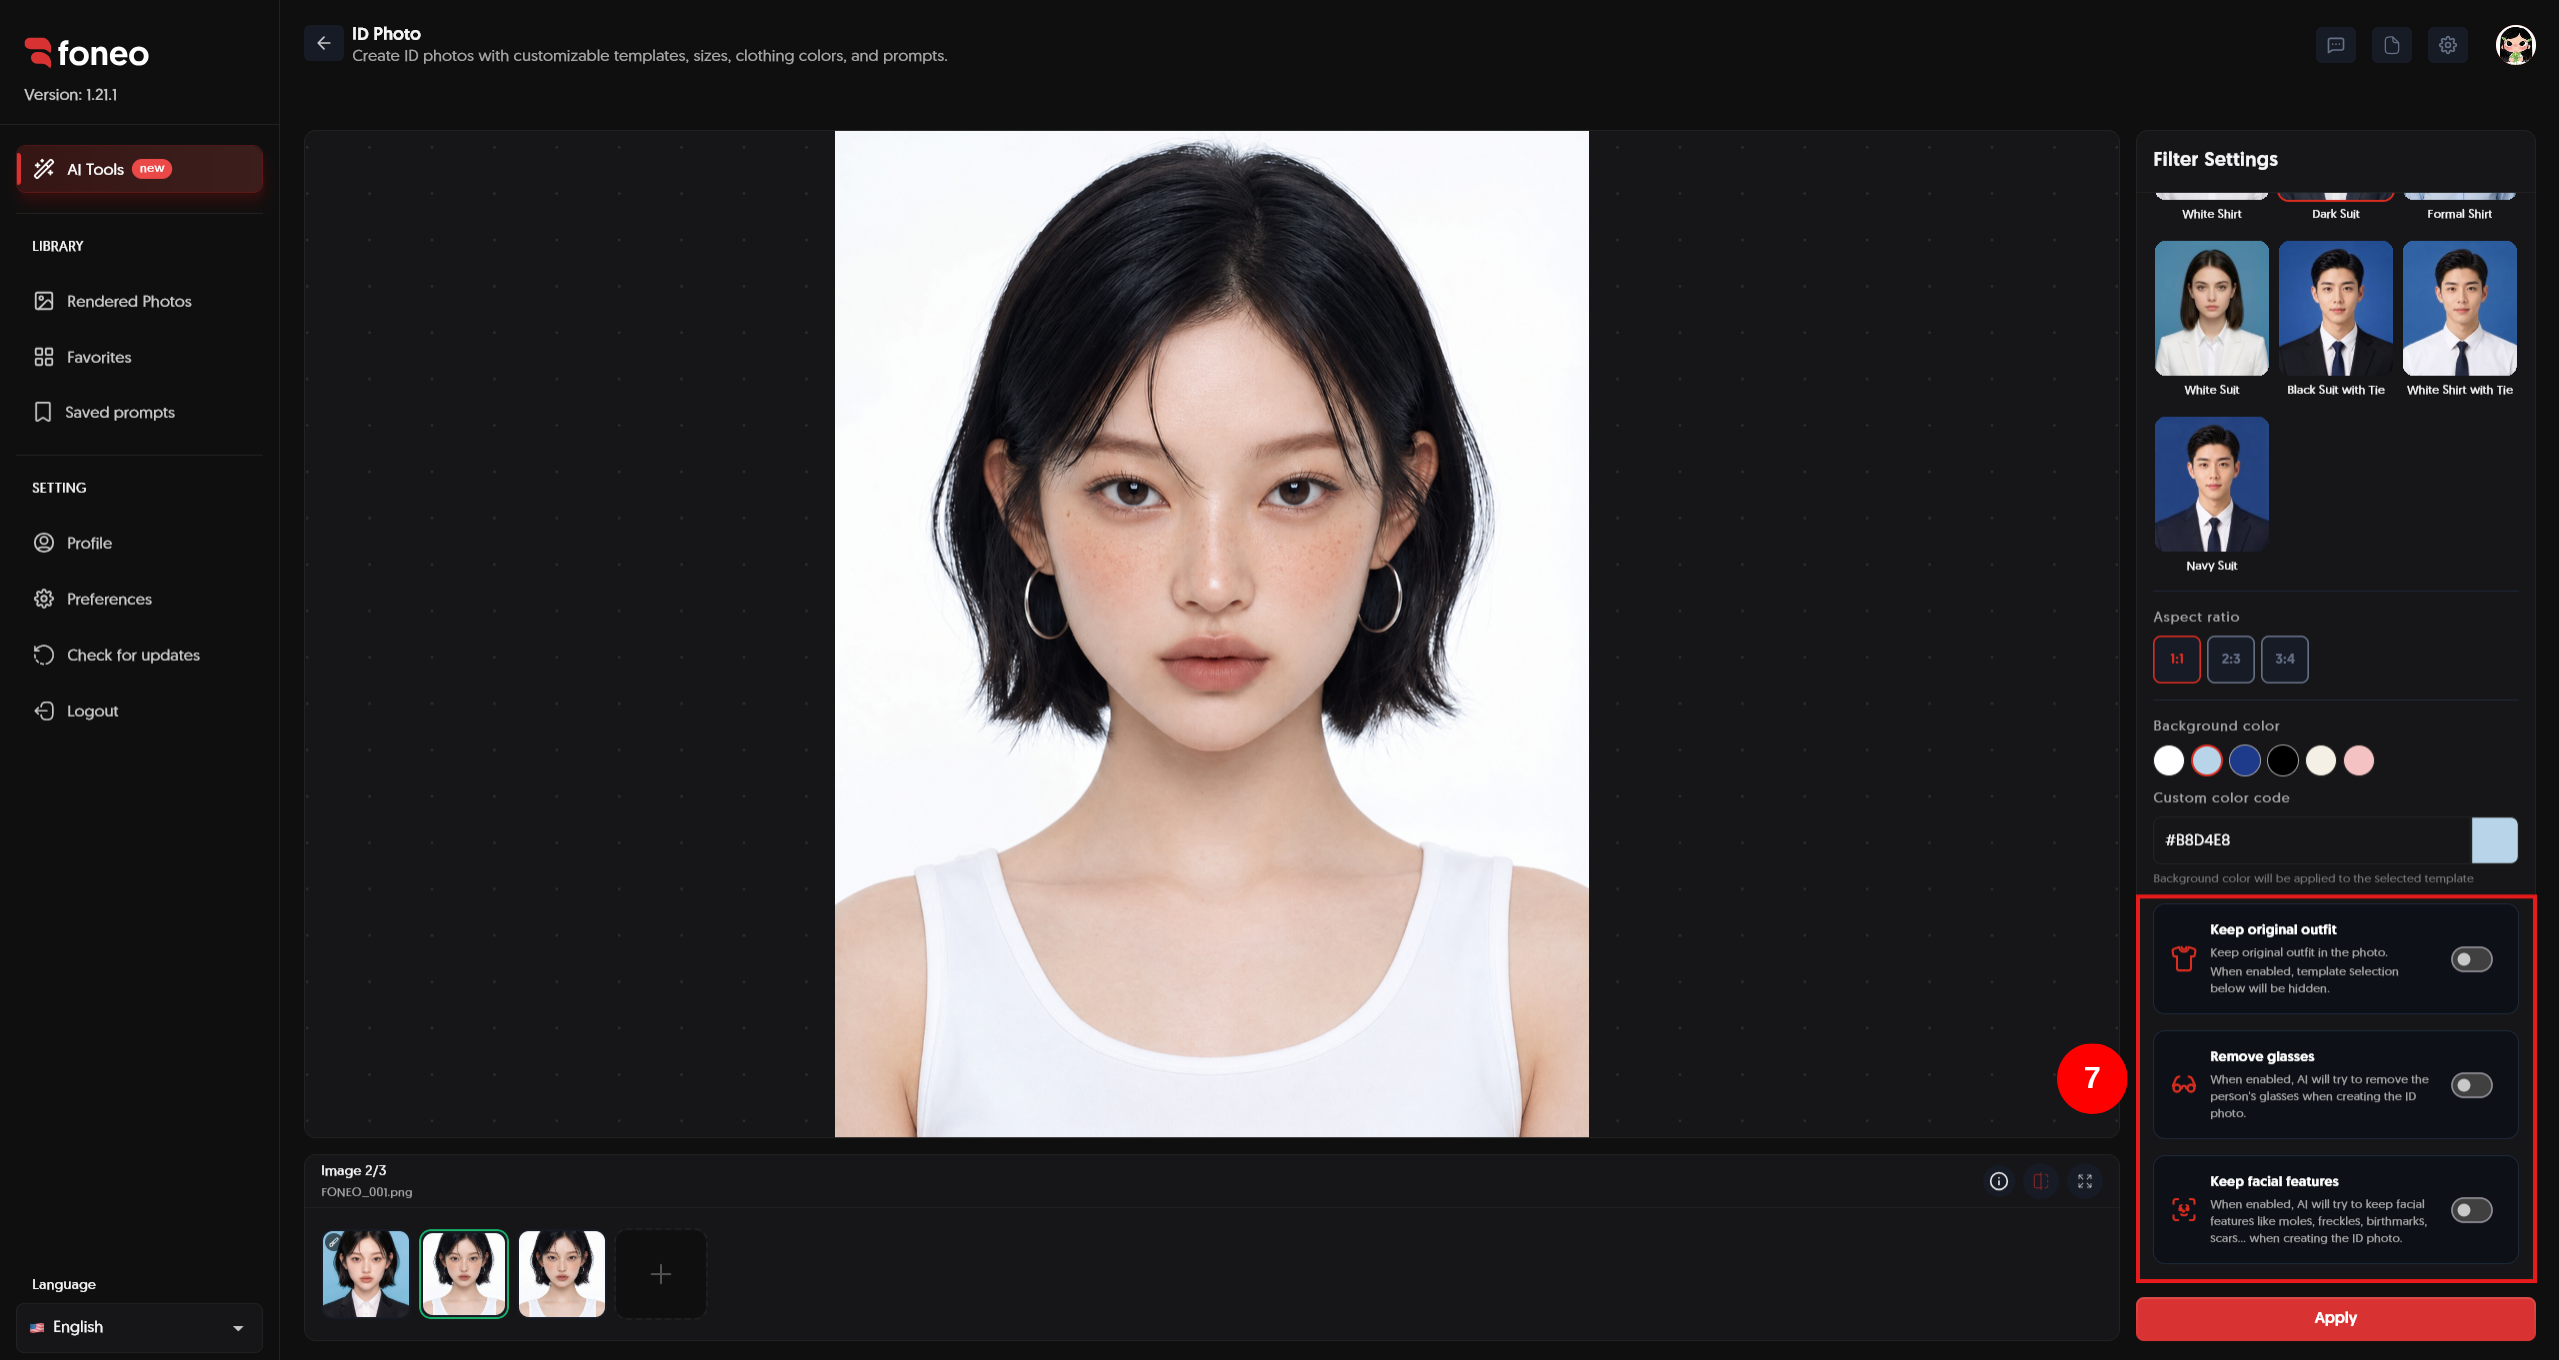
Keep original outfit
Enable Keep original outfit when you want to preserve the person's original clothing.
When enabled:
- AI will prioritize keeping the clothing from the original image.
- ID Photo Template selection will be hidden and unavailable.
- You can still use Prompt and the remaining options.
This option is useful when you want to create an ID photo without changing the person's current outfit.
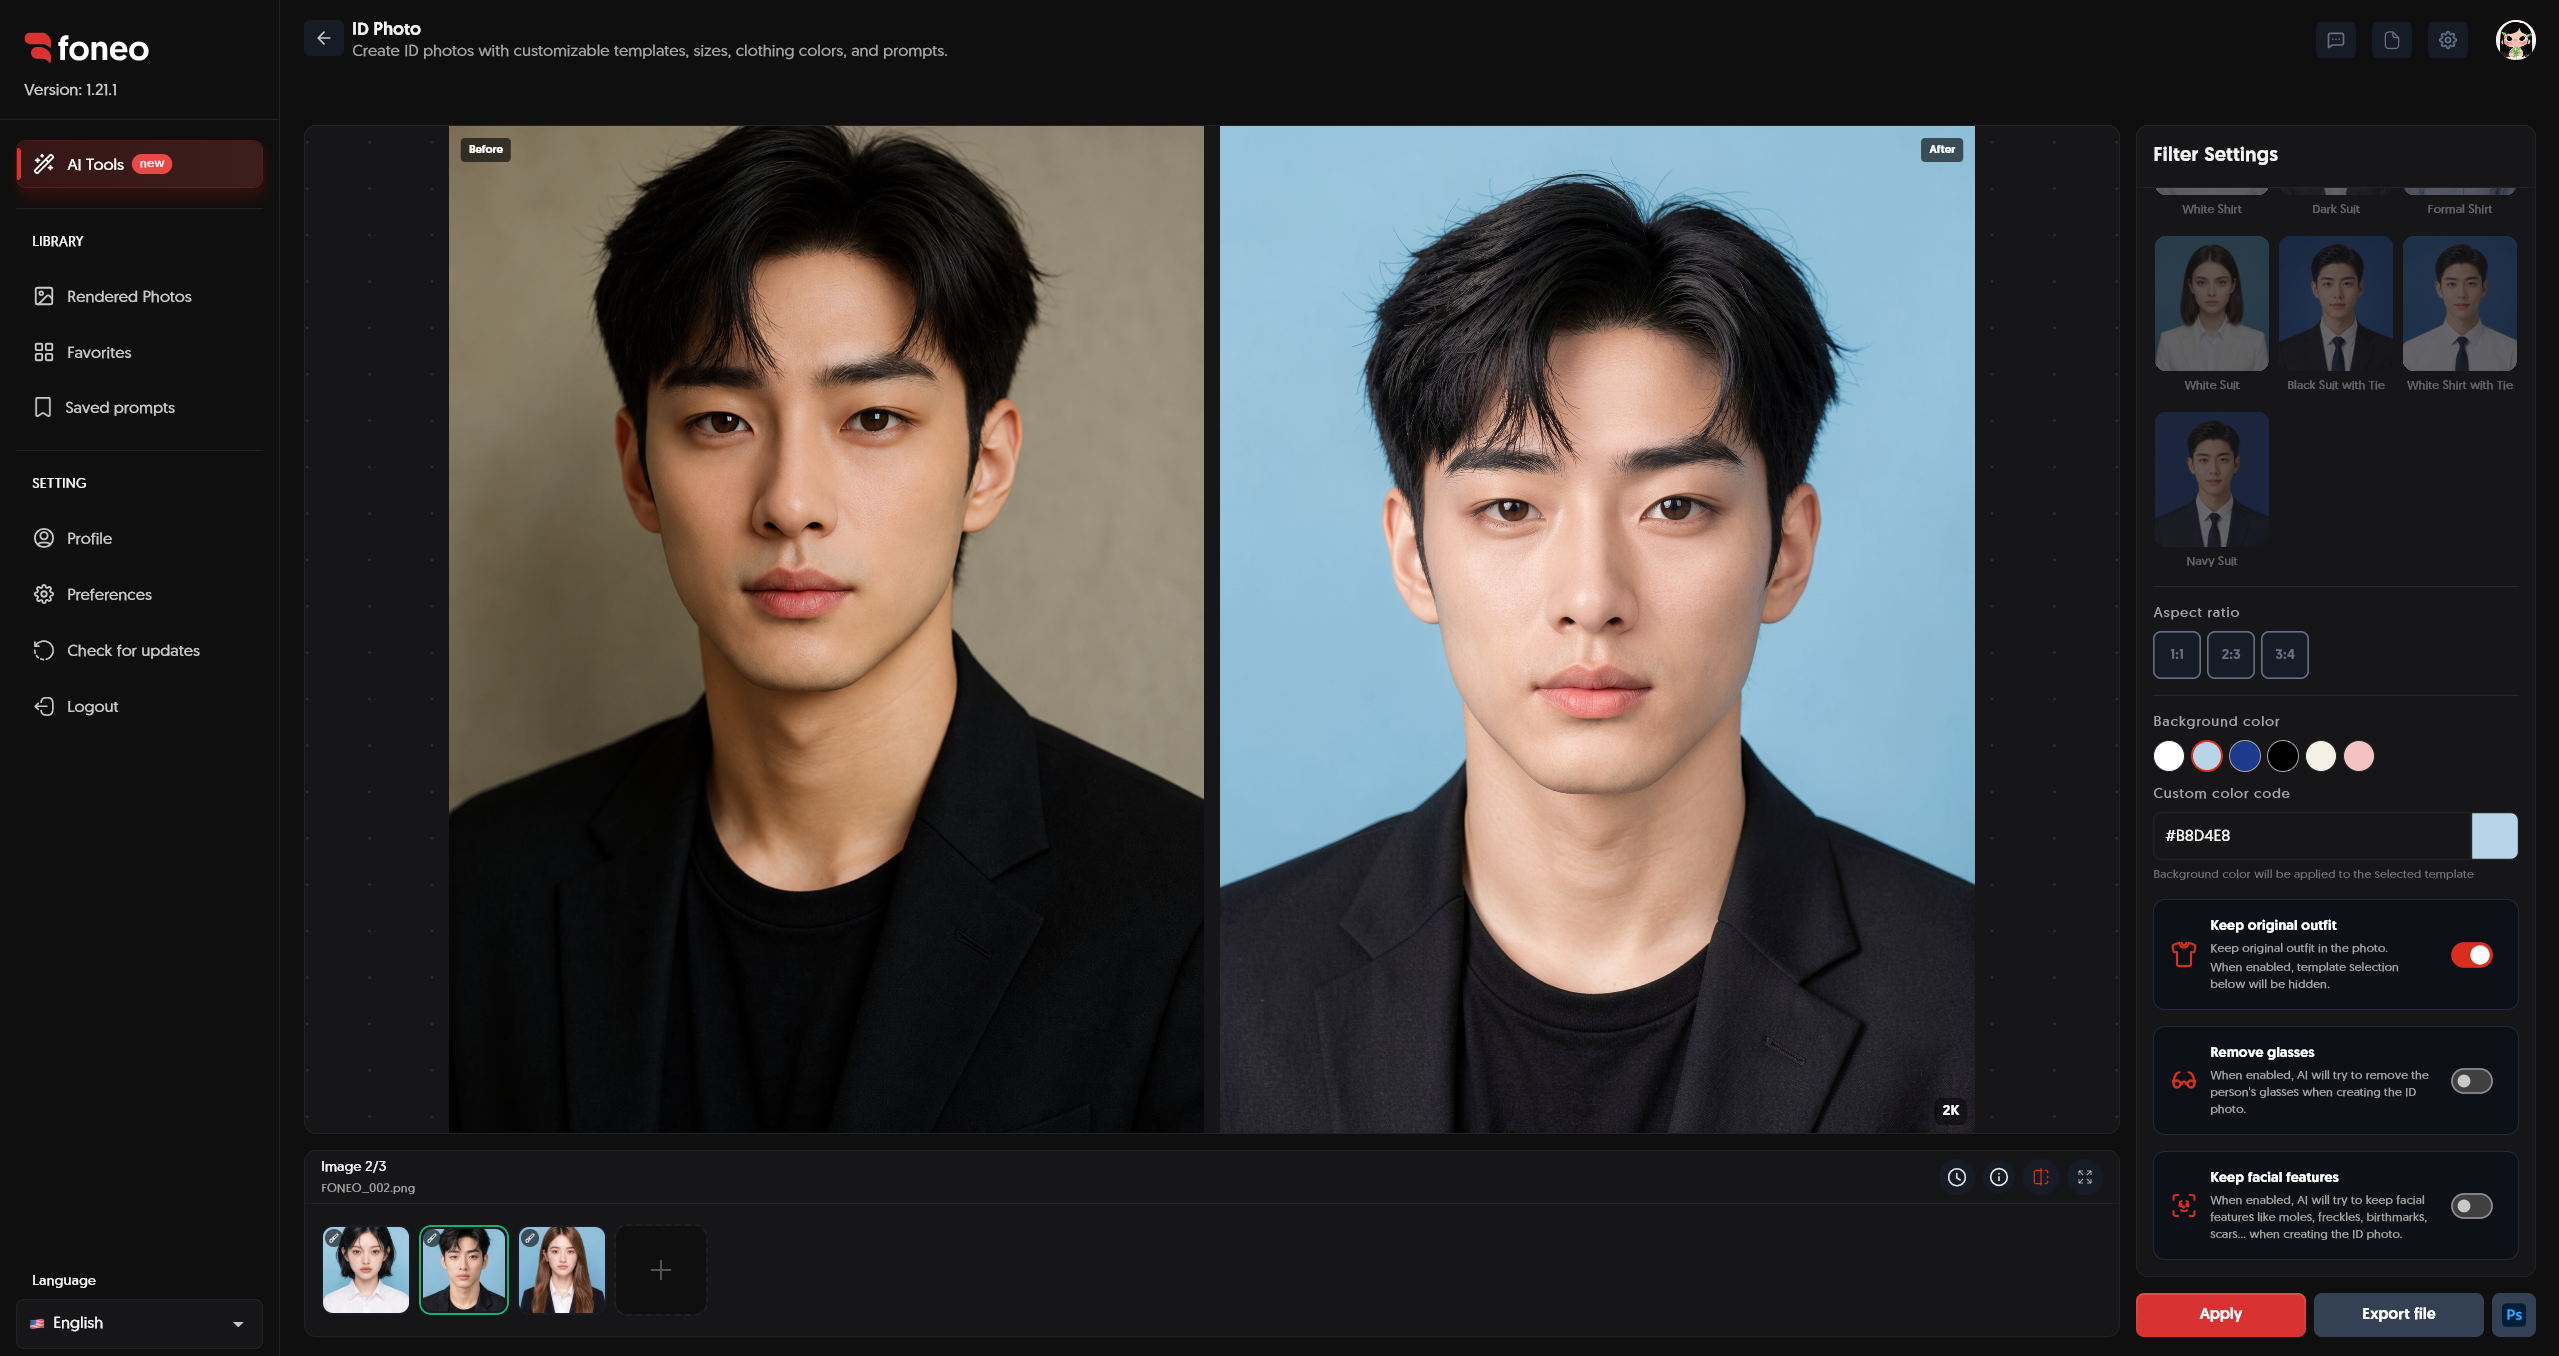
Remove glasses
Enable Remove glasses when the person in the original image is wearing glasses but you want to create an ID photo without them.
AI will attempt to remove the glasses during the ID photo generation process.
If you want to keep the glasses from the original image, you do not need to enable this option.
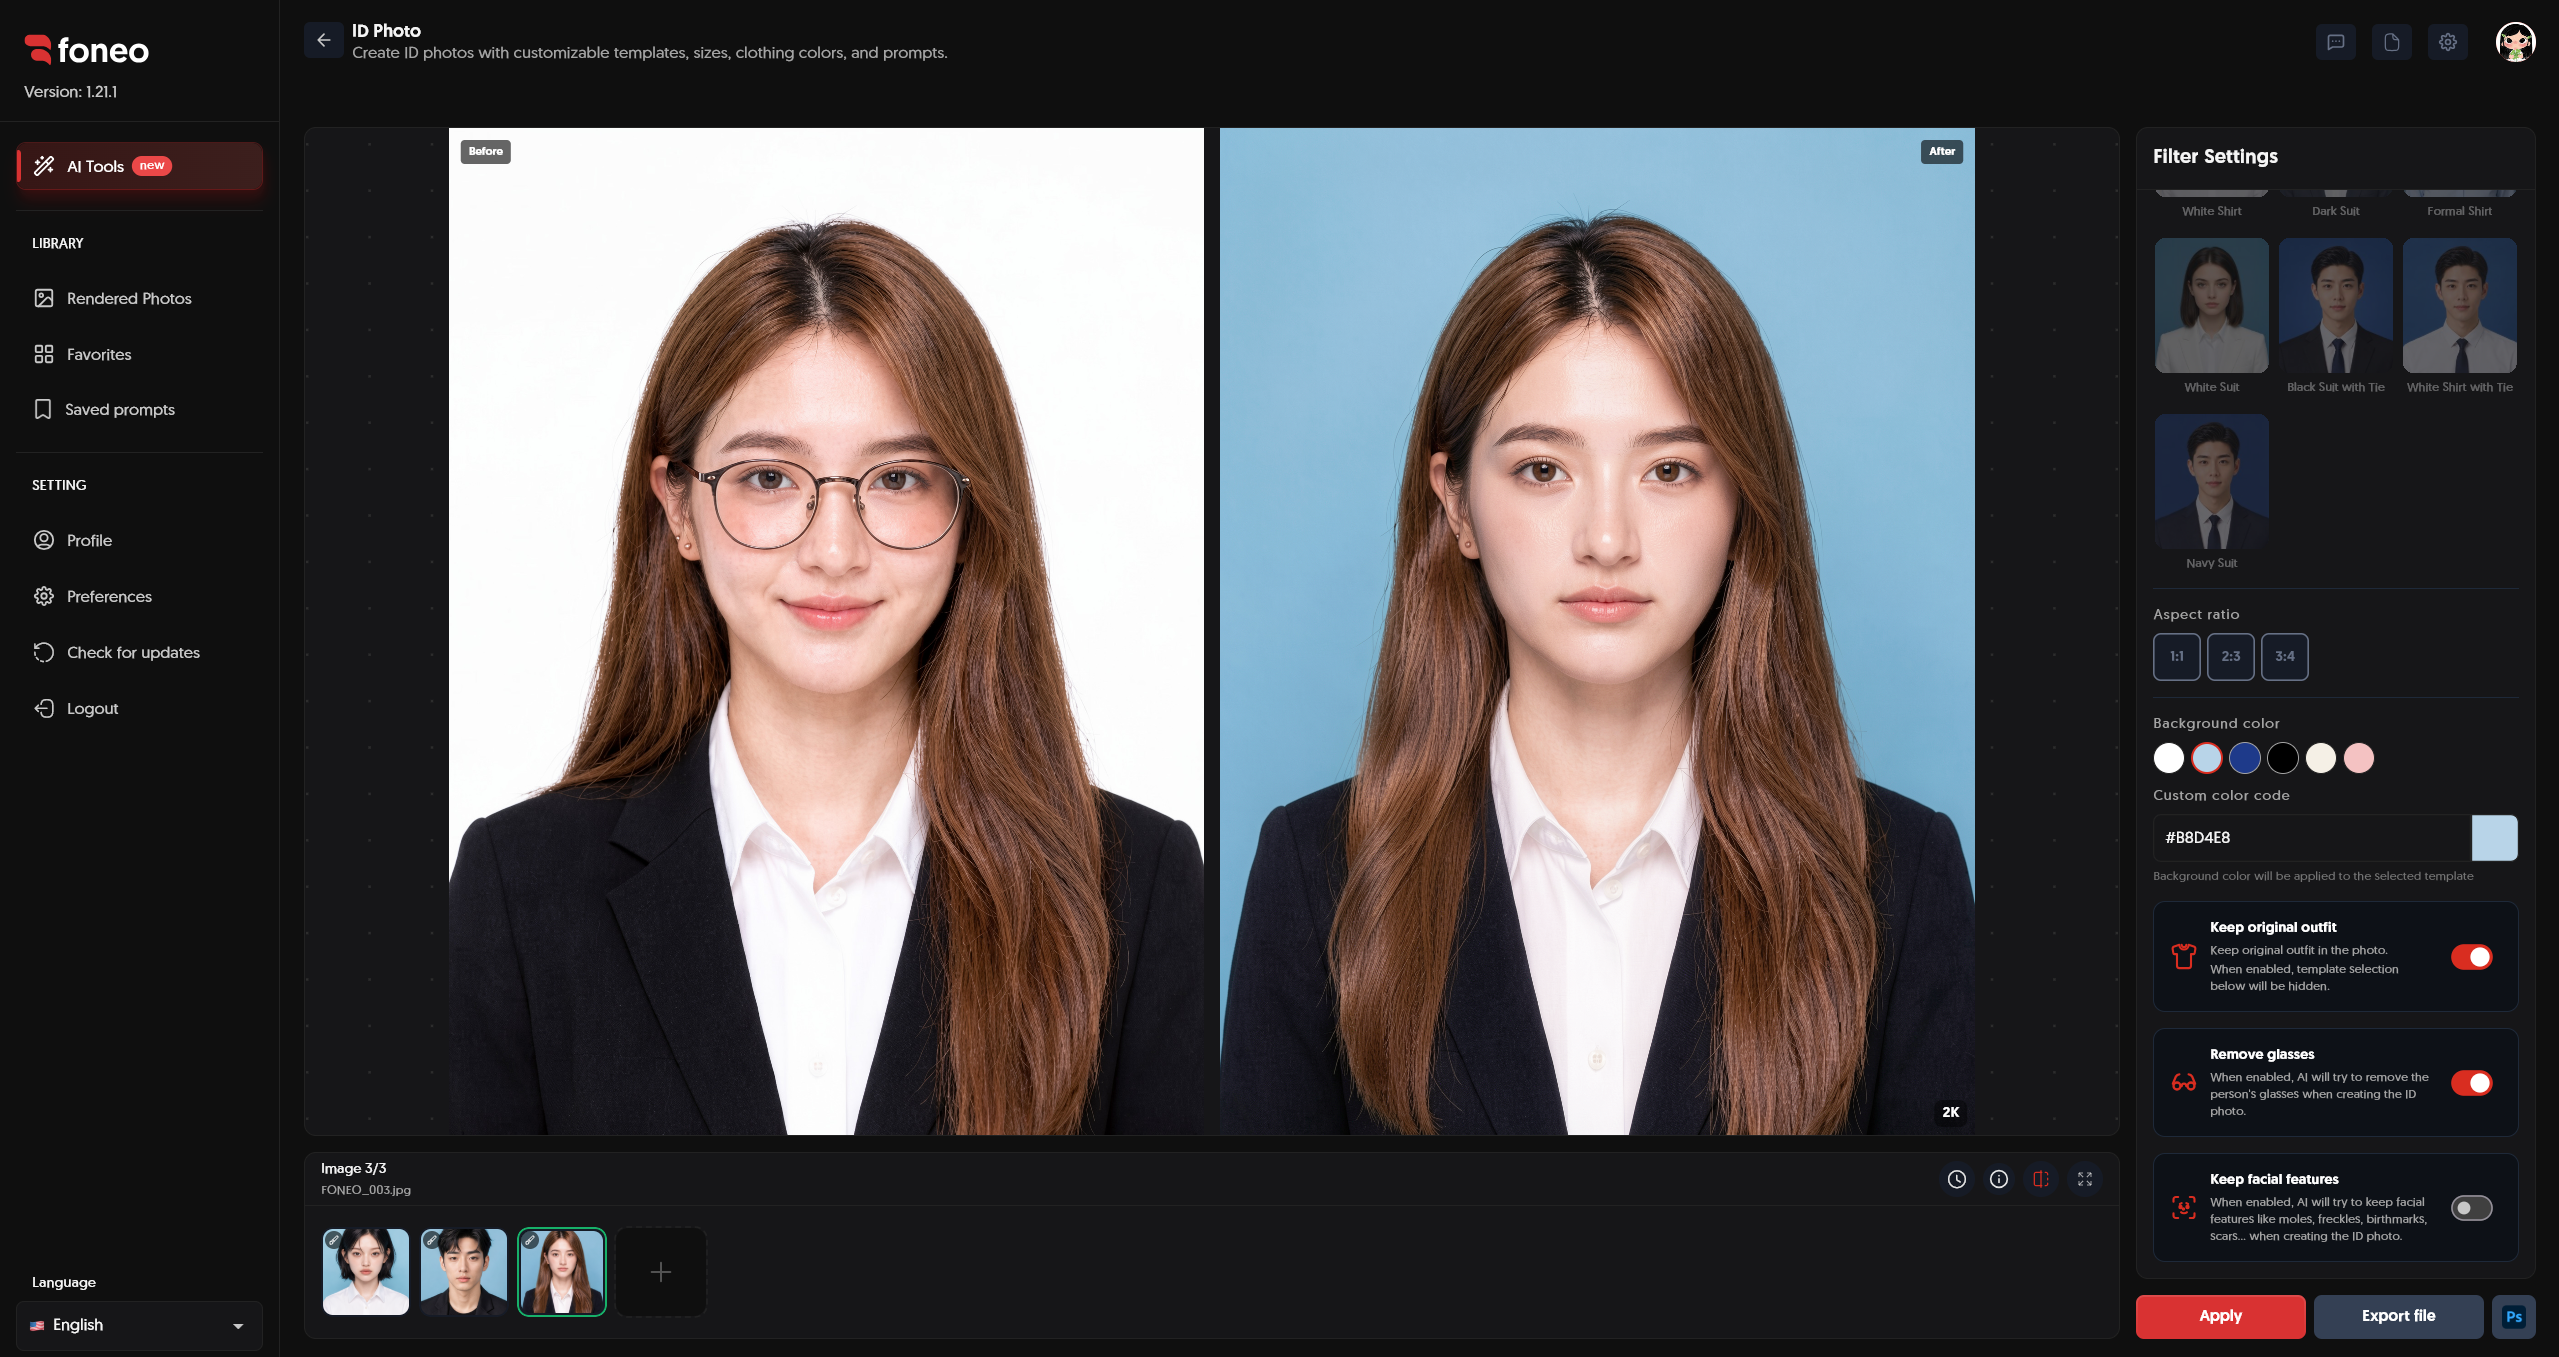
Keep facial features
Enable Keep facial features when the person has facial features that you want to preserve.
For example:
- Moles.
- Scars.
- Freckles.
- Birthmarks.
- Other natural identifying facial features.
This option helps AI prioritize preserving the detected facial features from the original image.
Note: All 3 options are optional. Only enable the options that match your needs.
8. Apply
After completing your settings, click Apply to start creating the ID photo with AI.
You can create an ID photo in two ways:
Using a Template:
Select photo → Choose Template → Configure options if needed → Apply
Using a Prompt:
Select photo → Prompt → Enter a description → Configure options if needed → Apply
After processing is complete, review the result in the preview area.
If the result is not suitable, you can change the Template, adjust the Prompt, or modify the options and click Apply again to generate a new result.
9. Export file / Ps
Once you are satisfied with the result, click Export file to export the image.
You can also click Ps if you want to continue editing the image in Photoshop.
Before exporting, check:
- Facial features.
- Aspect ratio.
- Background color.
- Clothing.
- Glasses.
- Facial details.
- Overall image composition.
How to Evaluate the Result After Creating an ID Photo
After Foneo finishes processing, review the image before exporting it.
Pay attention to:
- Face: Are the person's facial features and identity preserved?
- Composition: Is the face positioned appropriately within the photo frame?
- Aspect ratio: Does the image match the selected aspect ratio?
- Background color: Does the background match the selected color and appear uniform?
- Clothing: Does the clothing match the selected Template or Prompt?
- Glasses: If Remove glasses was enabled, were the glasses removed appropriately?
- Facial features: Are moles, scars, or other features that you wanted to preserve still visible?
- Overall result: Is the image clear, natural, and suitable for its intended purpose?
If the result is not suitable, return to Filter Settings, change the Template, Prompt, or additional options, and click Apply again.
Tips for Creating Natural-Looking ID Photos
1. Use a Clear Original Photo
Use an image with a clearly visible face, sufficient lighting, and minimal obstruction.
A high-quality original image gives AI more information to process the face and preserve important features.
2. Use a Template for Quick Results
If you want to create an ID photo quickly, choose a ready-made Template.
Templates allow you to change the clothing and create an ID photo without having to provide a detailed Prompt.
3. Use a Prompt for More Customization
If you want more control over the clothing or specific ID photo requirements, use a Prompt.
Clearly describe the important elements, such as:
Clothing style + color + composition + background + features to preserve
For example:
Create a professional ID photo with a clean white formal shirt, centered face, even lighting, natural skin tone, plain background, and realistic facial features.
4. Use Suggest Prompt When You Need Ideas
If you are not sure how to write a Prompt, click Suggest Prompt to let Foneo generate suggestions.
You can then edit the Prompt based on your needs before clicking Apply.
5. Save Frequently Used Prompts
If you frequently create ID photos with the same clothing style or requirements, use Save prompt to save the Prompt.
You can give the Prompt an easy-to-recognize name and use a category tag to make it easier to find later.
6. Choose the Right Aspect Ratio
Foneo supports:
- 1:1
- 2:3
- 3:4
Choose the aspect ratio that best fits your intended use.
7. Choose a Suitable Background Color
You can select a preset background color or enter a Custom color code to create a background using a specific color code.
After processing, check the background color to make sure it matches your requirements.
8. Use Keep original outfit When You Want to Preserve Clothing
If you want to keep the clothing from the original image, enable Keep original outfit.
Note: When this option is enabled, the ID Photo Template selection will be hidden. You can use Prompt and the other available options to continue creating the photo.
9. Use Remove glasses When You Want an ID Photo Without Glasses
If the person in the original image is wearing glasses but you want to create an ID photo without glasses, enable Remove glasses.
If you want to keep the original glasses, you do not need to enable this option.
10. Preserve Identifying Facial Features
If the person has moles, scars, freckles, or other identifying facial features that you want to preserve, enable Keep facial features.
11. Check the Image Carefully Before Exporting
Before clicking Export file, review the entire image, especially:
Face → Clothing → Glasses → Facial features → Aspect ratio → Background color
If anything is not suitable, adjust the settings and click Apply to generate a new result.
Frequently Asked Questions
What is ID Photo on Foneo used for?
The ID Photo feature helps you create ID photos from existing images using AI. You can customize the Template, Prompt, aspect ratio, background color, and facial features.
Do I need a Prompt to create an ID photo?
No.
You can select a ready-made Template to create an ID photo.
If you want to provide specific requirements, you can enter a Prompt to give AI additional instructions.
Can I describe the ID photo using a custom Prompt?
Yes.
You can enter a Prompt to describe the clothing, composition, and facial features you want to preserve.
If you do not have an idea for your Prompt, you can use Suggest Prompt to get suggestions.
Can I save a Prompt for later use?
Yes.
After creating a suitable Prompt, click Save prompt to save it.
You can name the Prompt, edit its content, and select a category tag to make it easier to manage.
Which aspect ratios are available?
Foneo provides 3 options:
- 1:1
- 2:3
- 3:4
The aspect ratio is an optional setting and does not have to be customized.
Can I change the ID photo background color?
Yes.
You can select a preset background color or enter a Custom color code to use a specific color.
What does Keep original outfit do?
Keep original outfit prioritizes preserving the clothing the person is wearing in the original image.
When enabled, the ID Photo Template selection will be hidden and cannot be selected.
Why can't I select a Template when Keep original outfit is enabled?
When Keep original outfit is enabled, Foneo prioritizes preserving the clothing from the original image, so the ID Photo Template selection will be hidden.
You can use Prompt and the remaining options to continue creating the photo.
What does Remove glasses do?
Remove glasses is used when the person in the original image is wearing glasses but you want to create an ID photo without them.
What does Keep facial features do?
Keep facial features helps prioritize preserving natural facial features such as moles, scars, freckles, or other identifying features.
Can I use multiple options at the same time?
Yes.
You can combine the available options based on your needs.
However, when Keep original outfit is enabled, the ID Photo Template selection will be hidden.
Can I regenerate the photo if the result is not suitable?
Yes.
You can change the Template, adjust the Prompt, or modify options such as the aspect ratio, background color, and additional settings, then click Apply to generate a new result.
Can I edit the photo after creating the ID photo?
Yes.
After completing the process, you can click Export file to export the image or click Ps to continue editing it in Photoshop.
Related Articles
- How to Use Restore & Colorize on the Foneo AI Photo Editing App
- How to Use Portrait Effects on the Foneo AI Photo Editing App
- How to Use Lighting Effects on the Foneo AI Photo Editing App
- How to Use Weather Effects on the Foneo AI Photo Editing App
- How to Use Surface Transform on the Foneo AI Photo Editing App
Foneo · AI Photo Editing
Ready to try it on your own photos?
Download the Foneo app to edit photos with AI in just a few taps, or see the plan that fits your needs.