How to Use Restore & Colorize on the Foneo AI Photo Editing App
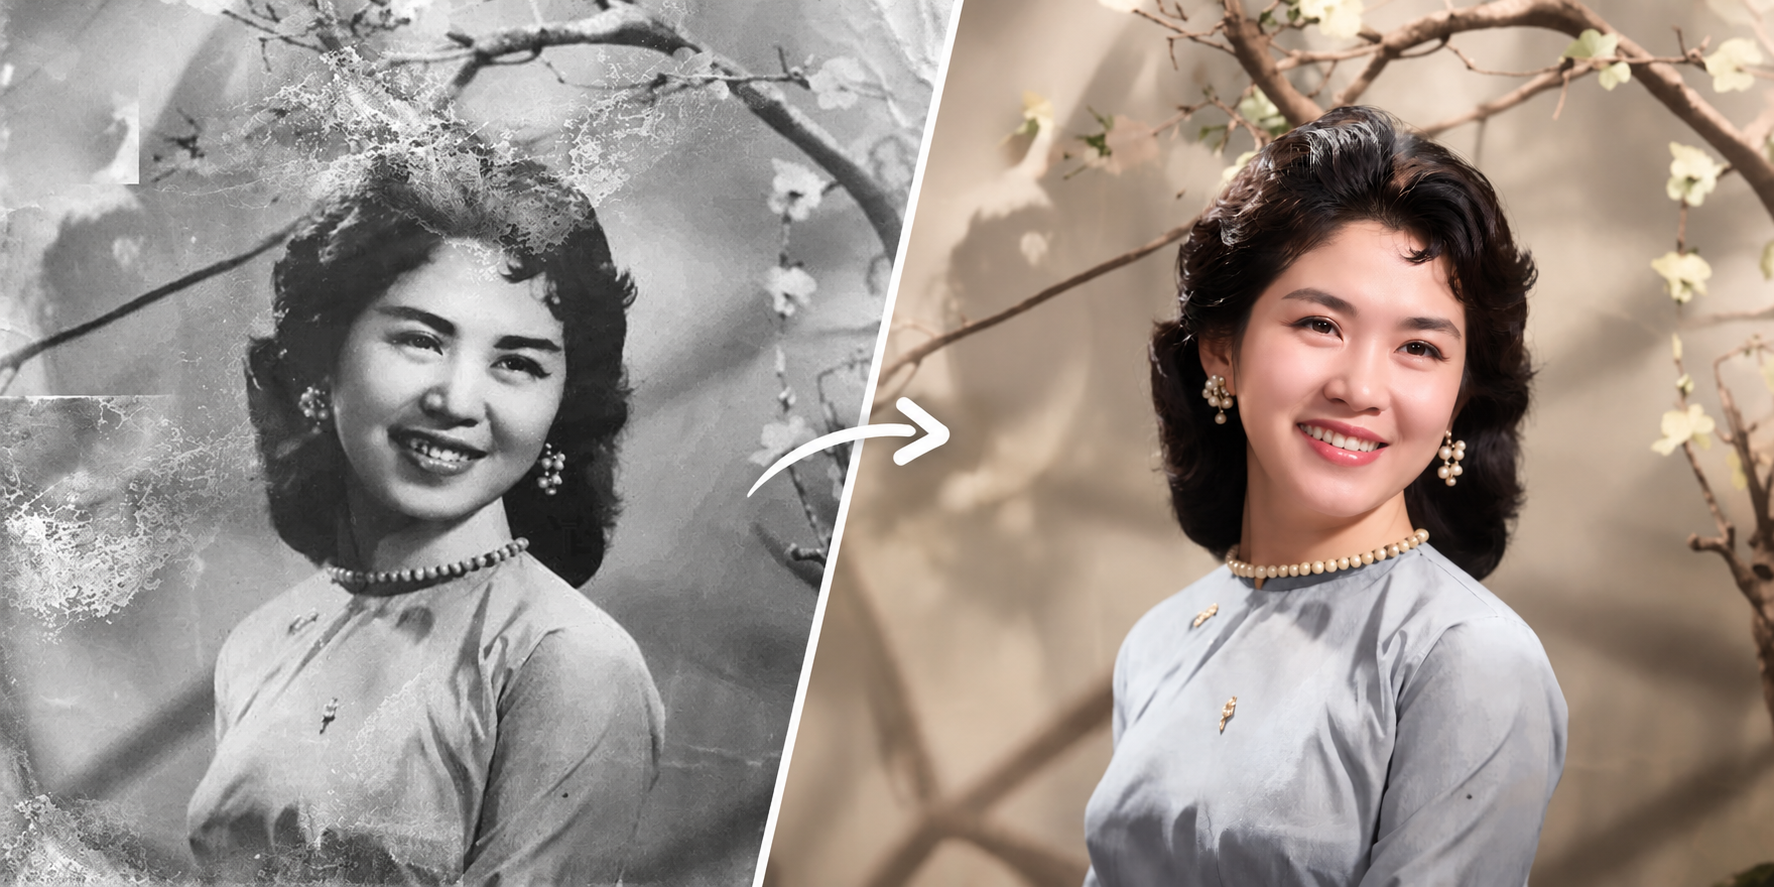
Old photos often become blurry, noisy, scratched, faded, or lose important details over time. With the Restore & Colorize feature on Foneo, you can use AI to restore photo quality, improve details, and add color to old photos in just a few simple steps.
Foneo supports automatic photo restoration, so you do not need to configure any detailed settings. Simply select a photo and click Apply, and AI will automatically analyze and restore the photo for you.
If you want more control over the result, you can use the additional settings in Filter Settings.
Before & After
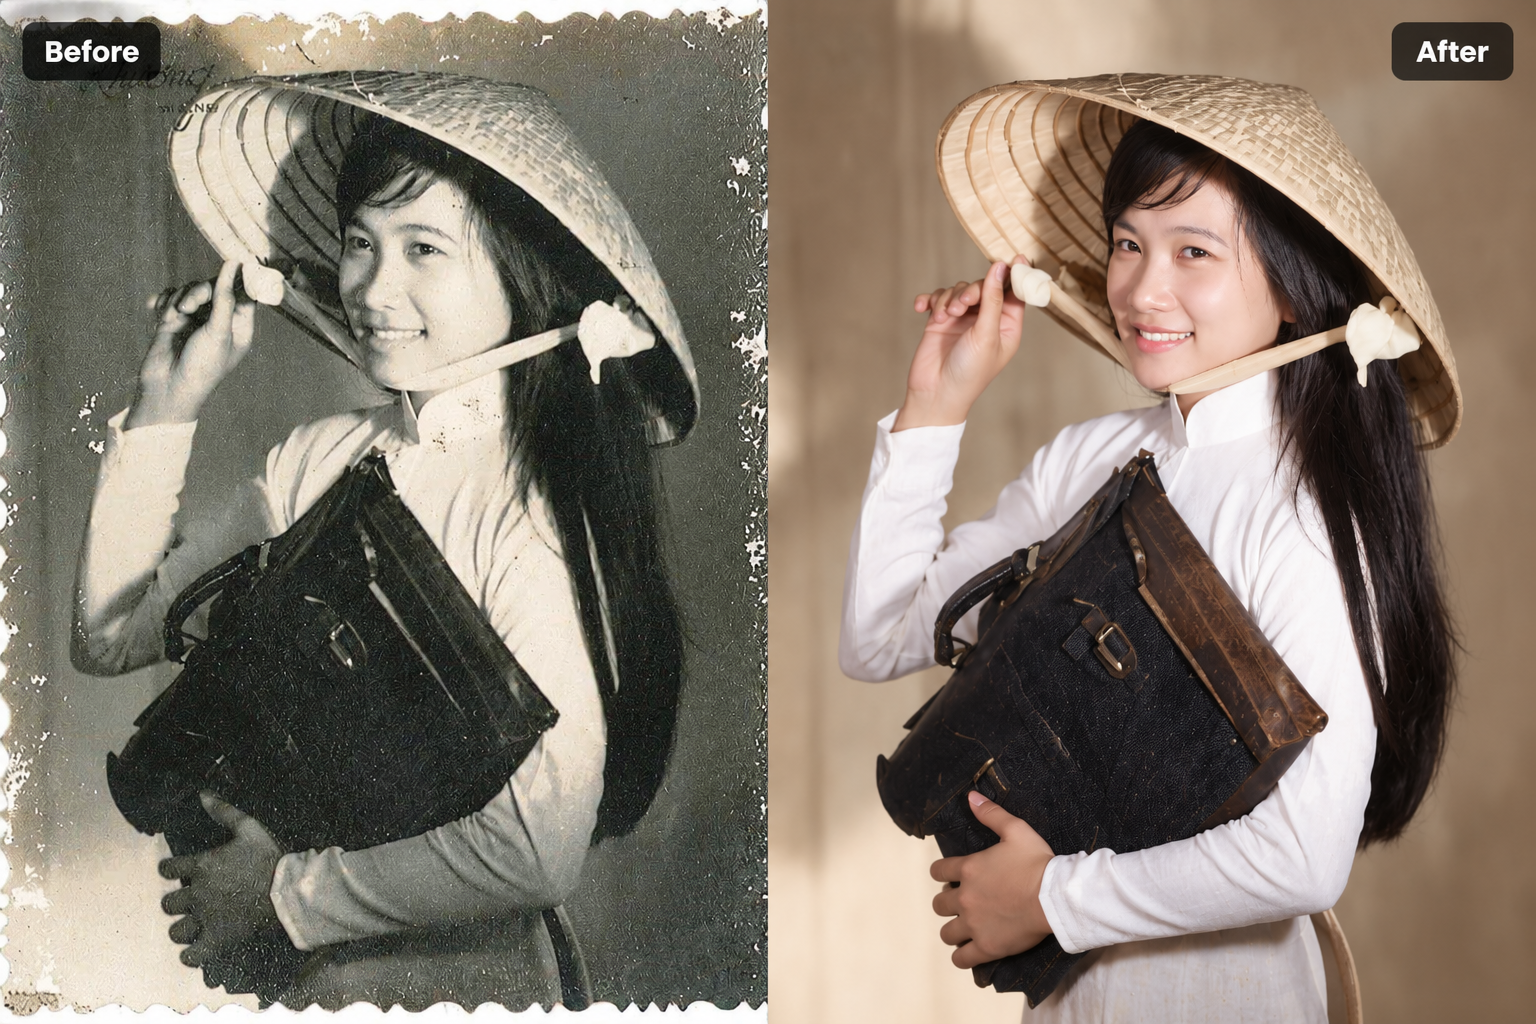
How to Use Restore & Colorize
To get started, upload the old or blurry photo you want to restore to Foneo and open the Restore & Colorize feature.
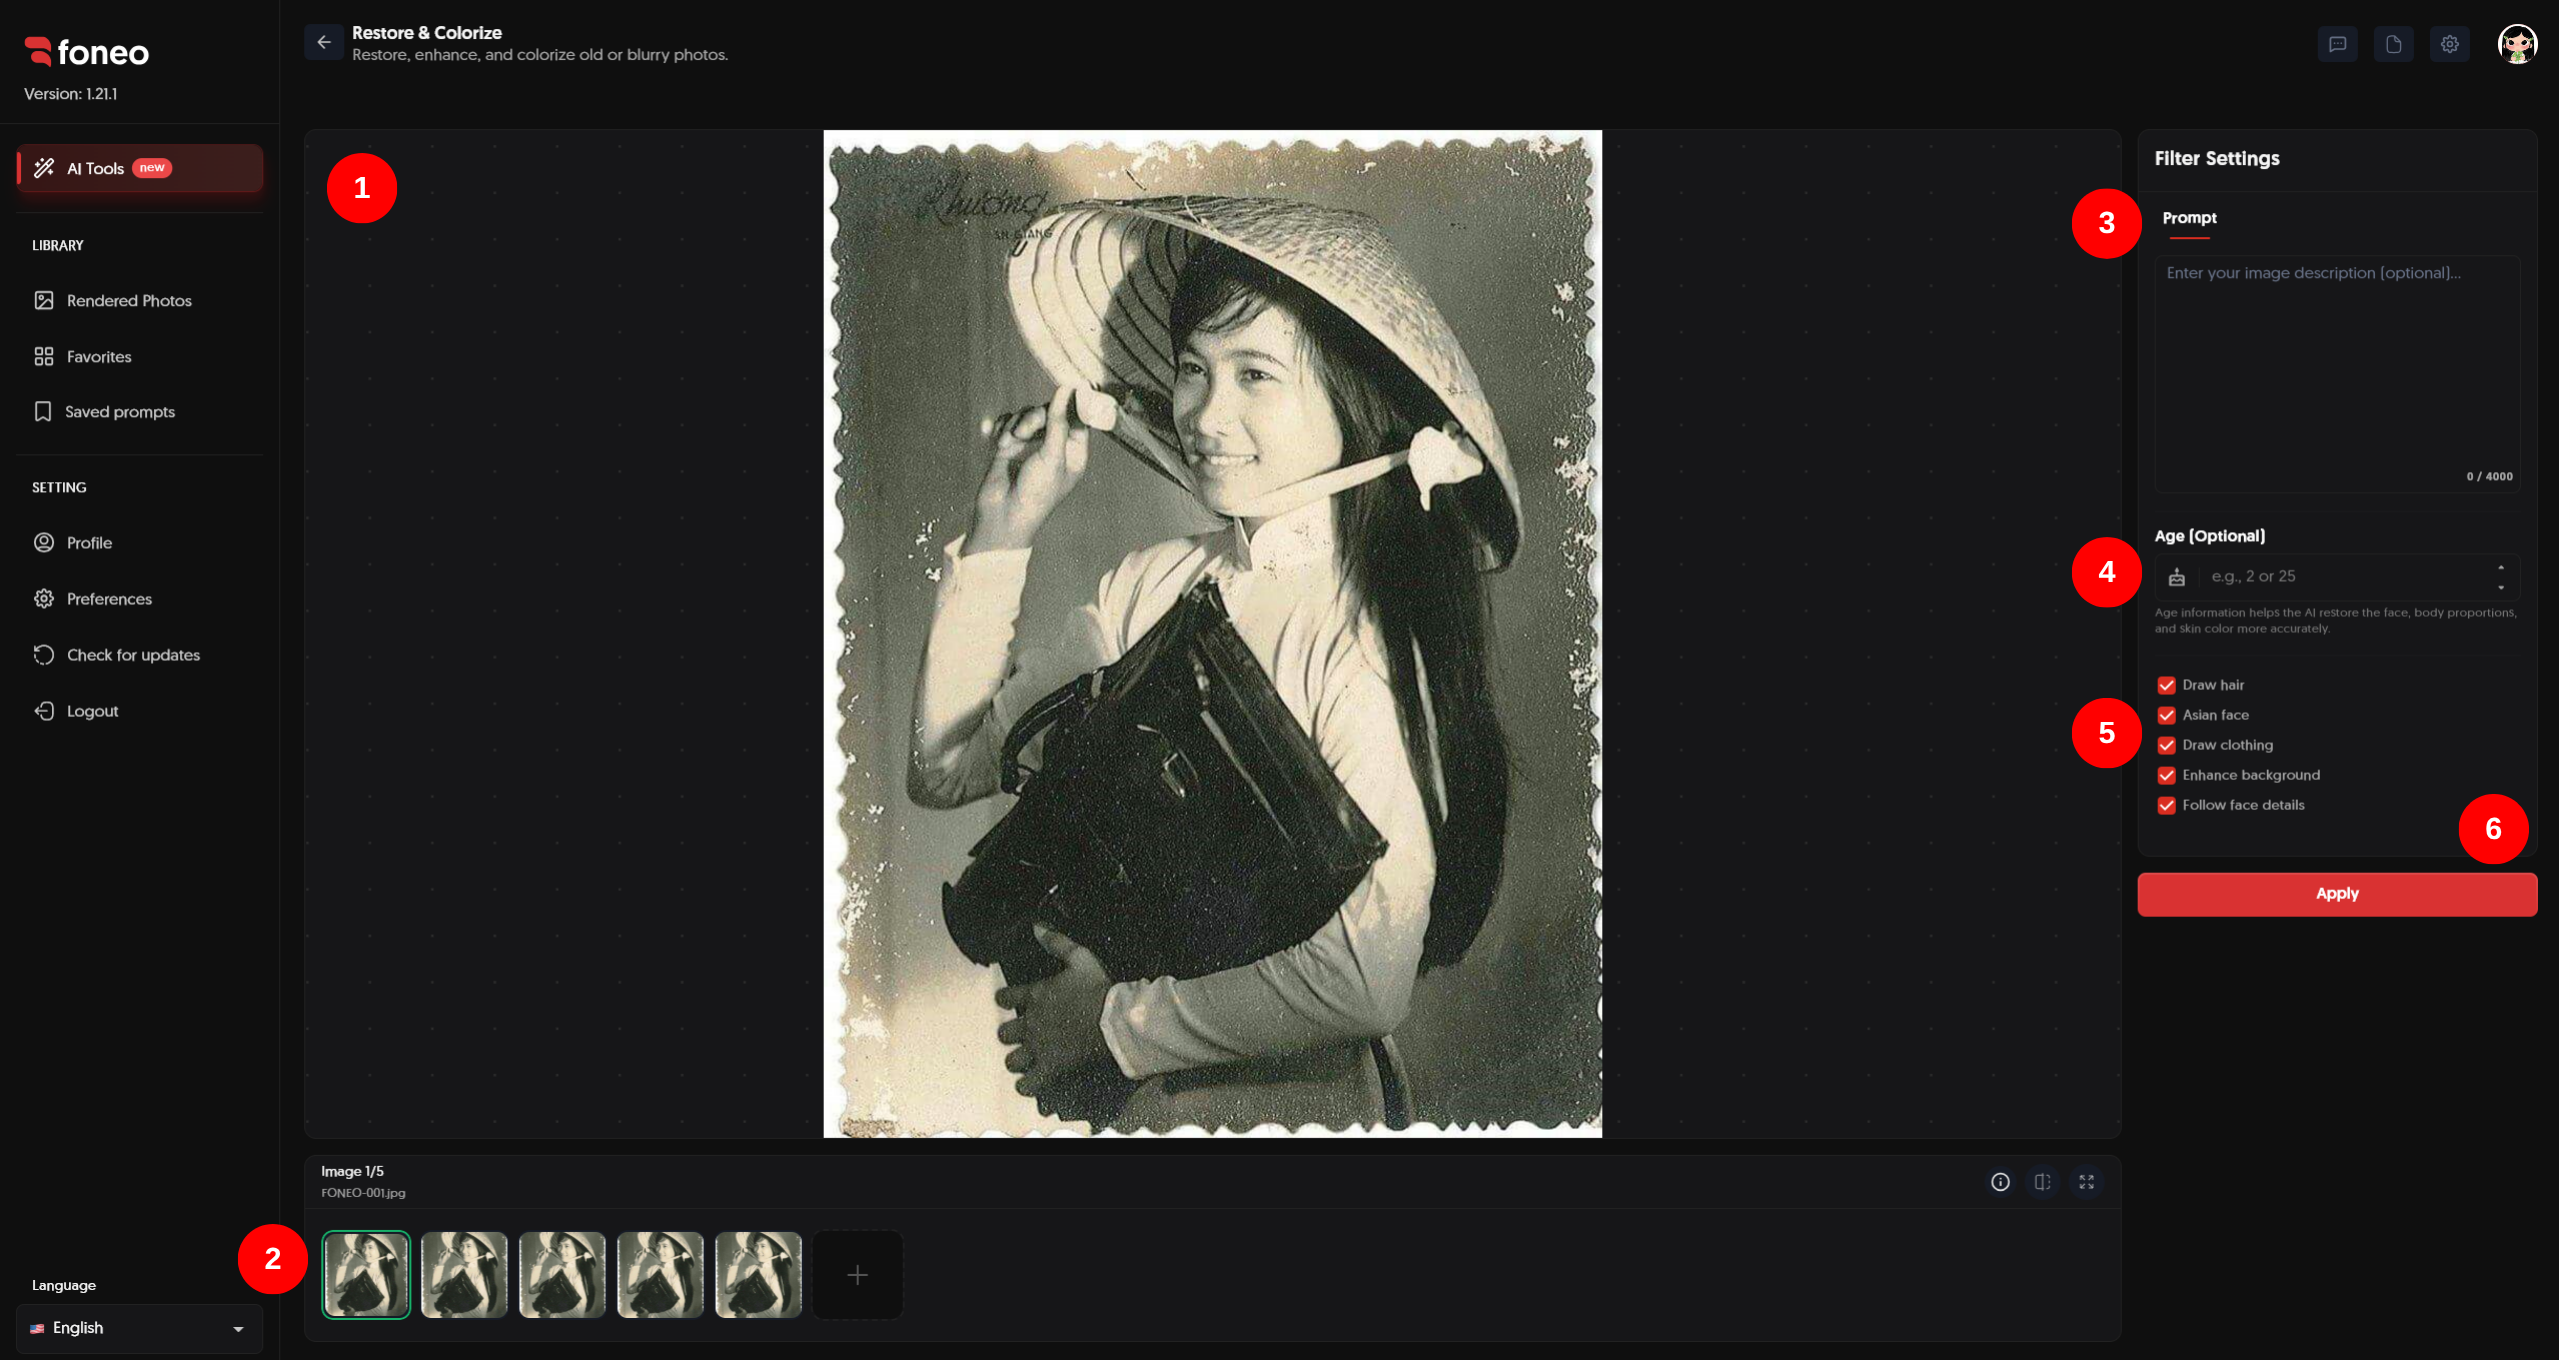
1. Preview the Photo
After selecting a photo, it will be displayed in the preview area so you can check its condition before starting the restoration process.
After processing, this area will also display the result so you can compare the original photo with the restored version.
You can use the feature without configuring any detailed settings. Foneo will automatically analyze the photo and restore it using AI.
2. Select the Photo to Restore
Uploaded photos will be displayed as thumbnails at the bottom of the screen.
You can:
- Click a thumbnail to select the photo you want to restore.
- Click + to add another photo.
- Select individual photos to preview and restore them.
After selecting a photo, you can click Apply immediately if you want to use automatic restoration.
Note: You do not need to enter a Prompt or configure additional settings if you only want AI to automatically restore the photo.
3. Enter and Save a Prompt if Needed
A Prompt allows you to describe how you want AI to restore the photo, which is especially useful when you want more control over the result.
You can describe things such as:
- Blurry or damaged areas that need to be restored.
- Details that need to be enhanced.
- Desired colors.
- Facial features that should be preserved.
- Hair and clothing that need to be recreated.
- Original characteristics that should remain unchanged.
Prompt example:
Restore this old photo by removing scratches, stains, noise, blur, and damaged areas. Enhance sharpness and details naturally while preserving the original face, identity, pose, clothing, composition, and overall appearance. Do not add or alter any meaningful details.
Save a Prompt
If you create a Prompt that works well and want to reuse it for future restorations, you can click Save.
In the Save Prompt window, you can:
- Enter a Prompt name.
- Review and edit the Prompt content.
- Select a category tag for organization.
- Click Create new tag to create a new tag if needed.
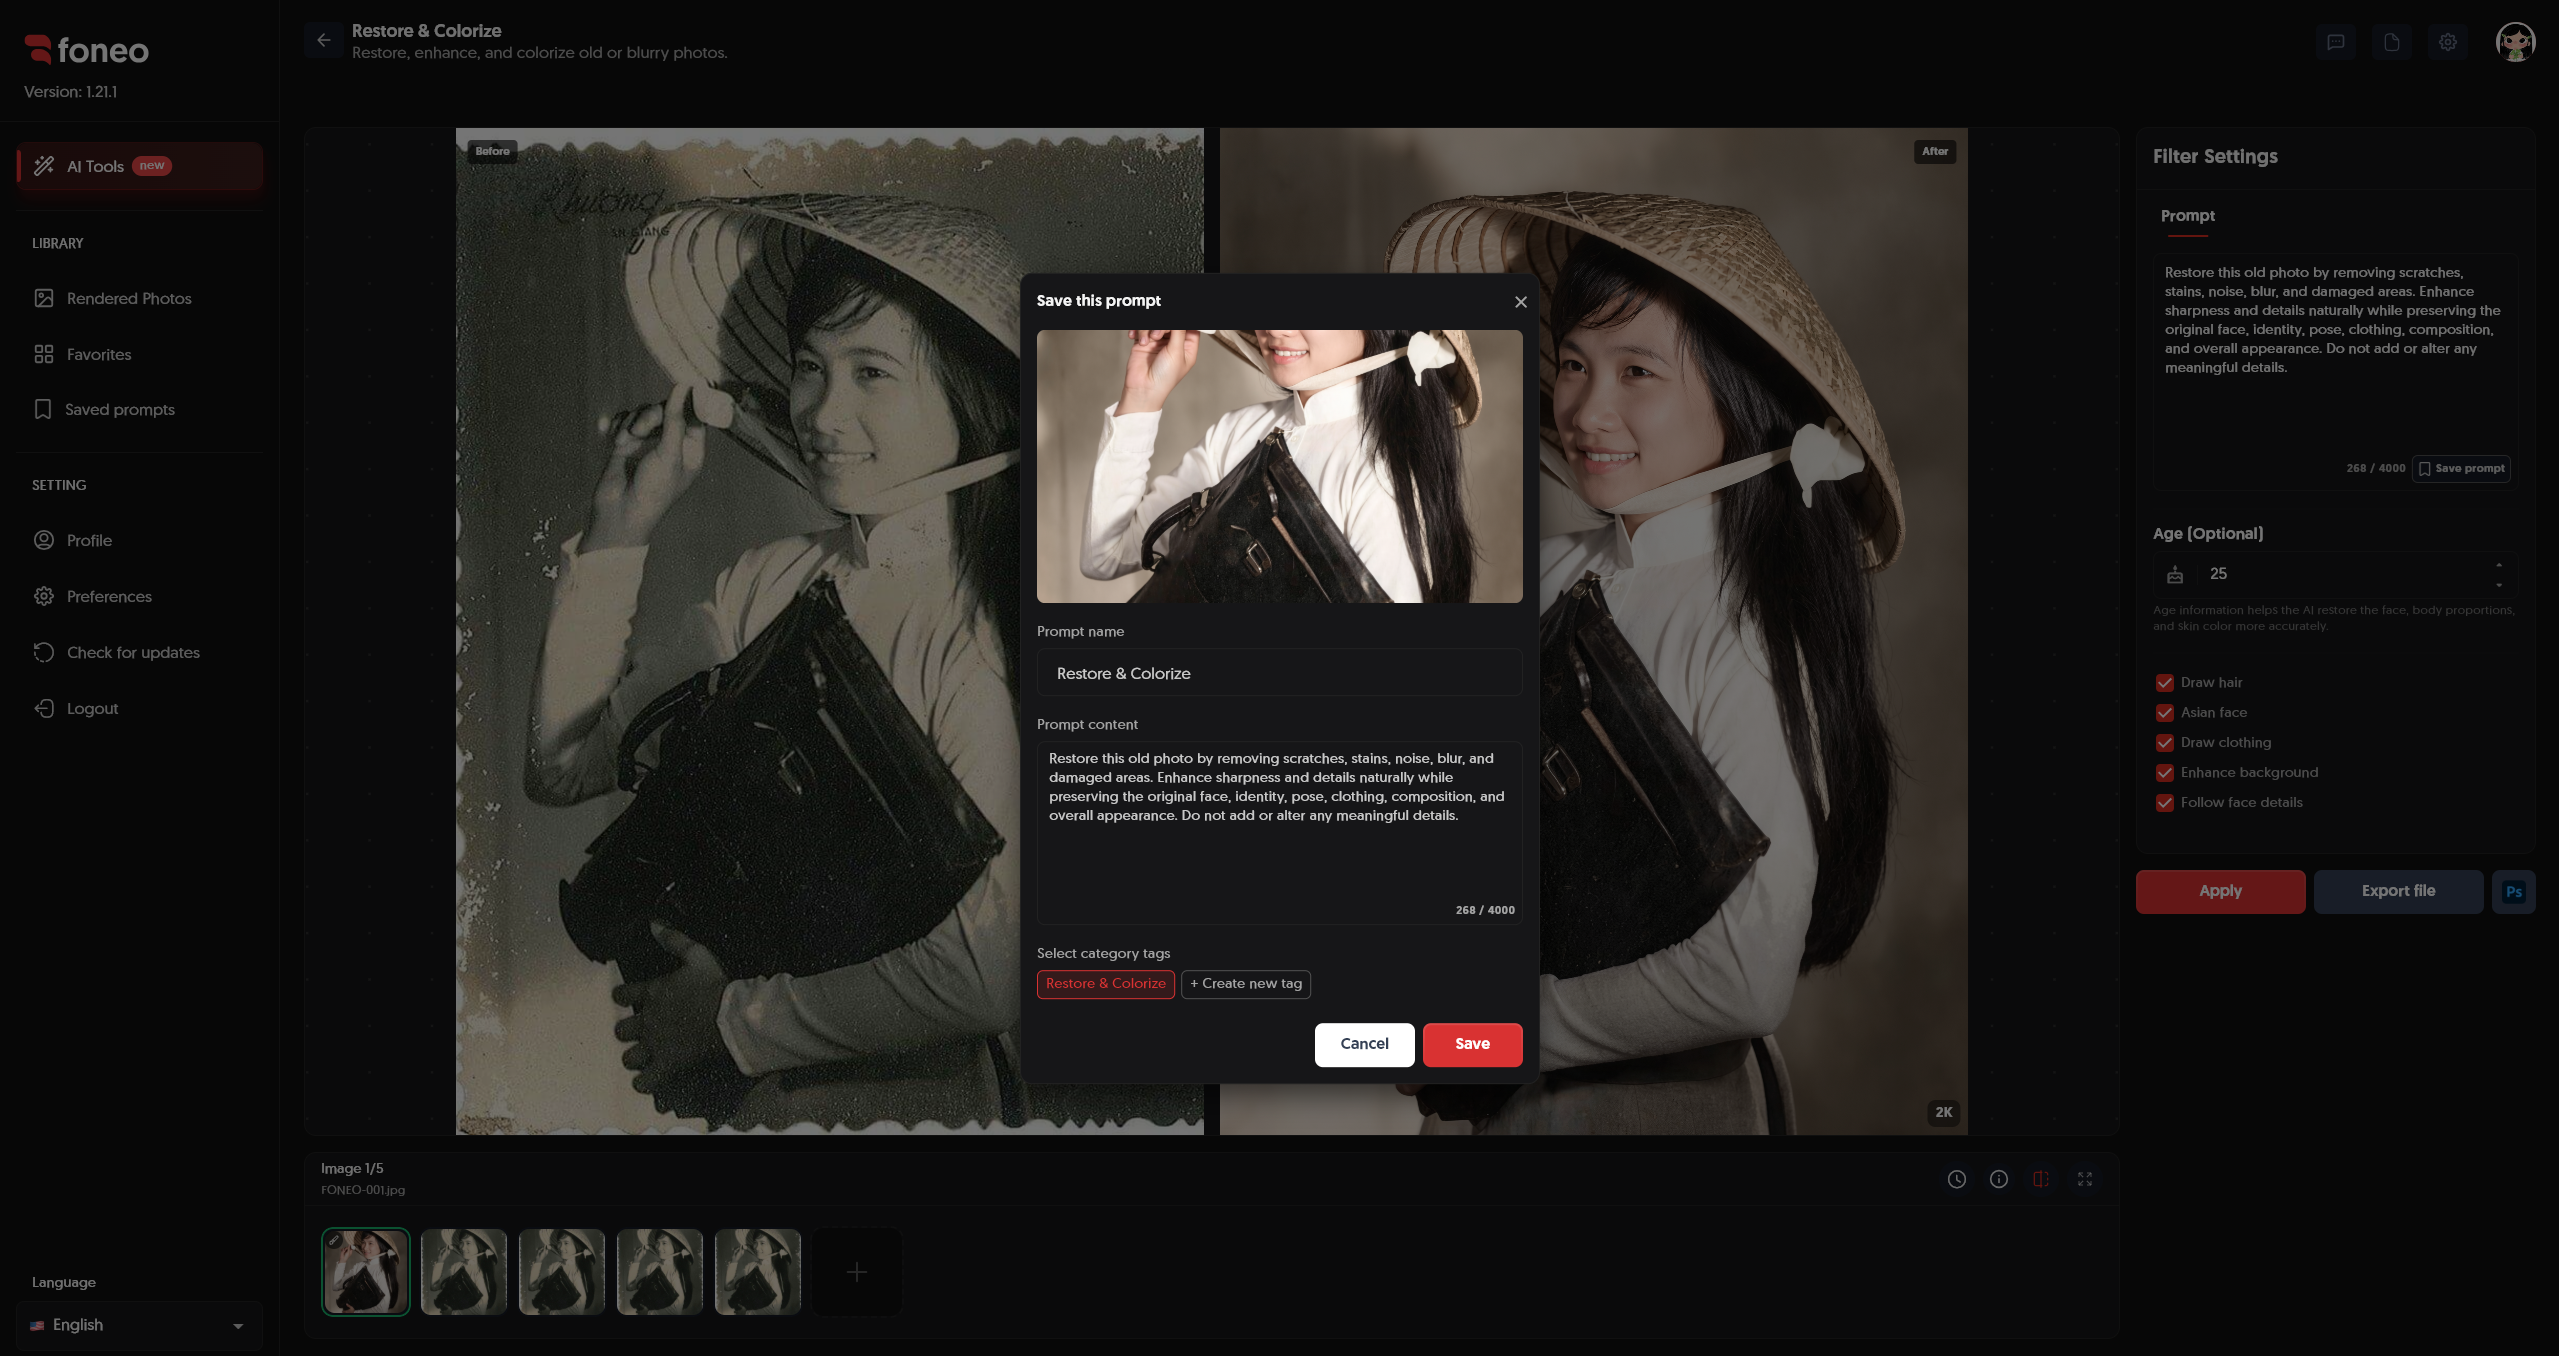
After completing the information, click Save to save the Prompt.
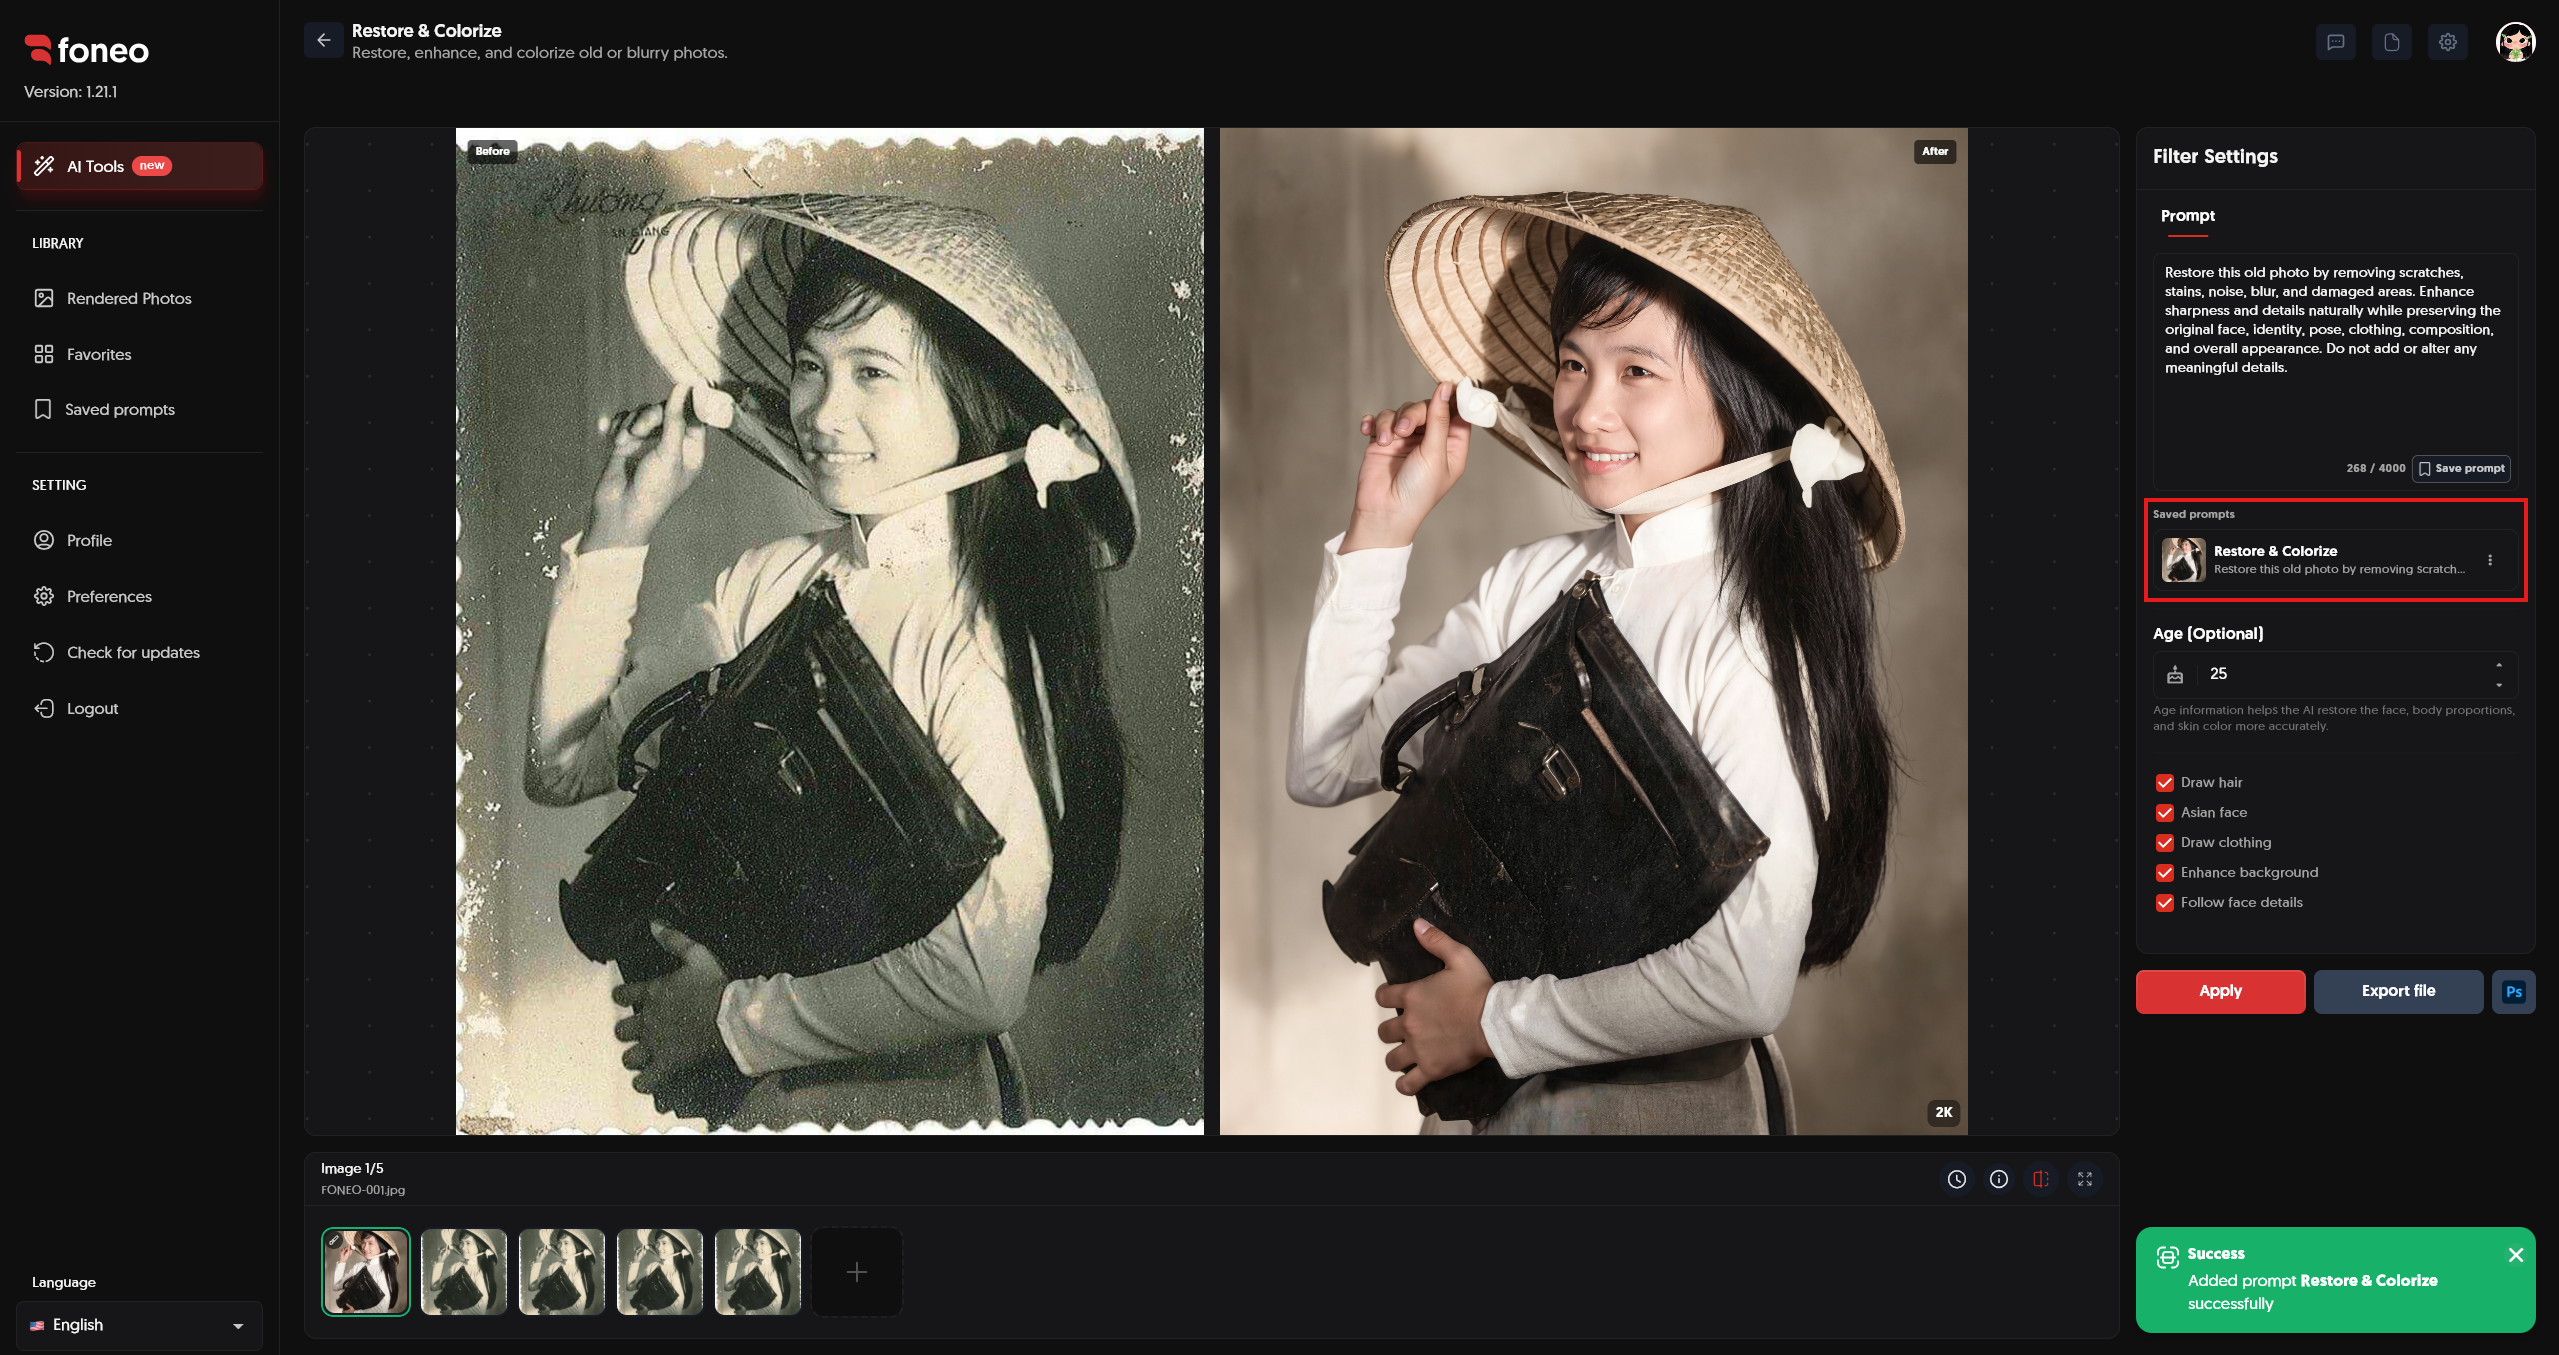
Saved Prompts can be reused for future edits.
Note: Entering and saving a Prompt are both optional. If you only want to automatically restore the photo, you can skip this entire section and click Apply.
4. Enter the Age if Needed
You can enter the age of the person in the photo, for example:
30
Age information gives AI additional context when restoring the face, body proportions, and skin color.
Age is optional, so you can leave it blank if you do not know the exact age or do not need to provide it.
5. Customize the Restoration Details
You can turn each option on or off depending on the condition of the photo.
Draw hair: Helps AI recreate or add hair details when the original hair is blurry, incomplete, or unclear.
Asian face: Provides additional guidance for AI when restoring the face of an Asian subject.
Draw clothing: Helps AI recreate clothing details when the original clothing is blurry, incomplete, or damaged.
Enhance background: Helps improve the quality and details of the background.
Follow face details: Helps AI prioritize preserving the facial characteristics from the original photo during restoration.
These options are all optional. Only enable the options that are appropriate for the condition of the photo.
6. Apply and Export the Photo
After selecting a photo, click Apply to start the restoration process.
You do not need to enter a Prompt, provide an Age, or enable any options in Filter Settings.
- Without customization: Select photo → Apply
- With customization: Select photo → configure the necessary settings → Apply
Foneo will automatically analyze the photo and restore it using AI.
After processing is complete, check the result in the preview area. If you are satisfied with the result, click Export file to export the restored photo.
If you want to continue editing the photo in Photoshop, you can click Ps.
Note: The settings in Filter Settings are only needed when you want more control over how AI restores the photo. If you do not need any customization, simply select the photo and click Apply.
How to Evaluate the Result After Restoration
After AI finishes processing, check the restored photo and compare it with the original.
Pay attention to:
- Face: Are the facial features preserved naturally and consistently?
- Sharpness: Are the details improved without looking overly sharp or unnatural?
- Colors: Are the skin tone, hair, clothing, and other areas balanced?
- Hair: Do the restored hair details look natural?
- Clothing: Do the clothing details remain consistent with the original photo?
- Background: Has the background been improved while still matching the original composition?
- Overall: Does the restored photo preserve the key characteristics of the original?
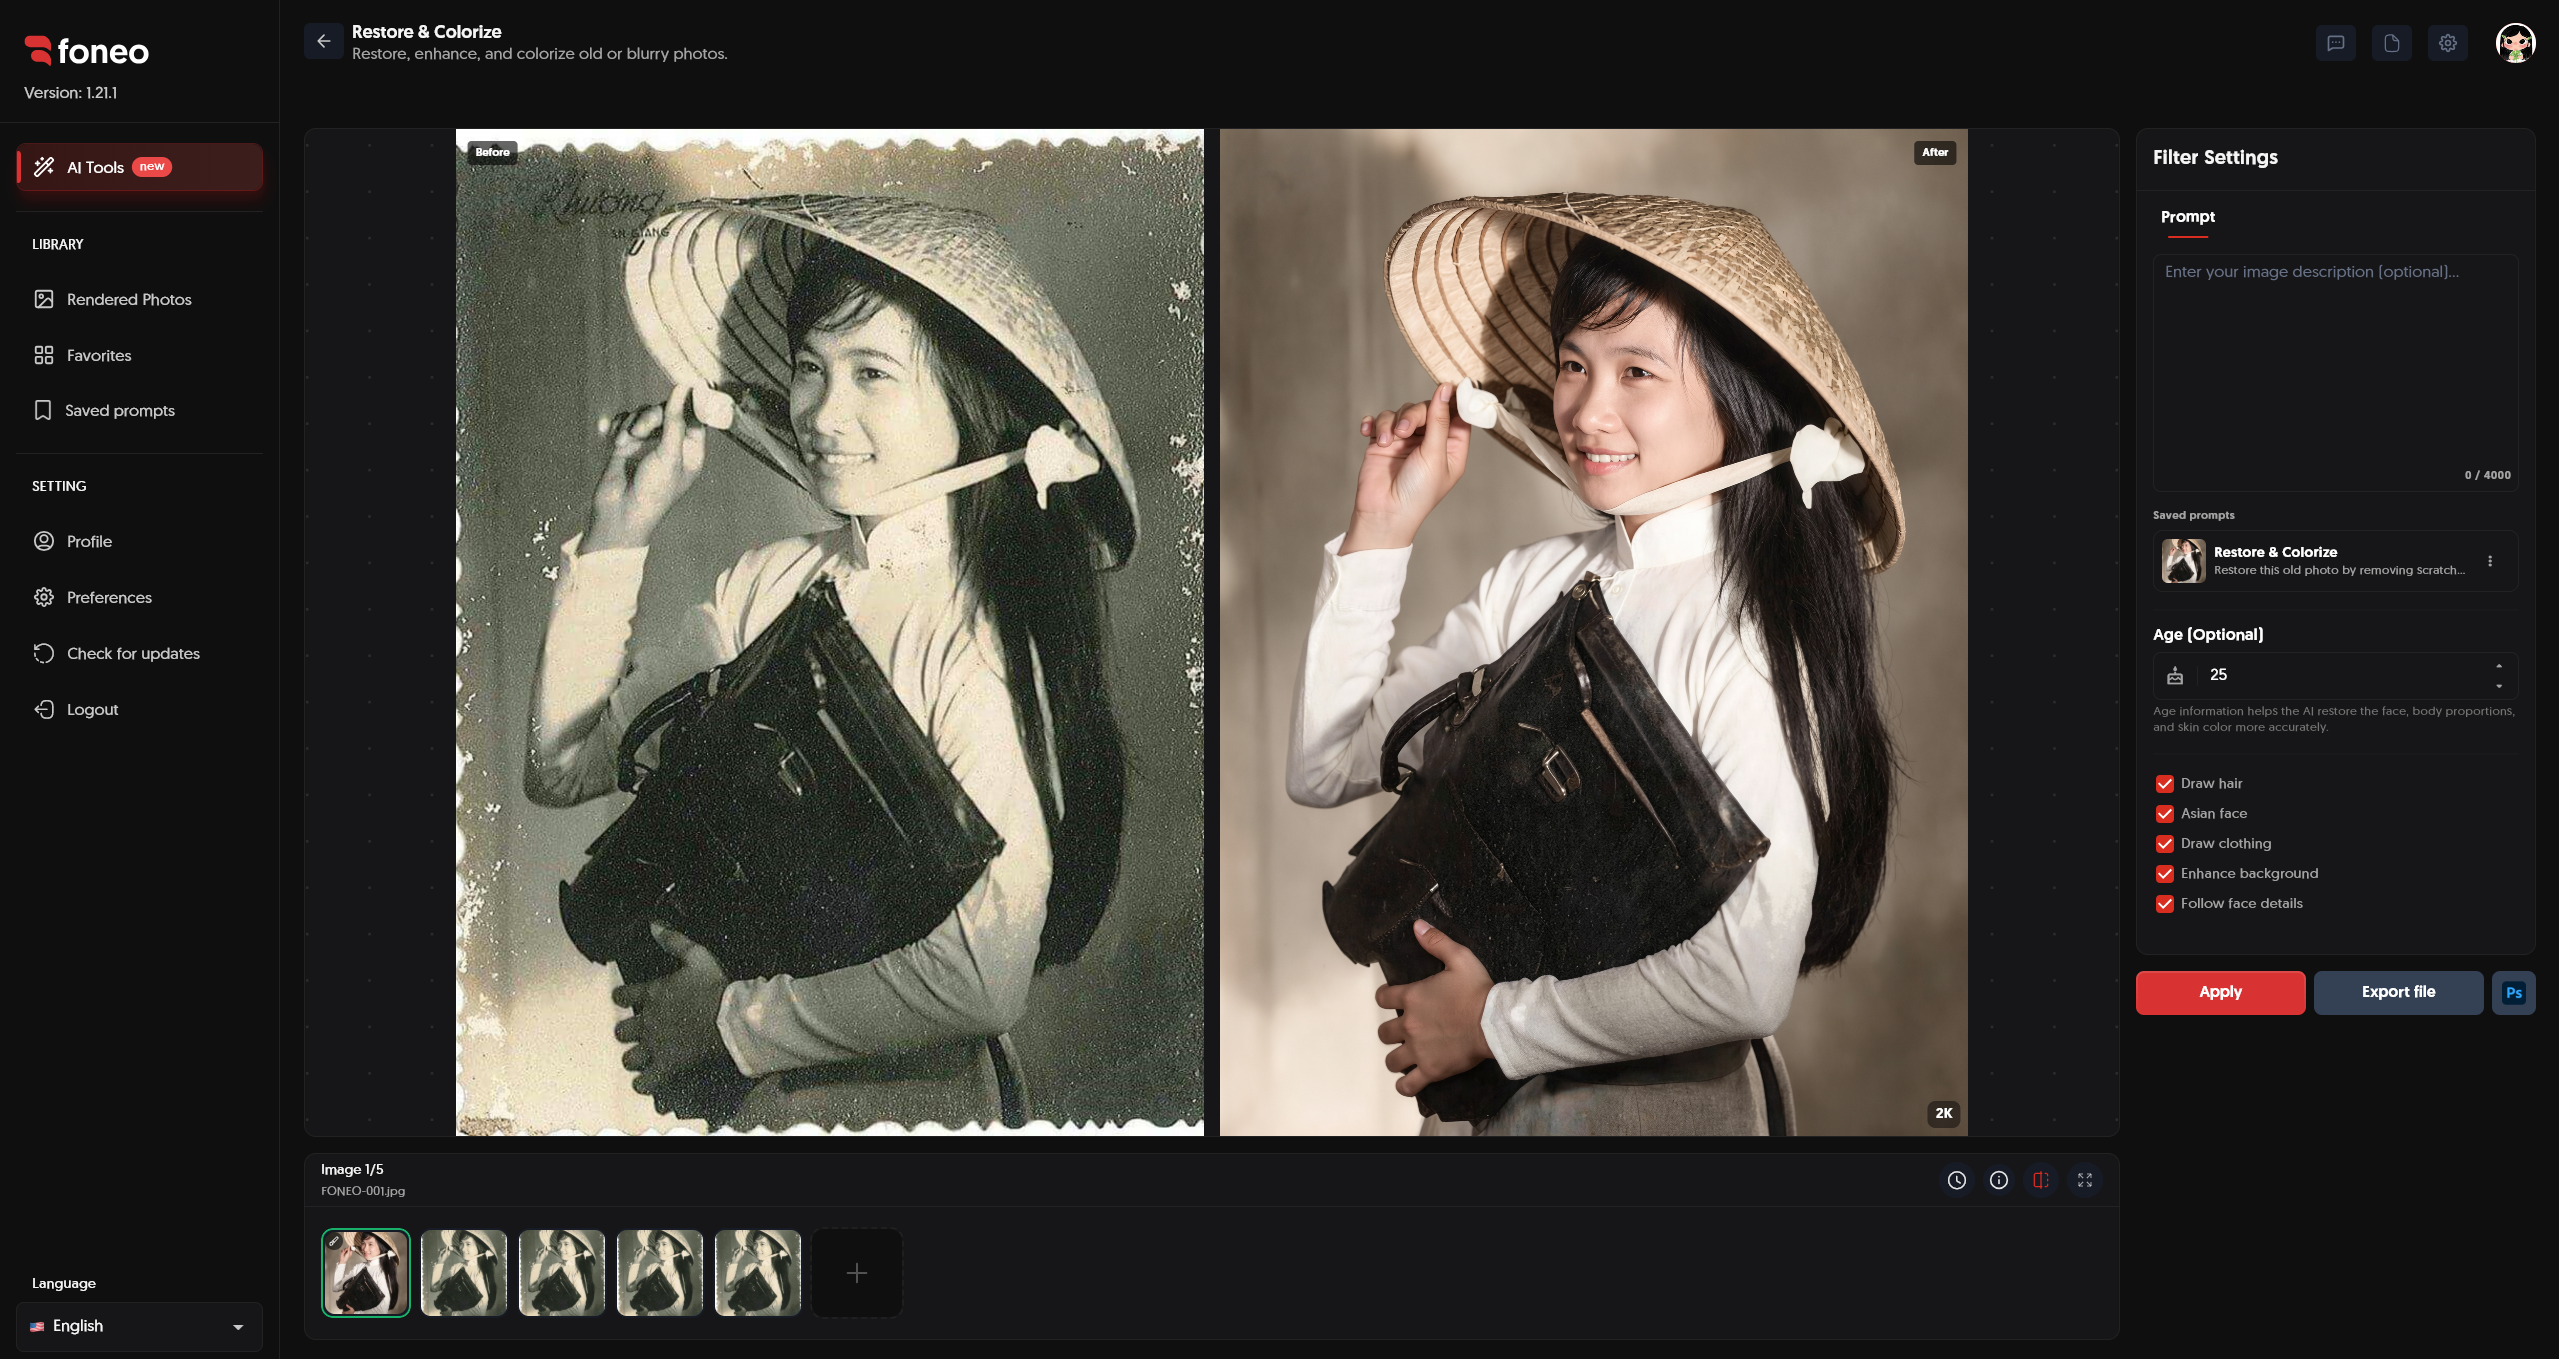
If the result is not suitable, you can return to Filter Settings, adjust the Prompt or other settings, and click Apply to process the photo again.
Tips for Natural-Looking Old Photo Restoration
1. Start with Automatic Restoration
If you are not sure how to configure the settings, you can let Foneo automatically process the photo.
Simply:
Select photo → Apply
Foneo will automatically analyze and restore the photo without requiring a Prompt or any additional settings in Filter Settings.
2. Use the Highest-Quality Original Photo
Use the highest-quality version of the original photo available.
Photos that retain more details give AI more information to analyze and restore blurry, damaged, or missing areas.
3. Clearly Describe What You Want to Restore
If the automatic result is not what you expect, you can use a Prompt to describe more clearly what you want AI to process.
Focus on key requirements such as:
- Restoring damaged areas.
- Improving sharpness and details.
- Restoring natural colors.
- Preserving the original face and characteristics.
- Keeping the original composition and important details unchanged.
4. Save Frequently Used Prompts
If you often use a similar restoration approach, you can click Save prompt to save it.
Use a recognizable Prompt name and a category tag to make it easier to find and reuse later.
5. Only Enable Options That Match the Photo
You do not need to enable every option in Filter Settings. Choose the settings based on the actual condition of the photo:
- Hair is blurry or missing details → Draw hair
- The subject is Asian → Asian face
- Clothing is blurry or missing details → Draw clothing
- The background needs improvement → Enhance background
- You want AI to closely follow the original facial features → Follow face details
6. Use Age Only When Needed
If you know the subject's age, you can enter it in Age to provide AI with additional information during restoration.
If you do not know the exact age, you can leave it blank and use automatic restoration.
7. Check the Result Before Exporting
After processing, compare the original and restored photos to check important details such as the face, colors, hair, clothing, and background.
If the result is not suitable, you can adjust the Prompt or settings in Filter Settings, then click Apply to process the photo again before clicking Export file.
Note: The settings in Filter Settings are optional. If you simply want to restore a photo quickly, you can select the photo → Apply and let Foneo process it automatically.
Frequently Asked Questions
What is Restore & Colorize on Foneo used for?
The Restore & Colorize feature uses AI to restore old or blurry photos while improving image details and colors.
Do I need to enter a Prompt to restore a photo?
No.
Simply select a photo and click Apply. AI will automatically analyze and restore the photo.
A Prompt is only needed when you want to provide more specific instructions for how AI should process the photo.
Do I need to configure the options in Filter Settings?
No.
The options in Filter Settings are additional settings. If you want to restore a photo quickly, simply:
Select photo → Apply
Can I save a Prompt for reuse?
Yes.
After creating a suitable Prompt, you can click Save prompt to save it.
You can name the Prompt, edit its content, and select a category tag to organize it.
What is Age used for?
Age allows you to enter the age of the person in the photo to provide AI with additional information during restoration.
This option is not required.
What is Draw hair used for?
Draw hair helps AI recreate or add hair details when the original hair is blurry, incomplete, or unclear.
What is Asian face used for?
Asian face provides additional guidance for AI when restoring the face of an Asian subject.
What is Draw clothing used for?
Draw clothing helps AI recreate clothing details when the original clothing is blurry, incomplete, or damaged.
What is Enhance background used for?
Enhance background helps improve the quality and details of the background.
What is Follow face details used for?
Follow face details helps AI prioritize preserving the facial characteristics from the original photo during restoration.
Can I use multiple options at the same time?
Yes. You can combine multiple options in Filter Settings depending on the condition of the photo.
However, you do not need to use any of these options if you want to restore the photo automatically.
Can I process the photo again if the result is not suitable?
Yes.
You can adjust the Prompt or change the restoration settings, then click Apply to process the photo again.
Can I edit the photo after restoration?
Yes.
After processing, you can click Export file to export the photo or use Ps to continue editing it in Photoshop.
Related Articles
Foneo · AI Photo Editing
Ready to try it on your own photos?
Download the Foneo app to edit photos with AI in just a few taps, or see the plan that fits your needs.