How to Use Upscale on the Foneo AI Photo Editing App

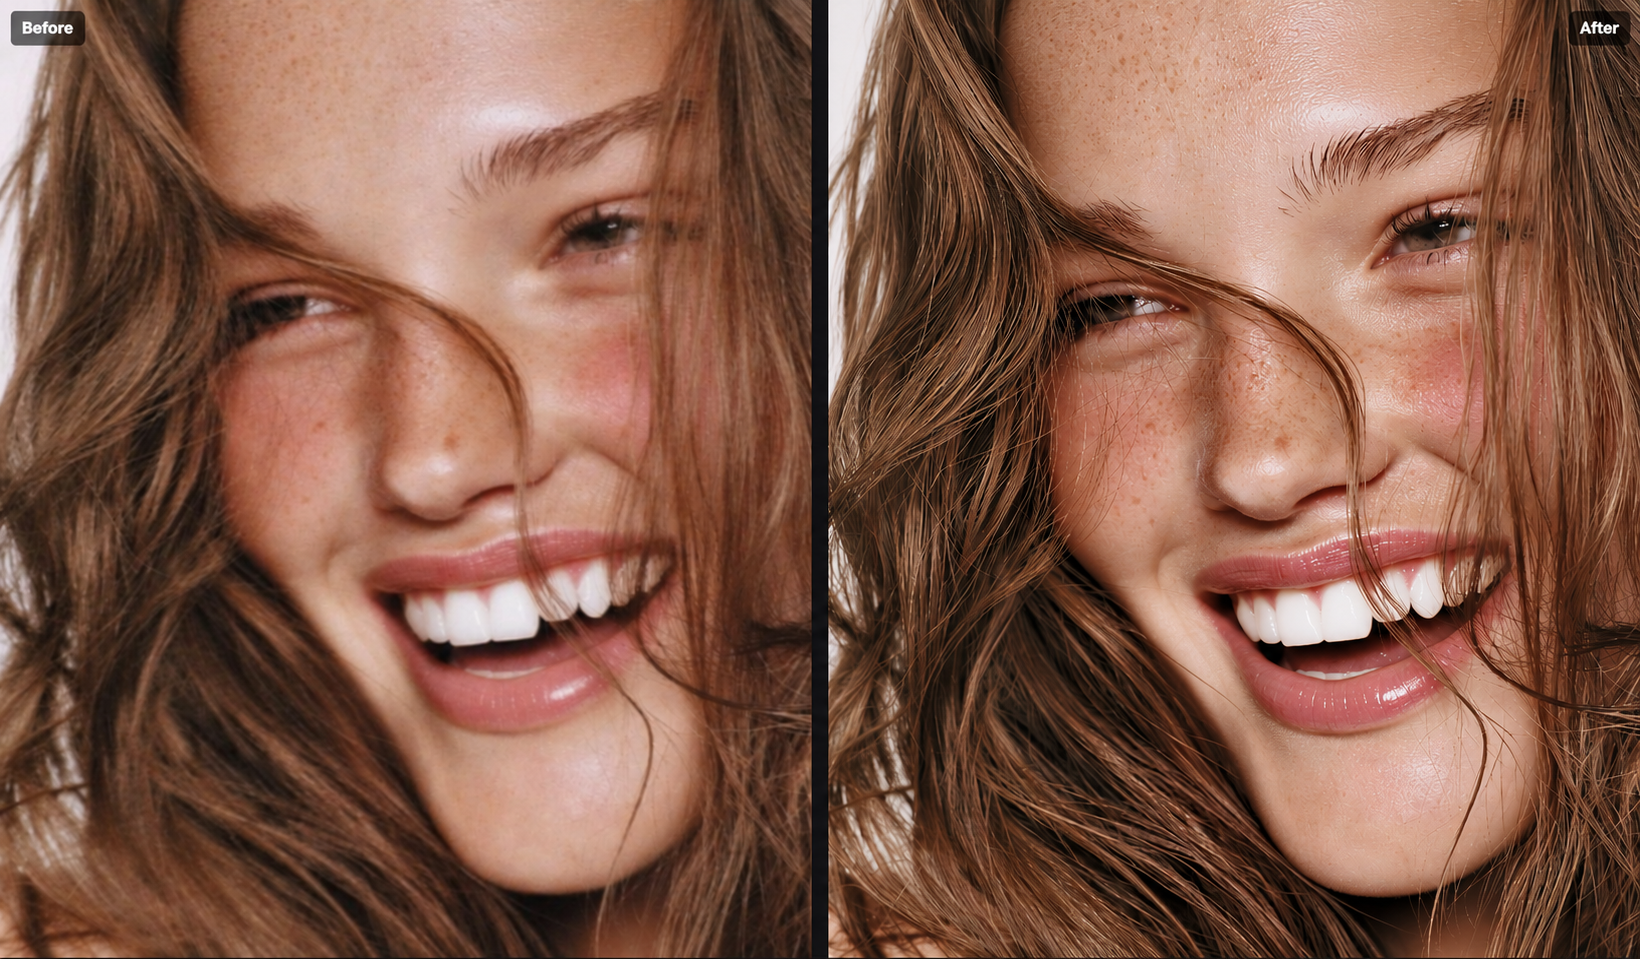
Low-resolution images can be difficult to use for printing, high-quality publishing, or further editing. With the Upscale feature on Foneo, you can enhance images to 2K or 4K using AI while preserving details and sharpness.
Foneo supports two upscaling levels: 2x and 4x, with a maximum resolution of 4K.
Before & After
How to Use Upscale
After uploading an image to Foneo and opening the Upscale feature, follow the steps below.
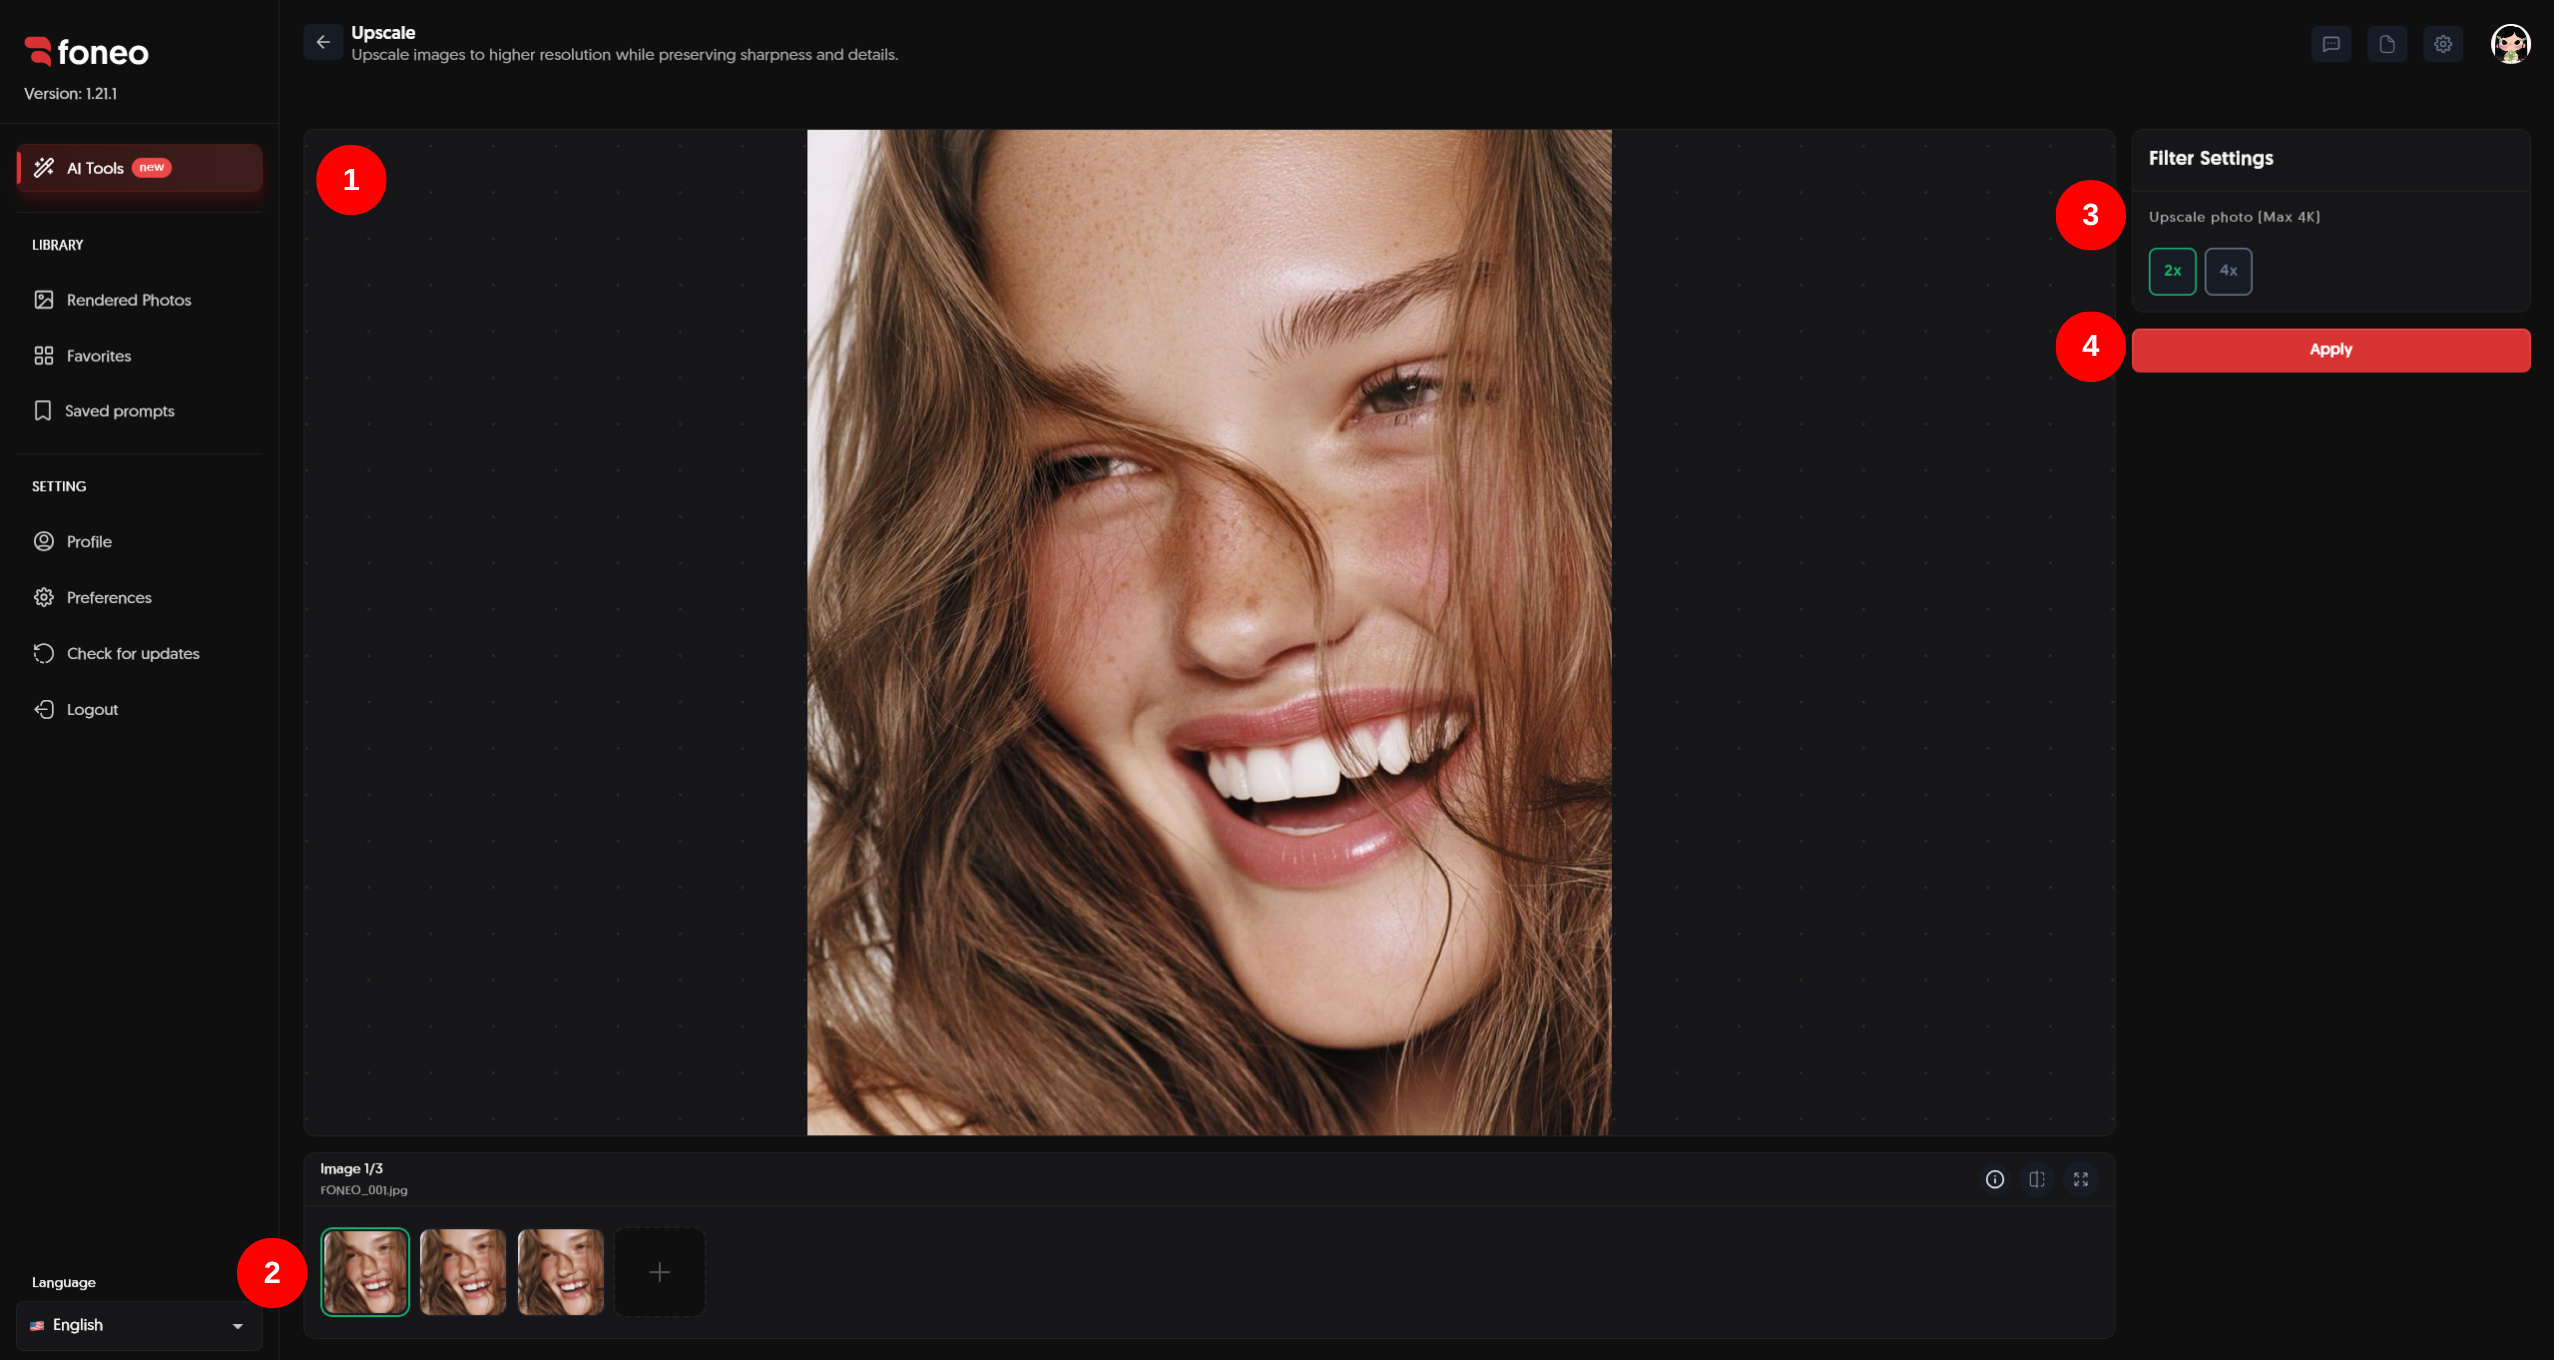
1. Preview Your Image
After uploading an image, it will be displayed in the preview area in the center of the screen.
You can check the image quality before upscaling.
For the best results, use an image with:
- Clear content.
- Relatively complete details.
- Minimal damage or distortion.
The better the input image, the more information Foneo has to preserve natural details during the Upscale process.
2. Select an Image
Uploaded images are displayed in the image area at the bottom of the screen.
You can:
- Select the thumbnail of the image you want to upscale.
- Click + to add a new image.
- Select individual images to preview and process them.
After selecting an image, you can continue setting the resolution level in Filter Settings.
3. Choose the Upscale Level
In Filter Settings, under Upscale photo (Max 4K), you can choose:
- 2x: Upscale the image by 2 times.
- 4x: Upscale the image by 4 times, up to 4K.
Choose the level based on your intended use.
4x is suitable when you need a higher-resolution image for further editing, publishing, or situations that require higher image quality.
4. Apply
After choosing the Upscale level, click Apply to start AI processing.
Foneo will analyze the image and add the necessary details during the upscaling process.
While processing, the system may display a processing status.
Once processing is complete, the result will be displayed in the preview area.
5. Review the Result Before Exporting
After the Upscale process is complete, review the image before exporting.
You can use the Before / After view to compare the original image with the upscaled result.
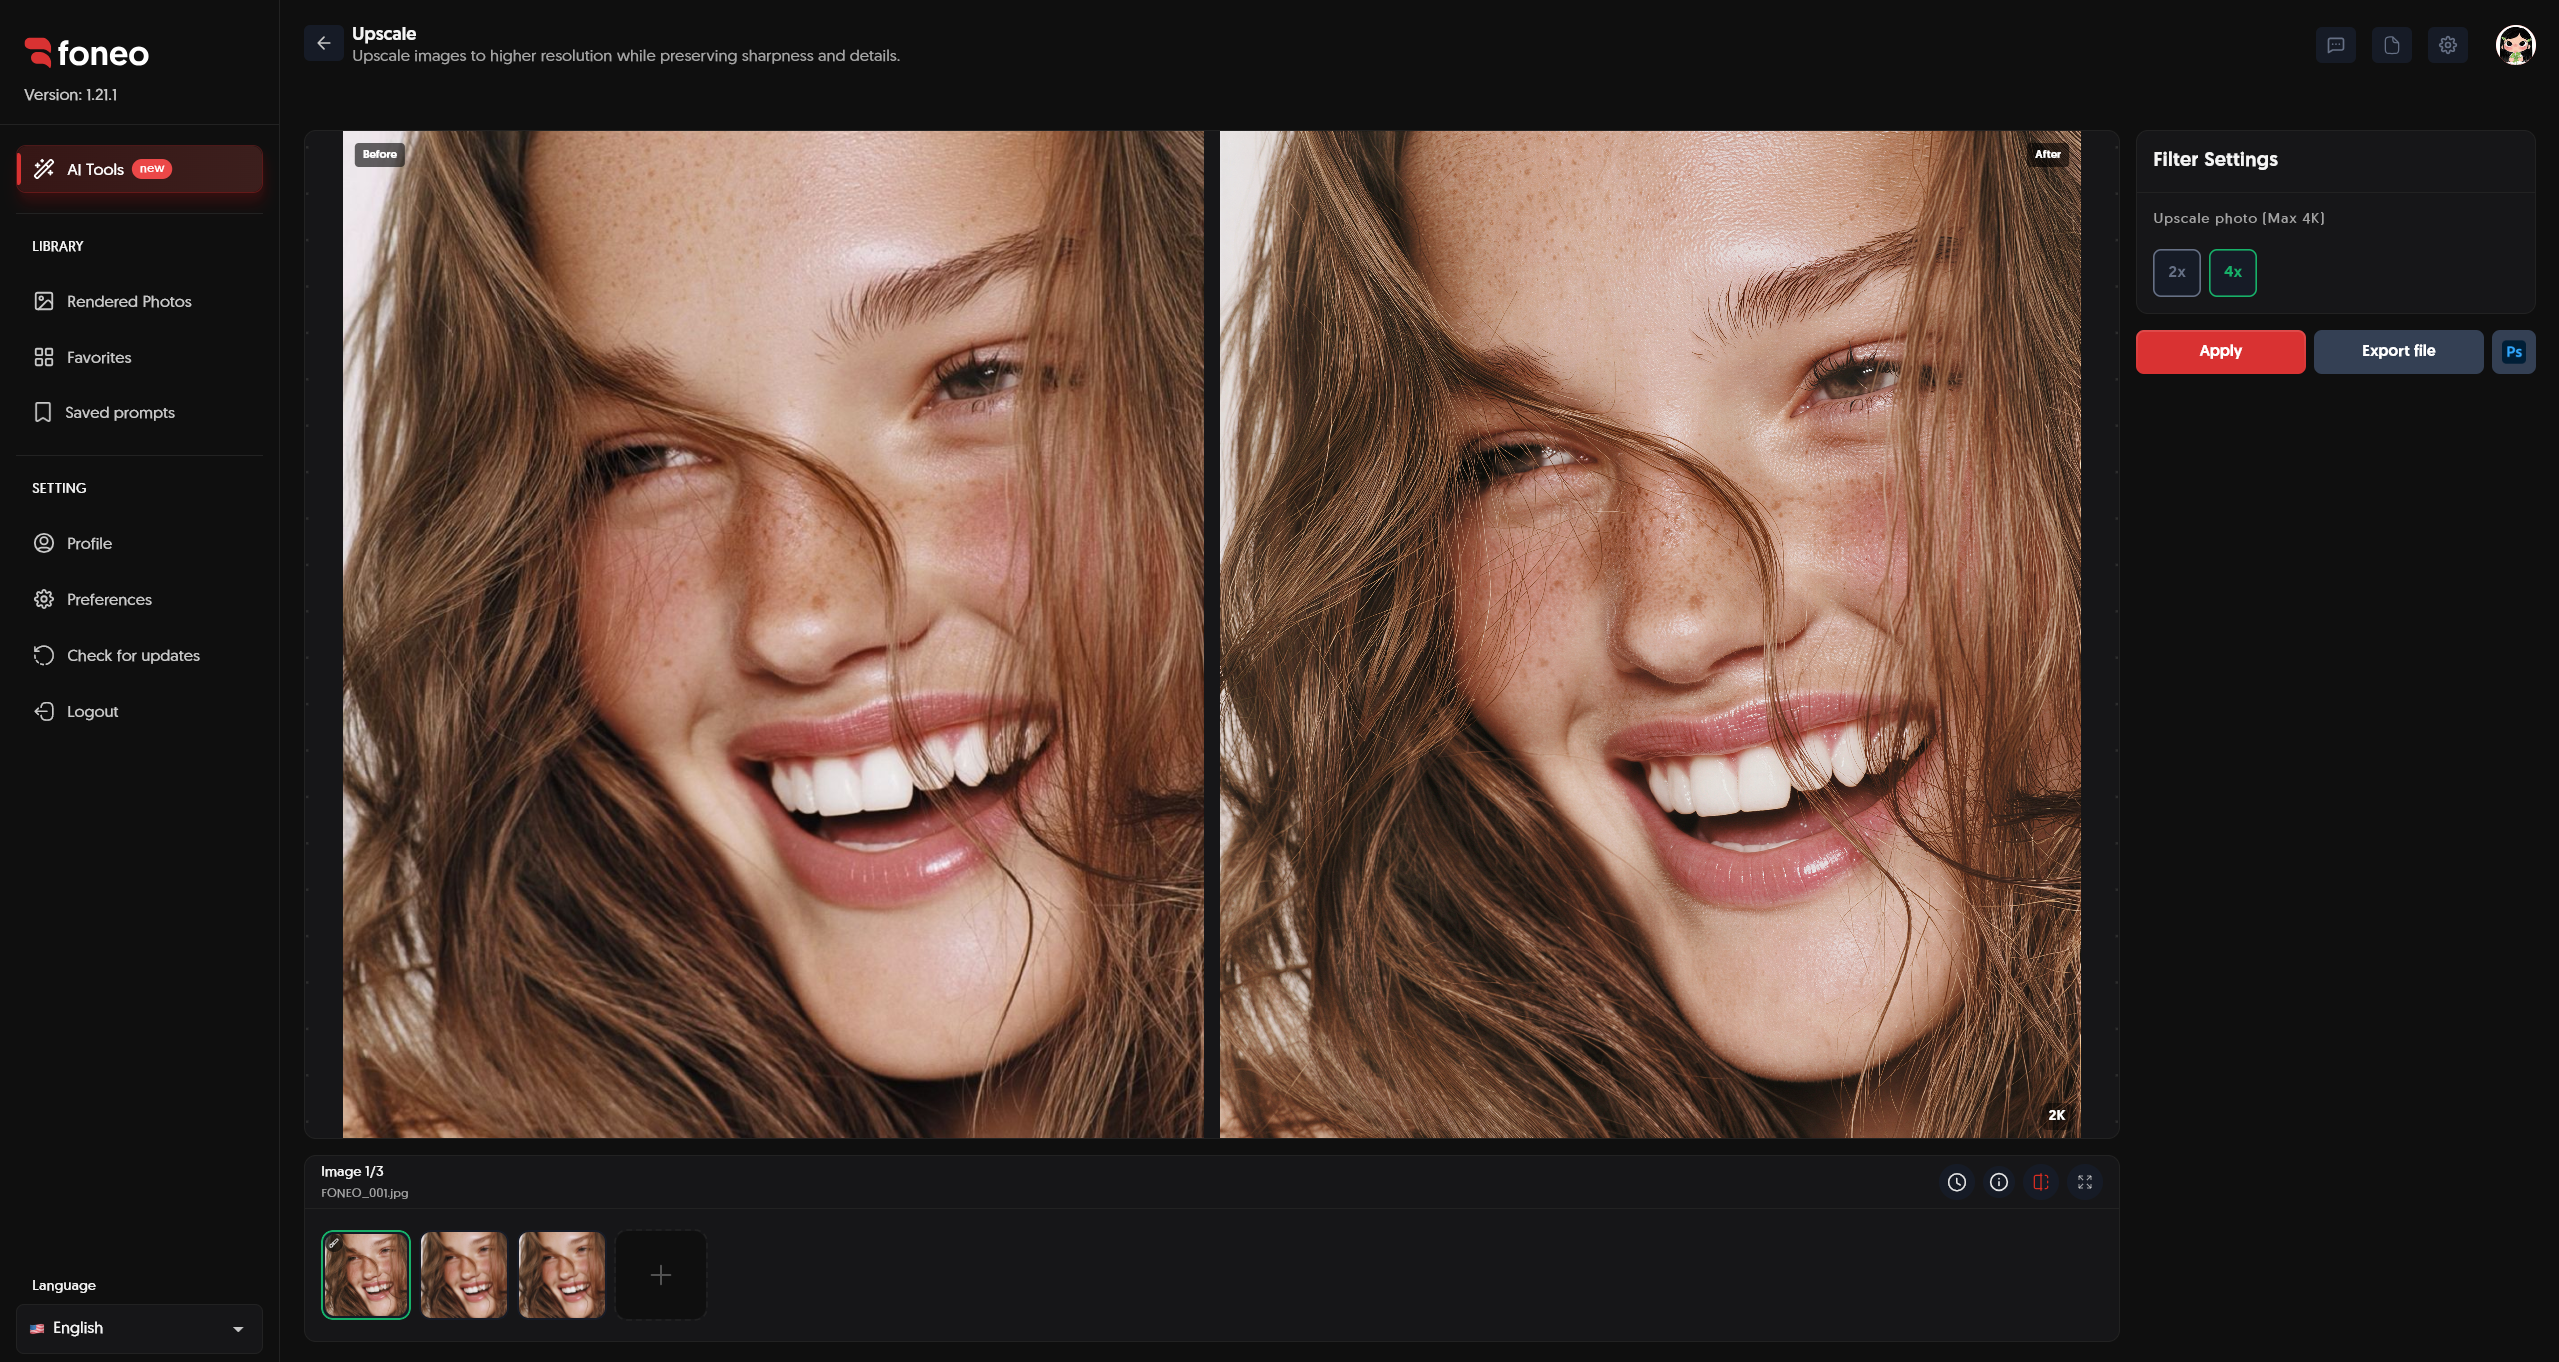
Pay close attention to areas with many details, such as:
- Face.
- Eyes and eyelashes.
- Hair.
- Skin.
- Teeth.
- Small details in the image.
If the result is not suitable, you can try 2x or 4x again depending on your needs.
6. Export file / Ps
Once you are satisfied with the result, click Export file to export the upscaled image.
You can also click Ps if you want to continue editing the image in Photoshop.
Before exporting, check:
- Sharpness.
- Facial details.
- Hair and other detailed areas.
- Image size and resolution.
- Overall image quality.
How to Evaluate the Result After Upscale
After Foneo finishes processing, check the result at a higher zoom level to identify changes more easily.
- Sharpness: Details should appear clearer than in the original image without looking overly sharpened or artificial.
- Facial details: If the image contains a person, check the eyes, nose, lips, skin, and facial features to ensure they remain natural.
- Hair details: Check individual hair strands and smaller hair areas to make sure the details are reconstructed appropriately.
- Small details: Areas such as teeth, fabric, patterns, or small objects should be checked carefully after processing.
- Overall: The upscaled image should have better sharpness while maintaining the natural appearance and details of the original image.
Tips for Creating Natural Upscaled Images
1. Use the Highest-Quality Original Image
Use the highest-quality version of the image available.
The clearer the original image, the more information Foneo has for AI to analyze and reconstruct details.
2. Choose 2x When You Only Need a Moderate Resolution Increase
If the original image is already relatively clear and you only need to increase its size, choose 2x.
This level is suitable when you want to improve the resolution without increasing it to the maximum level.
3. Choose 4x When You Need a Higher-Resolution Image
If you need a higher-resolution image, choose 4x.
Foneo supports upscaling up to 4K.
4. Check Areas with Fine Details Carefully
After Upscale, carefully check the face, hair, eyes, teeth, and other small details.
These areas are more likely to show changes after AI reconstructs the image.
5. Compare Before and After
Use the Before / After view to directly compare the original image with the upscaled result.
This makes it easier to identify improvements in sharpness and detail.
6. You Do Not Always Need to Choose 4x
4x is not necessary for every image.
Choose 2x or 4x based on the quality of the original image and your intended use.
7. Check the Image Before Exporting
Before clicking Export file, review the entire image.
If any area is not suitable, you can change the Upscale level and click Apply to process the image again.
Frequently Asked Questions
What is the Upscale feature used for?
Upscale uses AI to increase image resolution while improving sharpness and adding details to the image.
What Upscale levels does Foneo support?
Foneo supports two levels:
- 2x
- 4x
The maximum supported resolution is 4K.
Should I choose 2x or 4x?
You can choose based on the quality of the original image and your intended use.
2x is suitable when you need a moderate resolution increase.
4x is suitable when you need a higher-resolution image, up to 4K.
Does Upscale change the original image content?
The Upscale feature focuses on increasing resolution, improving sharpness, and adding details to the image. You should review the result after processing to make sure it meets your needs.
Can I process multiple images?
You can upload multiple images to the image area and select each image individually for processing.
Can I process an image again if the result is not suitable?
Yes.
You can change the level to 2x or 4x, then click Apply to process the image again.
Can I edit the image after using Upscale?
Yes.
After processing is complete, you can click Export file to export the image or click Ps to continue editing in Photoshop.
Does Upscale support images up to 4K?
Yes. Foneo supports the 4x level with a maximum resolution of 4K.
Related Articles
- How to Use Portrait Effects on the Foneo AI Photo Editing App
- How to Use Lighting Effects on the Foneo AI Photo Editing App
- How to Use Restore & Colorize on the Foneo AI Photo Editing App
- How to Use Weather Effects on the Foneo AI Photo Editing App
- How to Use Surface Transform on the Foneo AI Photo Editing App
- How to Use ID Photo on the Foneo AI Photo Editing App
Foneo · AI Photo Editing
Ready to try it on your own photos?
Download the Foneo app to edit photos with AI in just a few taps, or see the plan that fits your needs.