How to Use Prompt Edit on the Foneo AI Photo Editing App
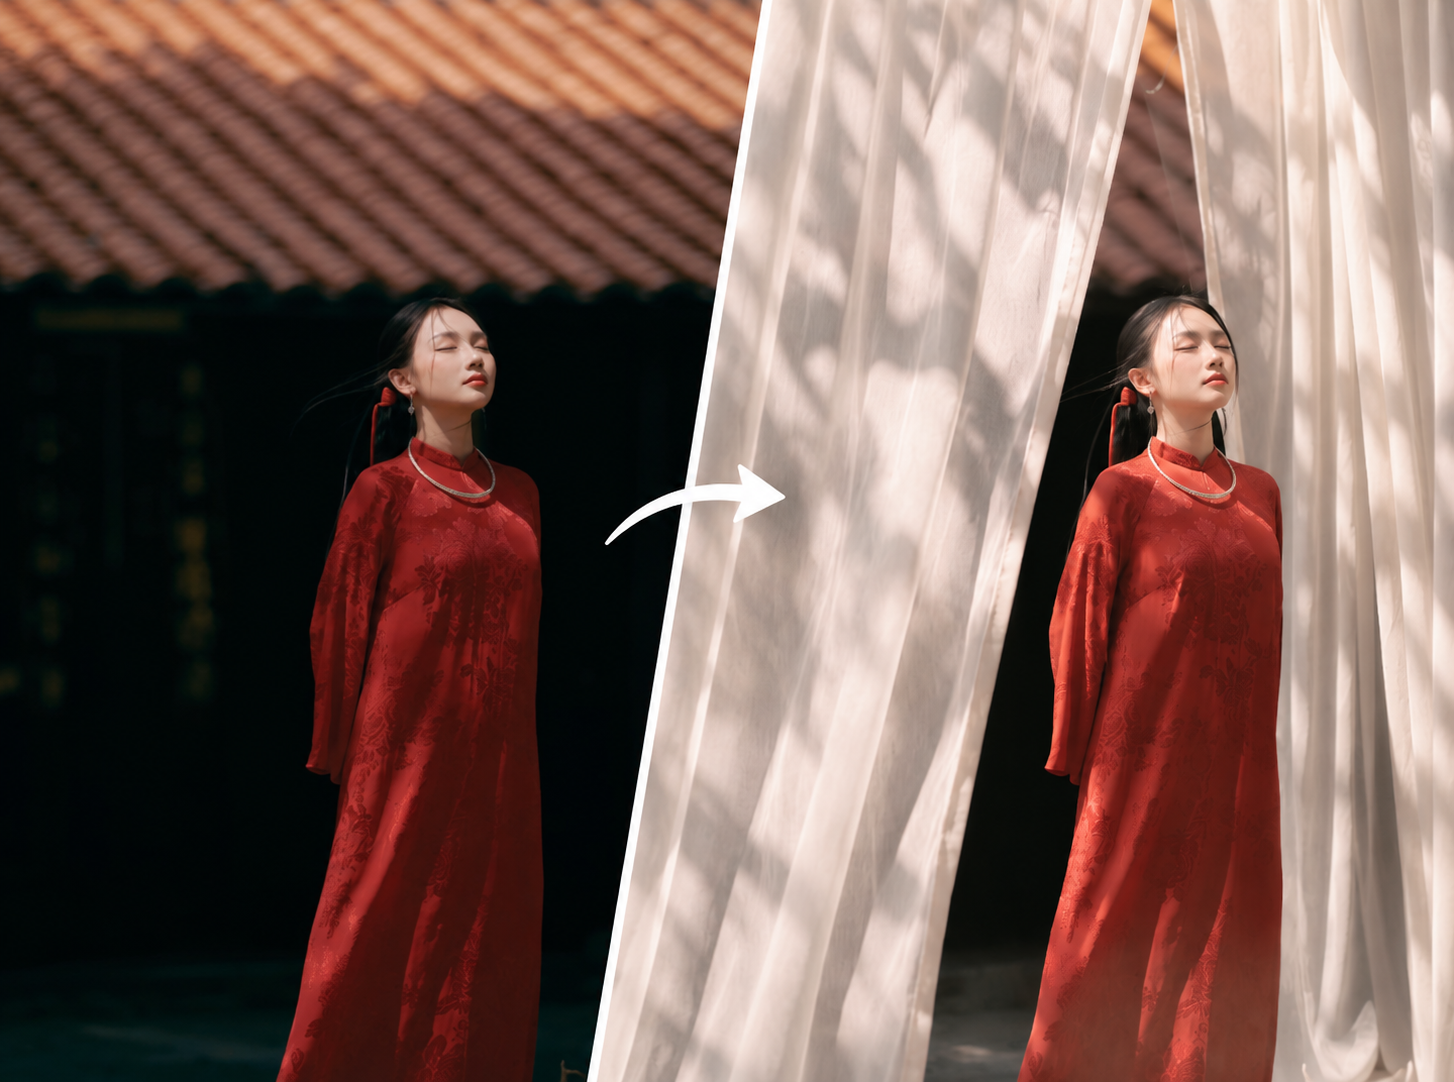
Prompt Edit is a feature that allows you to use AI to edit images based on instructions described in text.
With Prompt Edit on Foneo, you can describe what you want to change and create an image that matches your needs without performing complicated editing steps.
Before & After
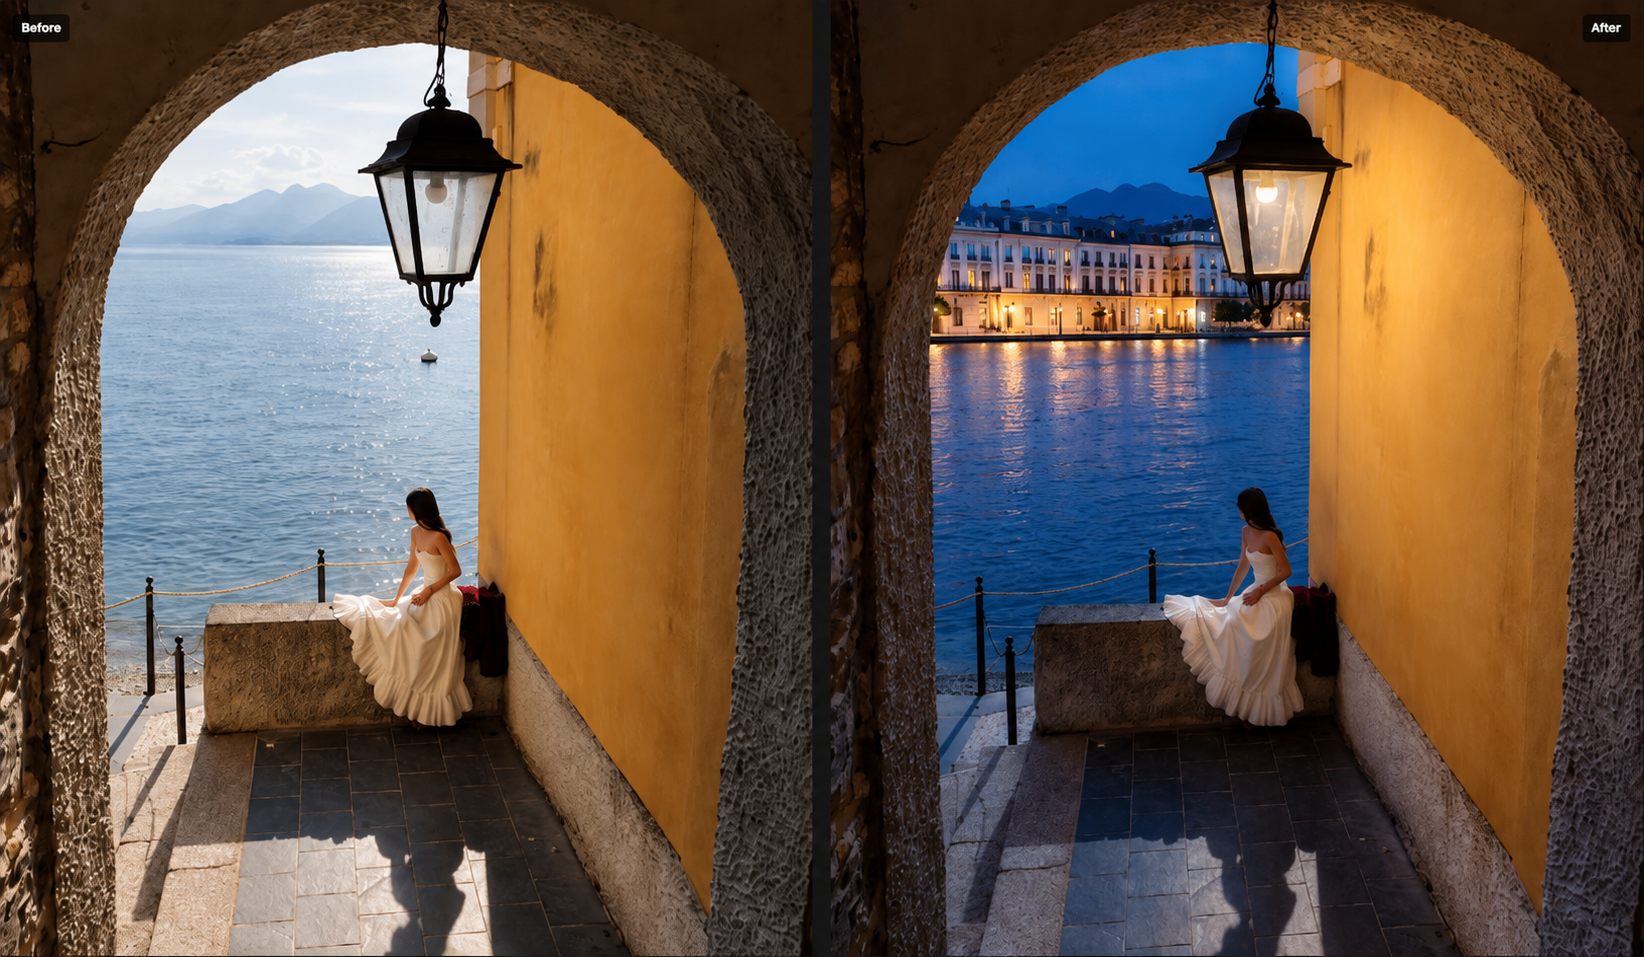
How to Use Prompt Edit
To get started, upload the image you want to edit to Foneo and open the Prompt Edit feature.
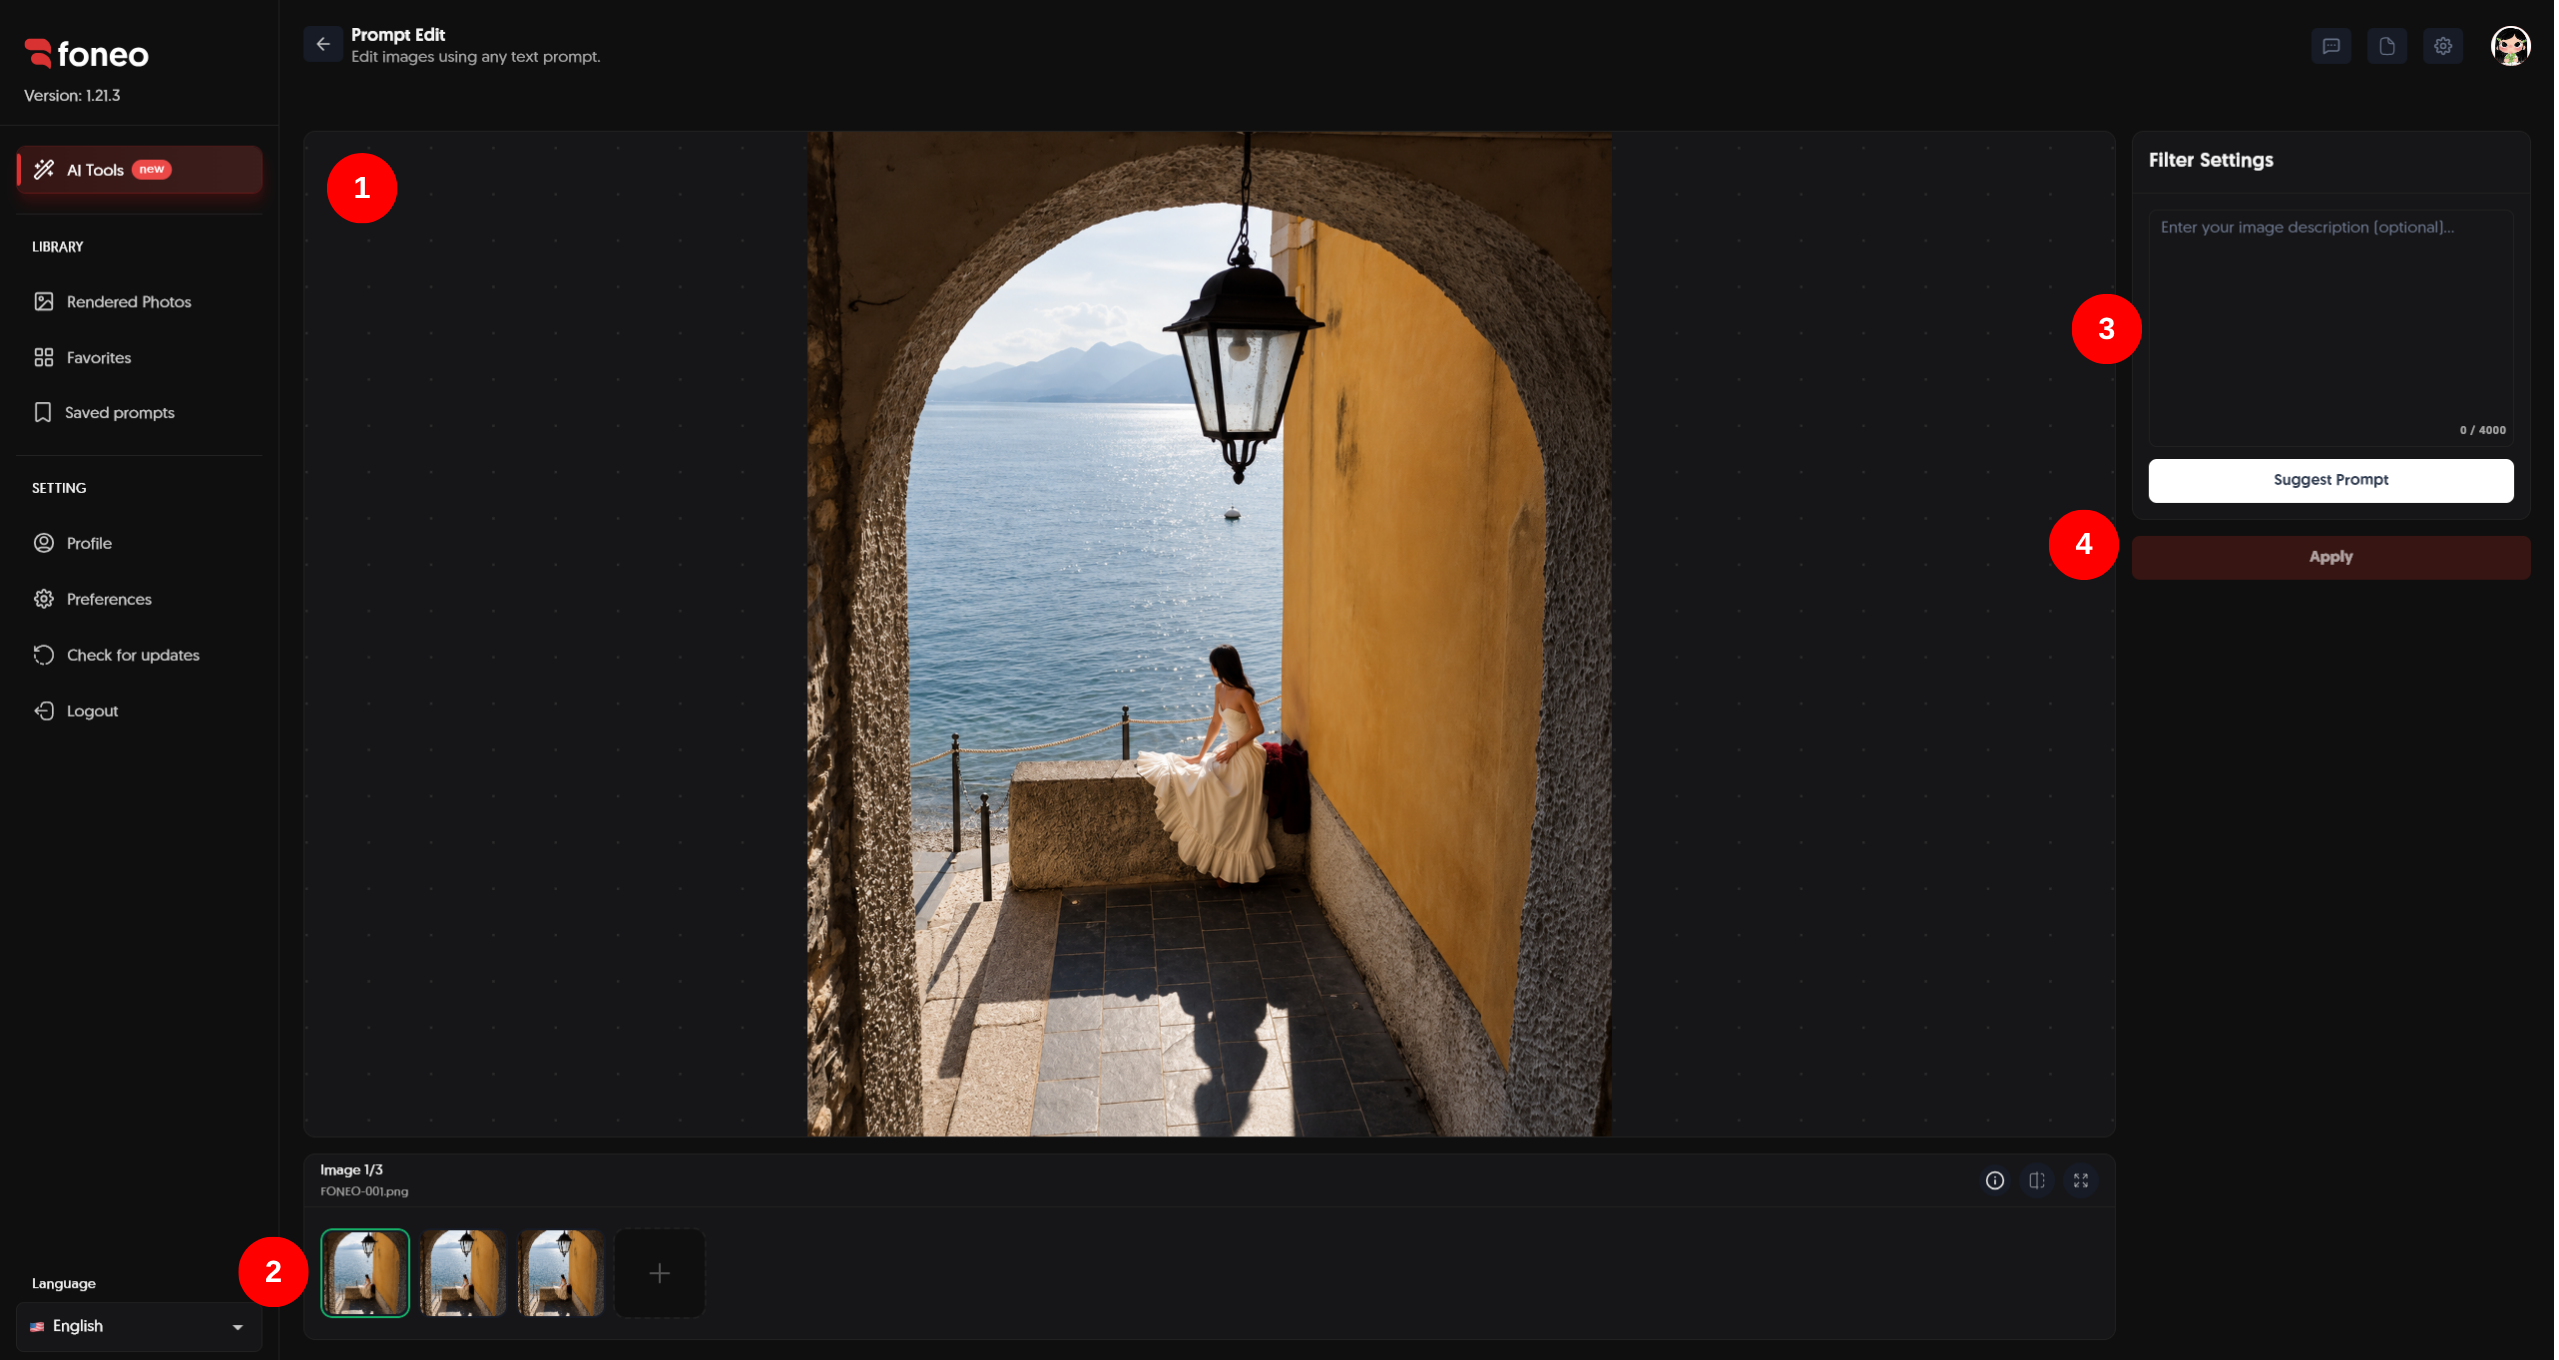
1. Add an Image to Edit
First, upload the image you want to edit to Foneo.
After uploading, the image will be displayed in the preview area in the center of the screen. You can review the image before starting the editing process.
2. Select the Image to Edit
Uploaded images will be displayed as thumbnails below the preview area.
- Click a thumbnail to select the image you want to edit.
- Click + to add a new image.
- Review the selected image before entering your editing instructions.
After selecting an image, go to Filter Settings to enter your editing instructions.
3. Enter a Prompt and Describe Your Editing Request
In Filter Settings, select the Prompt tab and enter your editing request in the description field.
You can describe specifically what you want to change in the image.
For example:
Transform the background into a natural blue-hour cityscape while preserving the original subject completely unchanged.
Or:
Create a high-fashion editorial photoshoot with a few delicate translucent fabric layers in the foreground, midground, and background.
You can describe elements such as:
- What you want to change.
- The area you want to edit.
- The desired visual style.
- Lighting.
- Colors.
- Atmosphere or setting.
- Details that should remain unchanged.
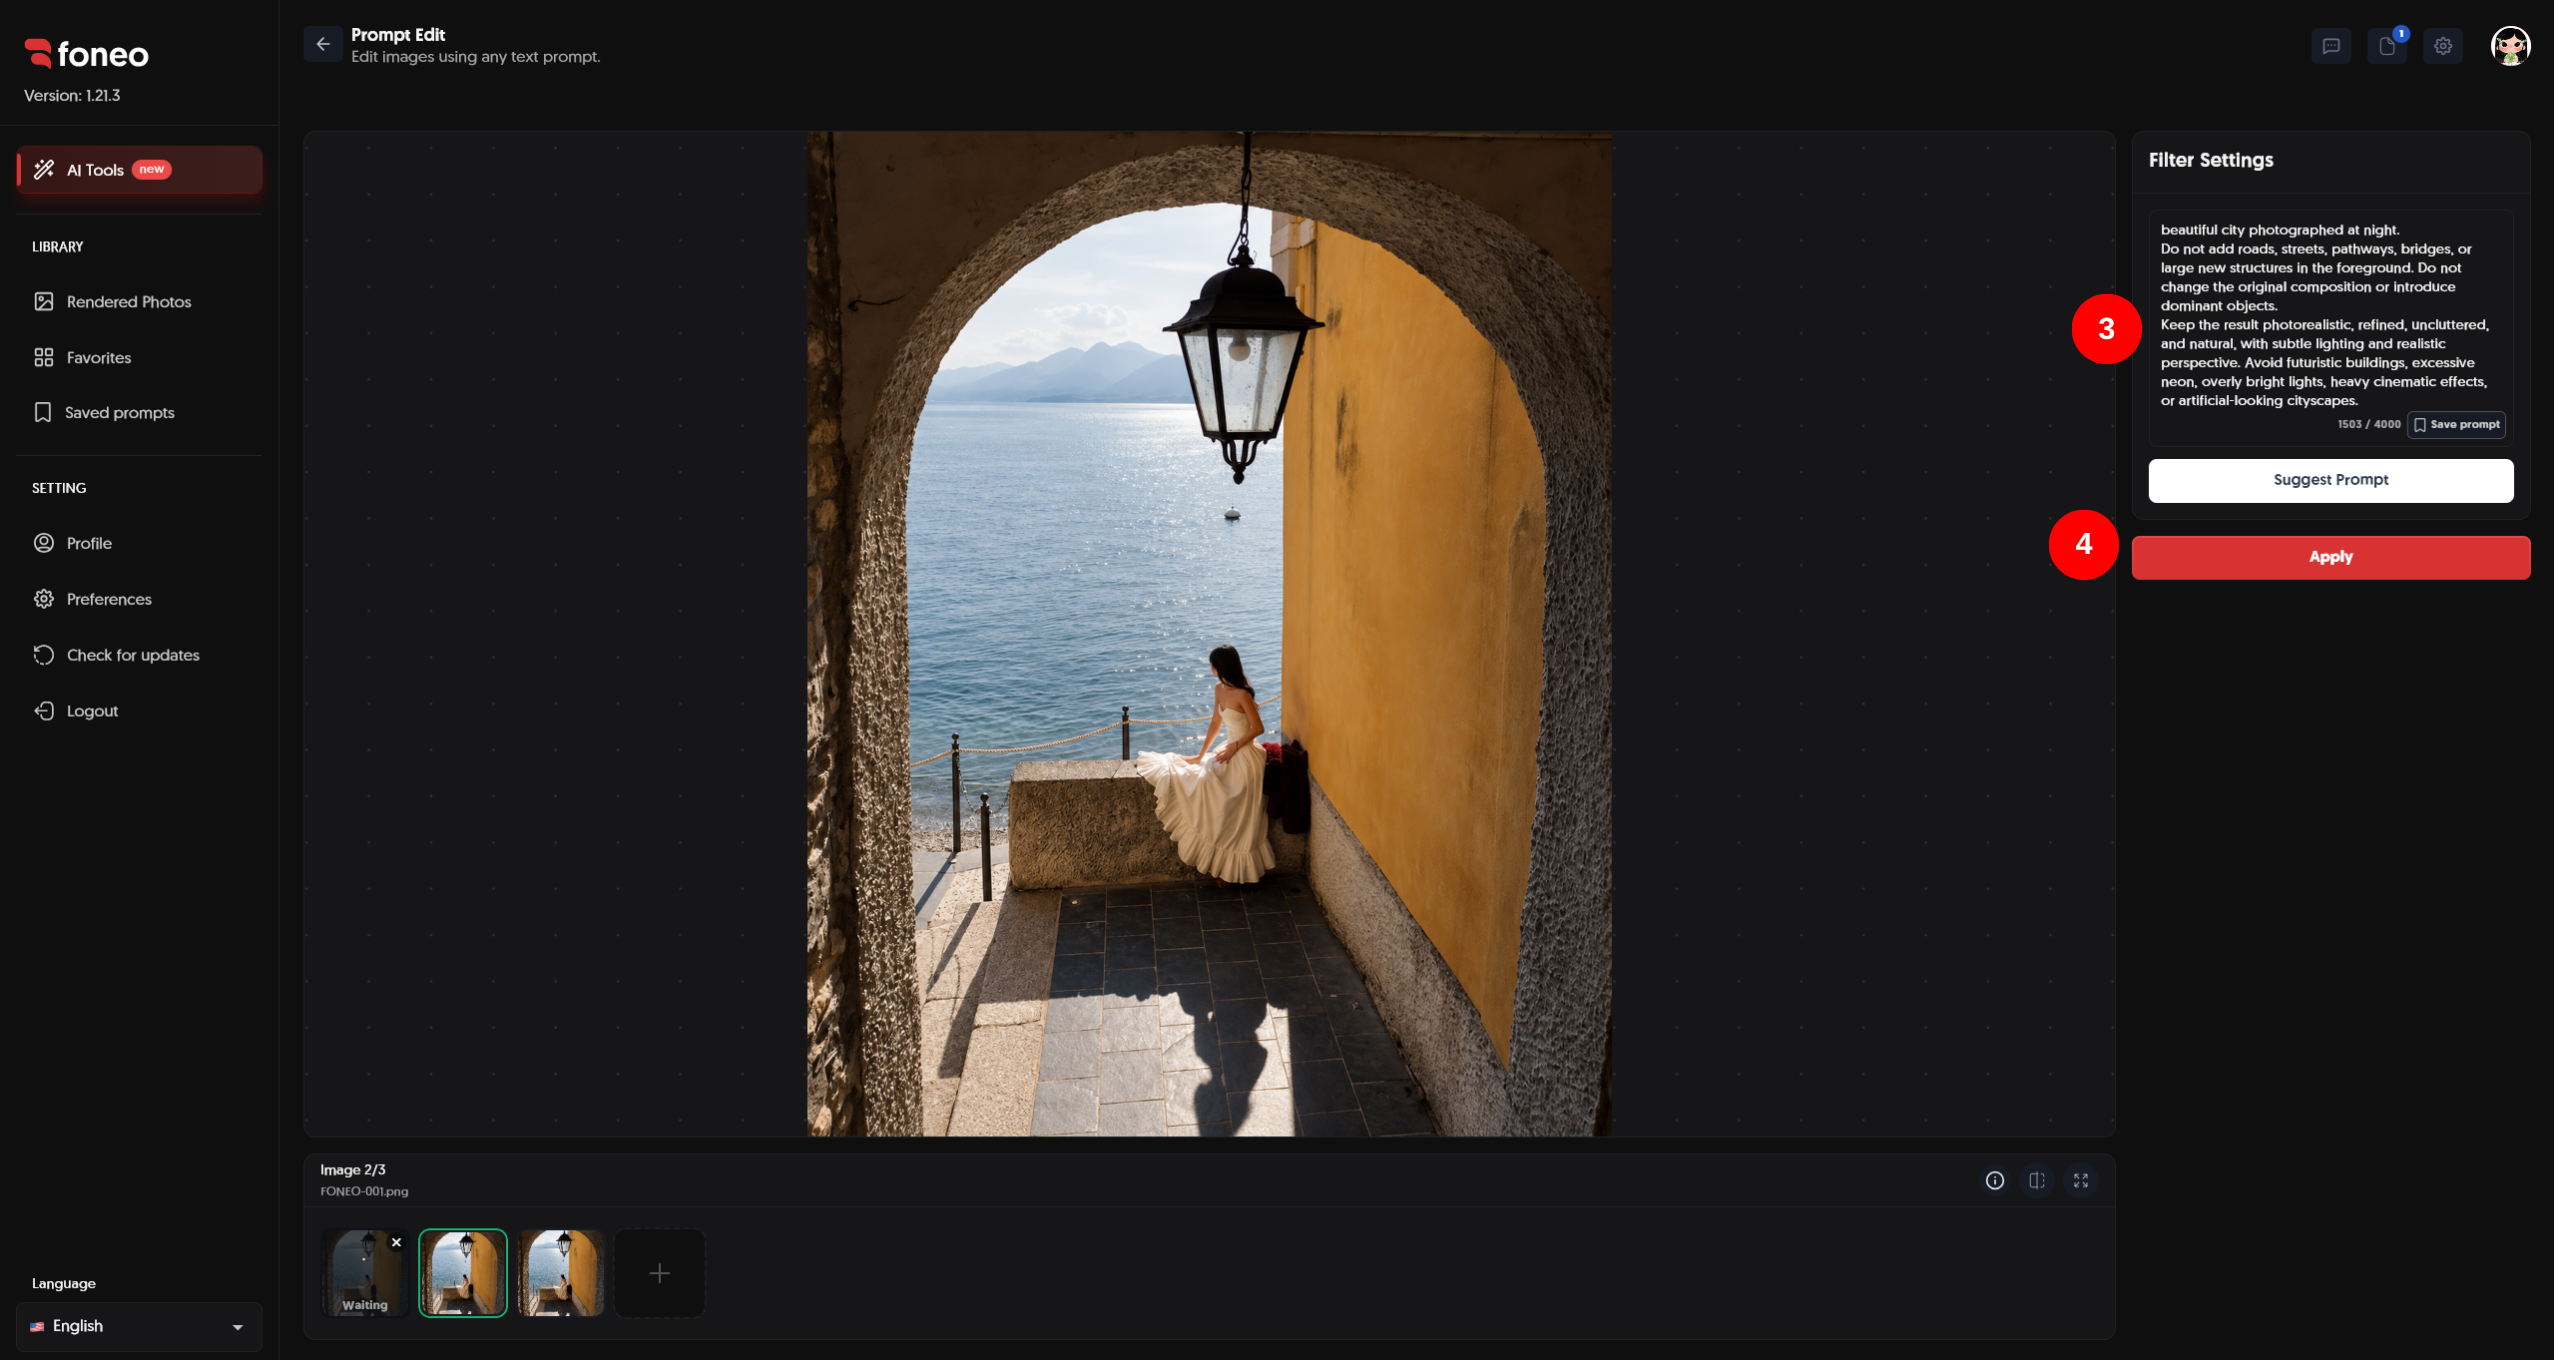
Use Suggest Prompt When You Are Not Sure How to Write a Prompt
If you are not sure how to create a Prompt, you can use Suggest Prompt to let Foneo suggest editing instructions.
After receiving a suggestion, you can review and edit the Prompt according to your needs before clicking Apply.
Suggest Prompt helps you quickly create a description without having to build a Prompt from scratch.
Save a Prompt for Future Use
If you have a Prompt that you use frequently, you can click Save prompt to save it.
After selecting Save prompt, Foneo will display a window where you can enter a Prompt name and select a category tag before clicking Save.
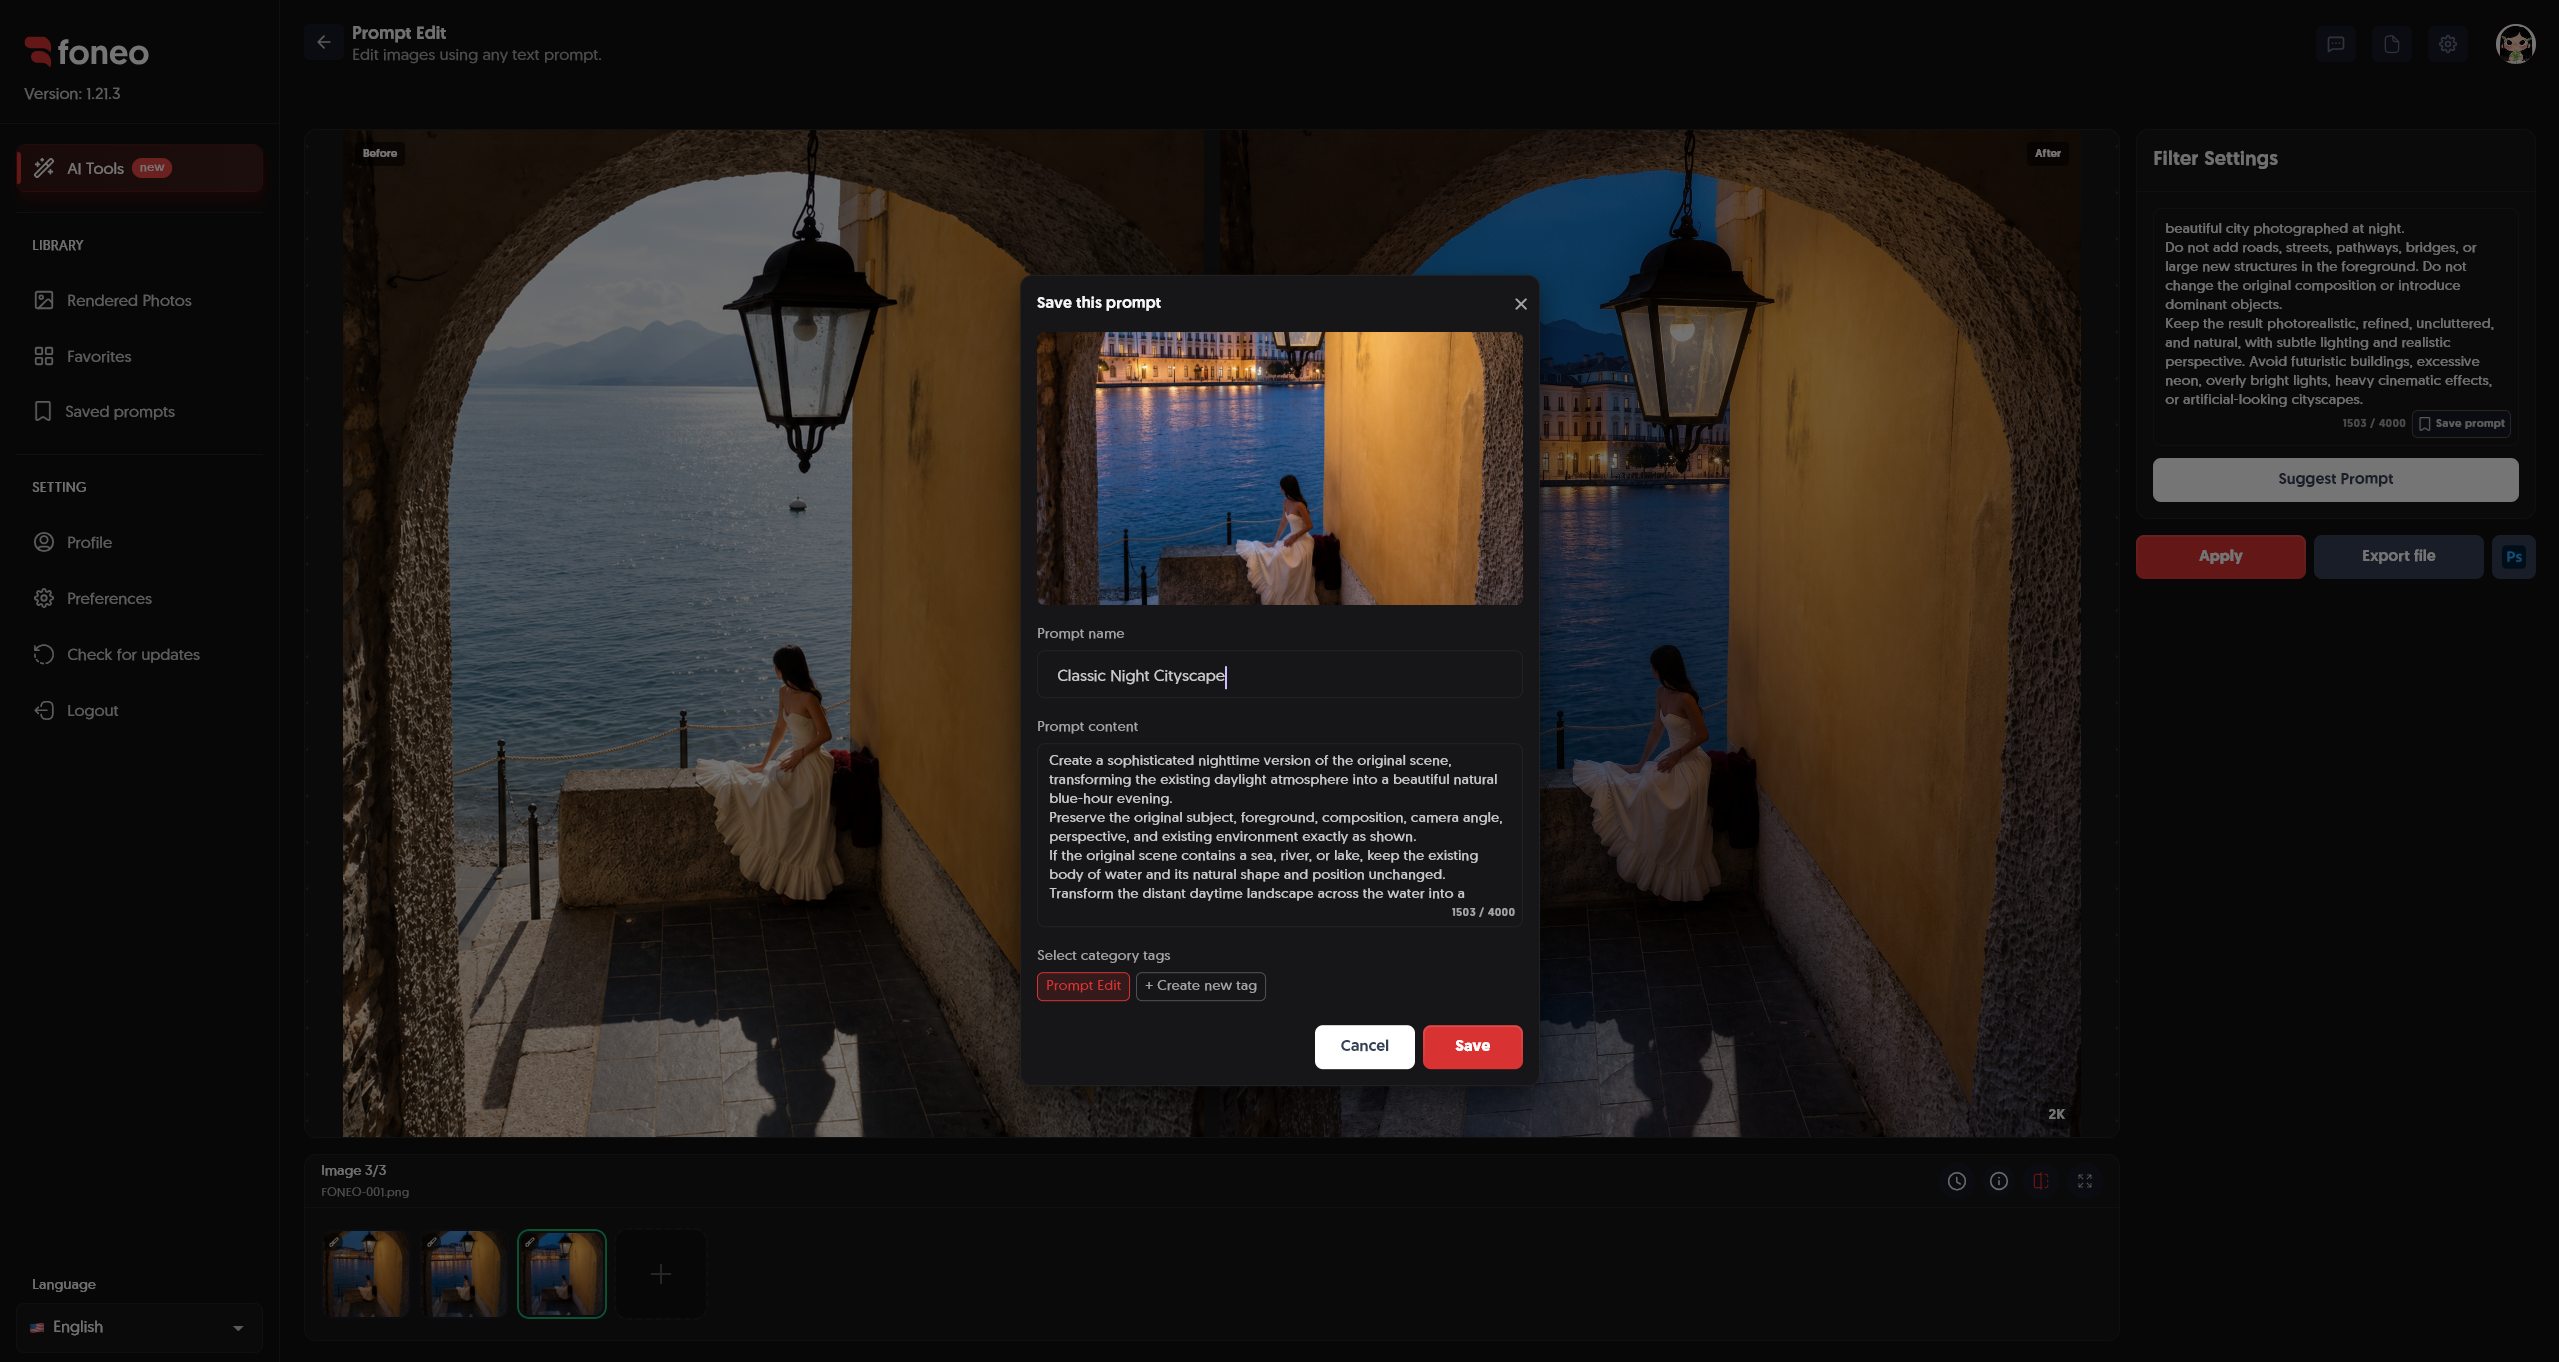
Saved Prompts will appear in Saved prompts. You can reuse them in future editing sessions without having to enter them again from scratch. )
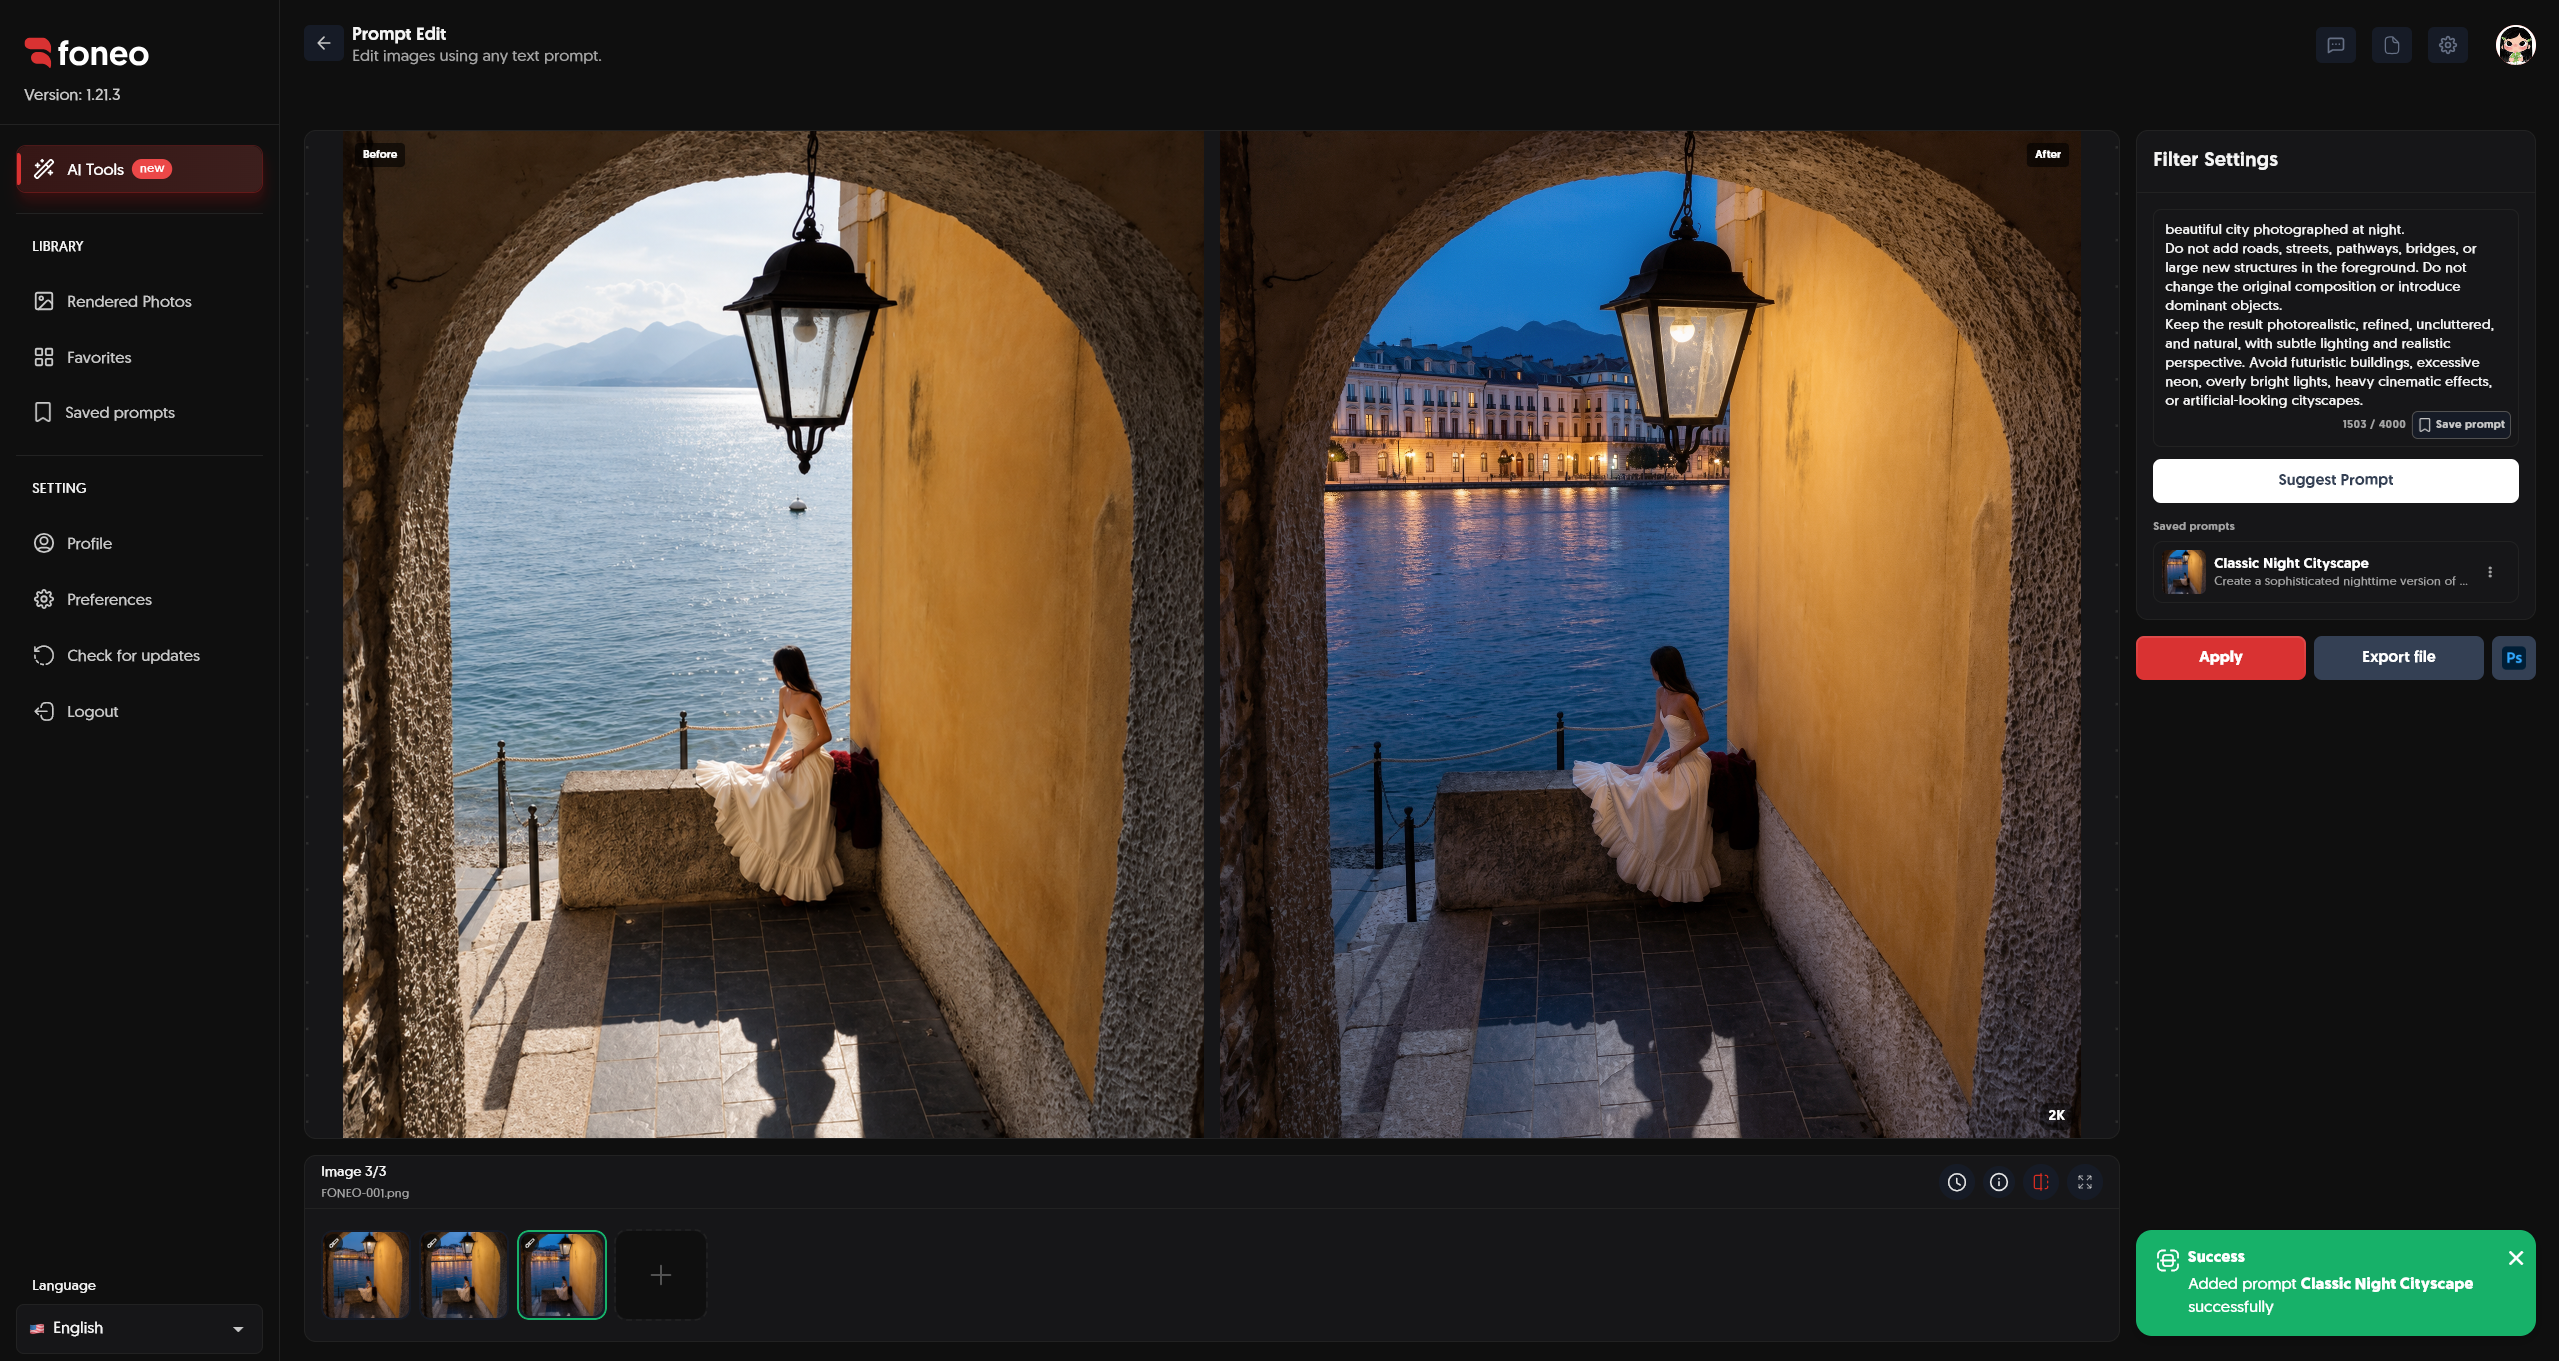
4. Click Apply to Start Editing
After completing your Prompt, click Apply to let Foneo start processing the image.
AI will analyze the image and make changes based on the instructions described in your Prompt.
Processing time may vary depending on the image and the complexity of the editing request.
5. Review the Result
After processing is complete, the result will be displayed in the preview area.
You can use Before & After mode to compare the original image with the edited version.
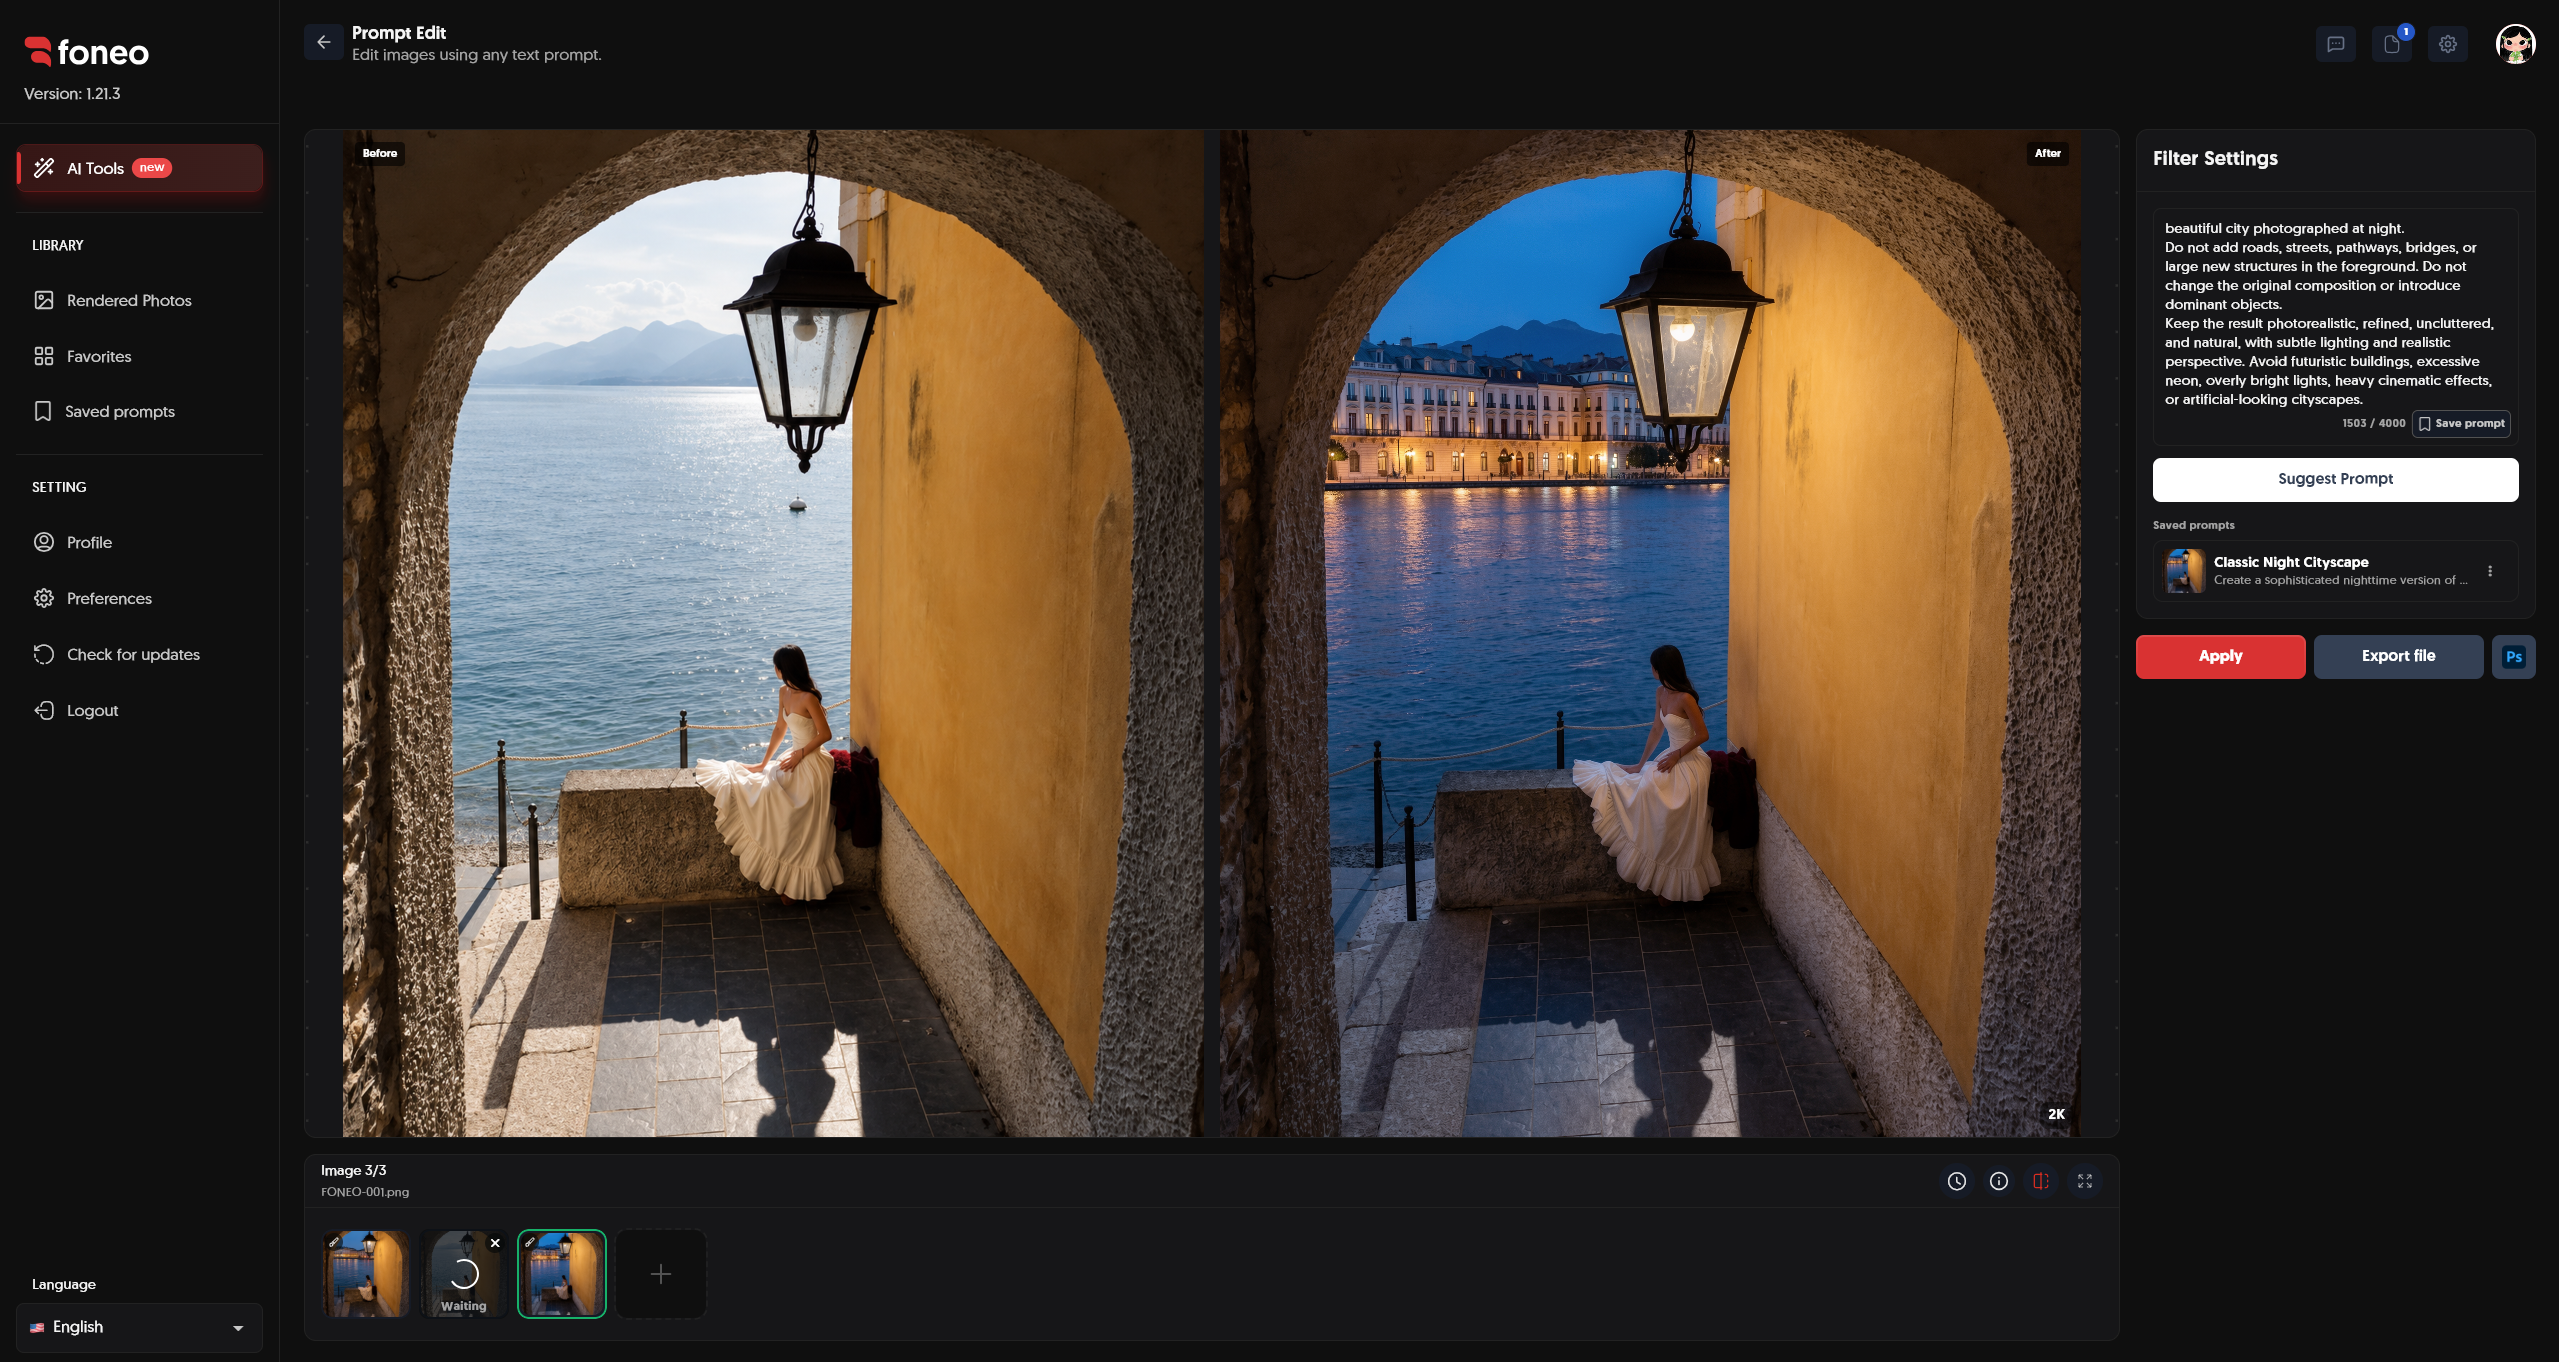
When reviewing the result, pay attention to:
- Editing result: Did AI perform the requested changes correctly?
- Subject: Is the main subject preserved as expected?
- Details: Are important image details preserved?
- Naturalness: Does the edited area blend naturally with the original image?
- Overall result: Is the result suitable for your intended use?
If the result meets your expectations, you can proceed to export the image.
6. Export the Image
Once you are satisfied with the result, click Export file to save the image to your device.
If you want to continue editing in Photoshop, you can use the Ps button to open the image and continue editing.
How to Write Effective Prompts
The Prompt is an important part of using Prompt Edit. You should clearly describe what you want to change and which elements should remain unchanged.
1. Clearly Describe What You Want to Change
Specify exactly which part of the image you want to change.
For example:
Transform the background into a sophisticated blue-hour cityscape.
2. Describe the Style and Atmosphere
You can add the desired style, lighting, colors, or atmosphere.
For example:
Create a cinematic blue-hour atmosphere with realistic city lights and reflections on the water.
3. Specify What Should Remain Unchanged
If you do not want AI to change the main subject or important details, clearly state this in your Prompt.
For example:
Preserve the original subject completely unchanged.
4. Combine Multiple Requirements
You can combine multiple requirements in a single Prompt to describe the desired result more clearly.
For example:
Transform the background into a natural blue-hour cityscape with realistic city lights and reflections on the water. Preserve the original subject completely unchanged and maintain realistic depth of field.
5. Use Suggest Prompt When Needed
If you are not sure how to create a Prompt, you can use Suggest Prompt to get suggestions.
Then, review and adjust the content so that the Prompt matches your image and the result you want.
Tips for Better Results
1. Describe Your Request Specifically
Instead of using a very short or general Prompt, clearly describe what you want AI to do.
2. Clearly Define the Area to Edit
If you only want to change part of the image, clearly describe the area to help minimize changes to other parts of the image.
3. Describe the Desired Style
You can add elements such as visual style, lighting, colors, atmosphere, or depth of field to achieve a result that better matches your expectations.
4. Specify What Should Remain Unchanged
If you want to preserve the subject, face, clothing, or other important details, include these requirements directly in the Prompt.
5. Save Frequently Used Prompts
For Prompts that you may use repeatedly, click Save prompt to save them.
You can find and reuse saved Prompts in Saved prompts during future editing sessions.
6. Check Before & After Before Exporting
After AI finishes processing, compare the original and edited images to make sure the result matches your request and important details are preserved.
What Can Prompt Edit Be Used For?
The Prompt Edit feature is suitable for various image editing needs, such as:
- Changing or transforming backgrounds.
- Changing the atmosphere and visual style of an image.
- Creating lighting or color effects based on a description.
- Adding or modifying elements in an image.
- Creating editorial or cinematic-style images.
- Adjusting the setting while preserving the main subject.
- Making specific editing requests that are not available through Templates.
- Saving and reusing frequently used Prompts.
Frequently Asked Questions
What is Prompt Edit used for on Foneo?
Prompt Edit uses AI to edit images based on the content described in a Prompt.
How do I use Prompt Edit?
Simply add an image, select the image you want to edit, enter your request in Prompt, and click Apply. Foneo will use AI to process the image based on your description.
What is Suggest Prompt used for?
Suggest Prompt provides Prompt suggestions when you are not sure how to describe your editing request.
You can use the suggestion as a starting point and edit the Prompt according to your needs.
Can I ask AI to preserve the subject in the image?
Yes. You can clearly describe which elements you want to preserve in your Prompt, such as the main subject or important image details.
Can I save a Prompt for future use?
Yes. You can click Save prompt, enter a name, and save the Prompt for use in future editing sessions.
Can I reuse a saved Prompt?
Yes. Saved Prompts are displayed in Saved prompts, allowing you to quickly reuse frequently used editing instructions.
Can I view the Before & After result after editing?
Yes. After Foneo finishes processing, you can use the preview area to check and compare the image before and after editing.
Can I continue editing the image after using Prompt Edit?
Yes. You can click Export file to export the image or use the Ps button to continue editing in Photoshop.
What should I do if the result is not suitable?
You can review the Prompt, describe the editing request more specifically, and process the image again to achieve a more suitable result.
Related Articles
- How to Use Surface Transform on the Foneo AI Photo Editing App
- How to Use Upscale on the Foneo AI Photo Editing App
- How to Use Architecture Enhancer on the Foneo AI Photo Editing App
- How to Use the Skin Retouch Feature on Foneo AI Photo Editor
- How to Use Falling Effects on Foneo AI Photo Editor
- How to Use Style Transfer on the Foneo AI Photo Editing App
- How to Use Enhance Face on Foneo AI Photo Editor
- How to Use the Product Enhancer Feature in Foneo AI Photo Editor
Foneo · AI Photo Editing
Ready to try it on your own photos?
Download the Foneo app to edit photos with AI in just a few taps, or see the plan that fits your needs.