How to Use Fashion Try-on on the Foneo AI Photo Editing App
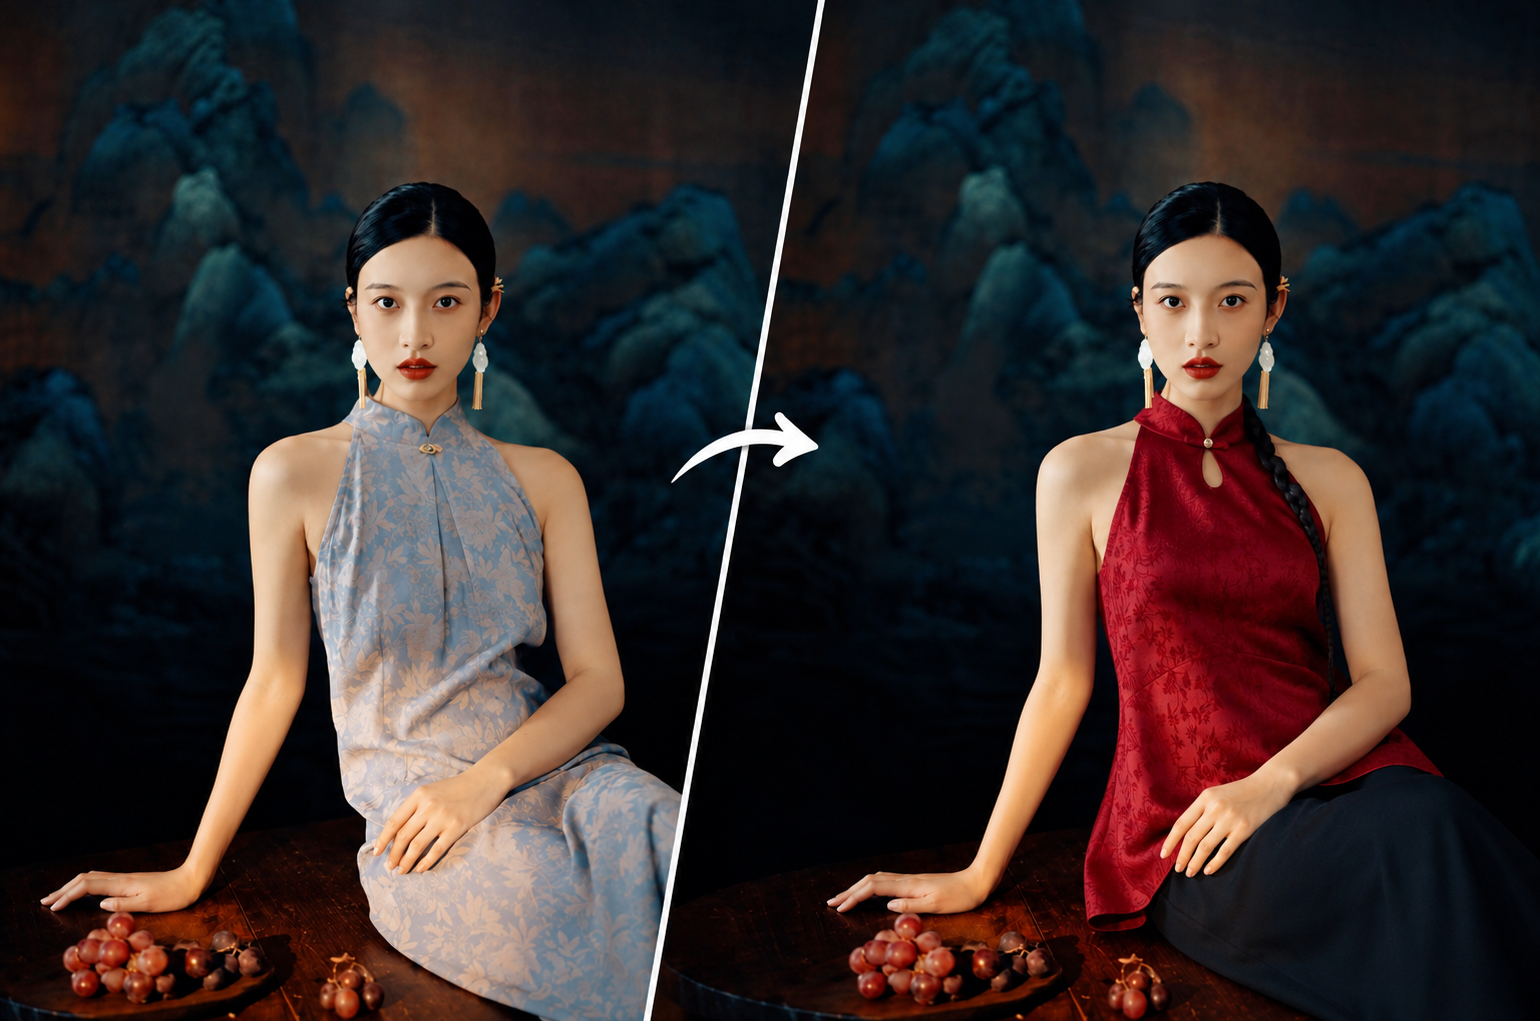
The Fashion Try-on feature on Foneo uses AI to change outfits in images. You can choose clothing from the built-in Template library, upload your own outfit image, or enter a Prompt to describe the style you want.
This feature is ideal for trying different fashion styles, changing outfits in portraits, or creating fashion images without taking new photos.
Before & After
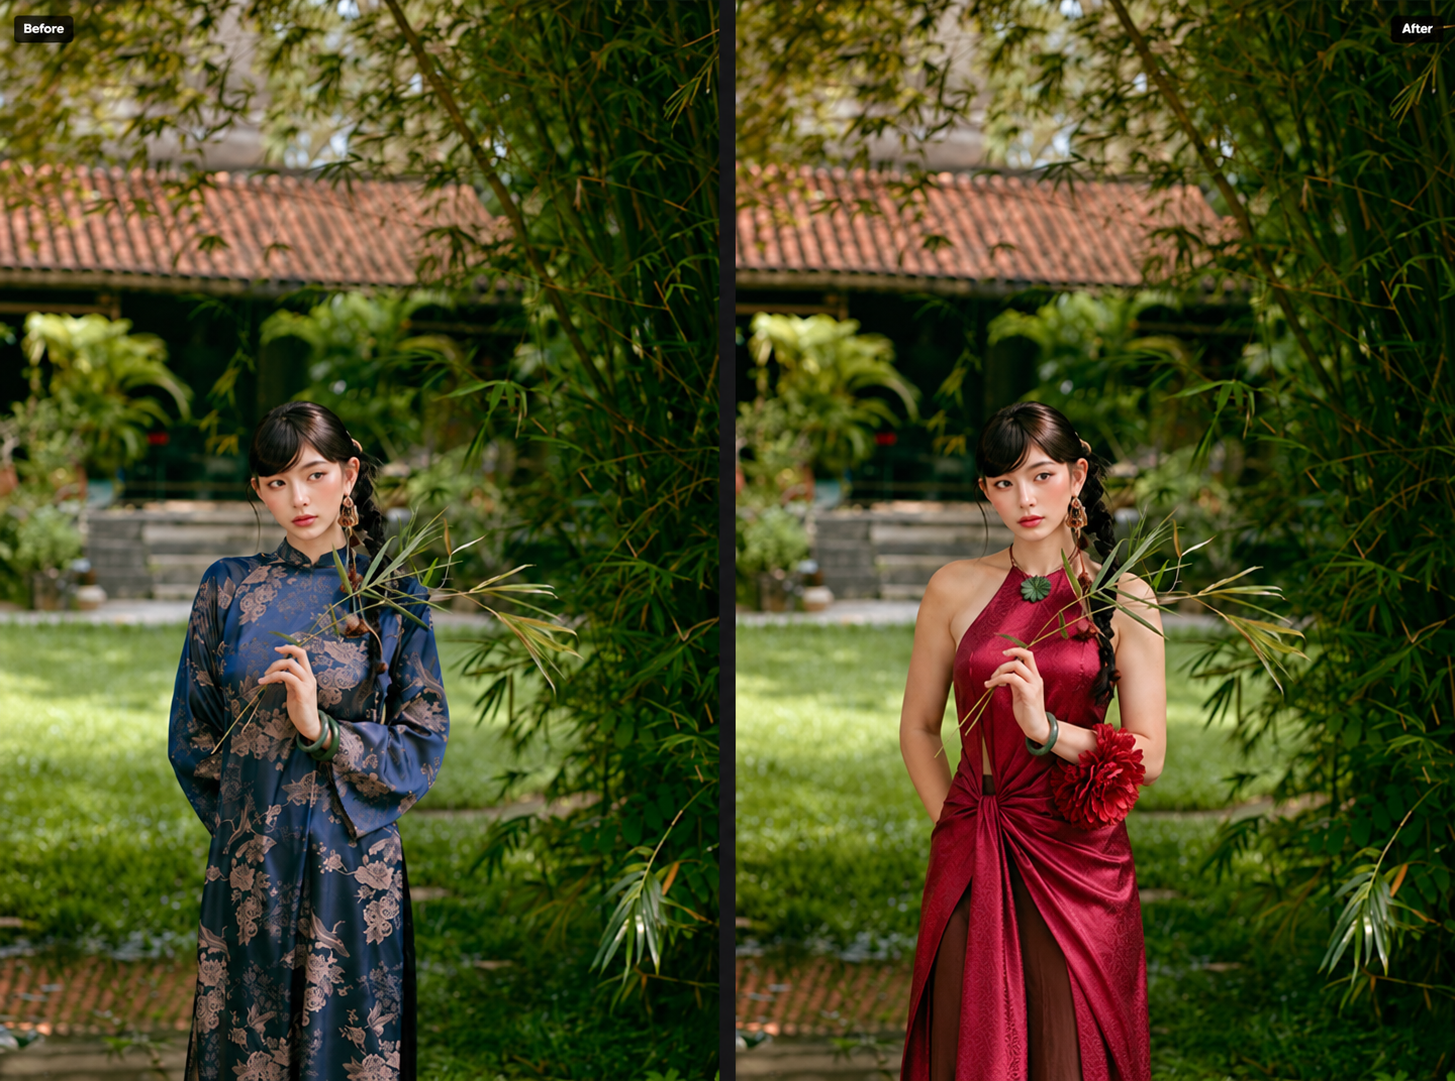
How to Use Fashion Try-on
To get started, upload a photo of the person or model whose outfit you want to change to Foneo, then open Fashion Try-on.
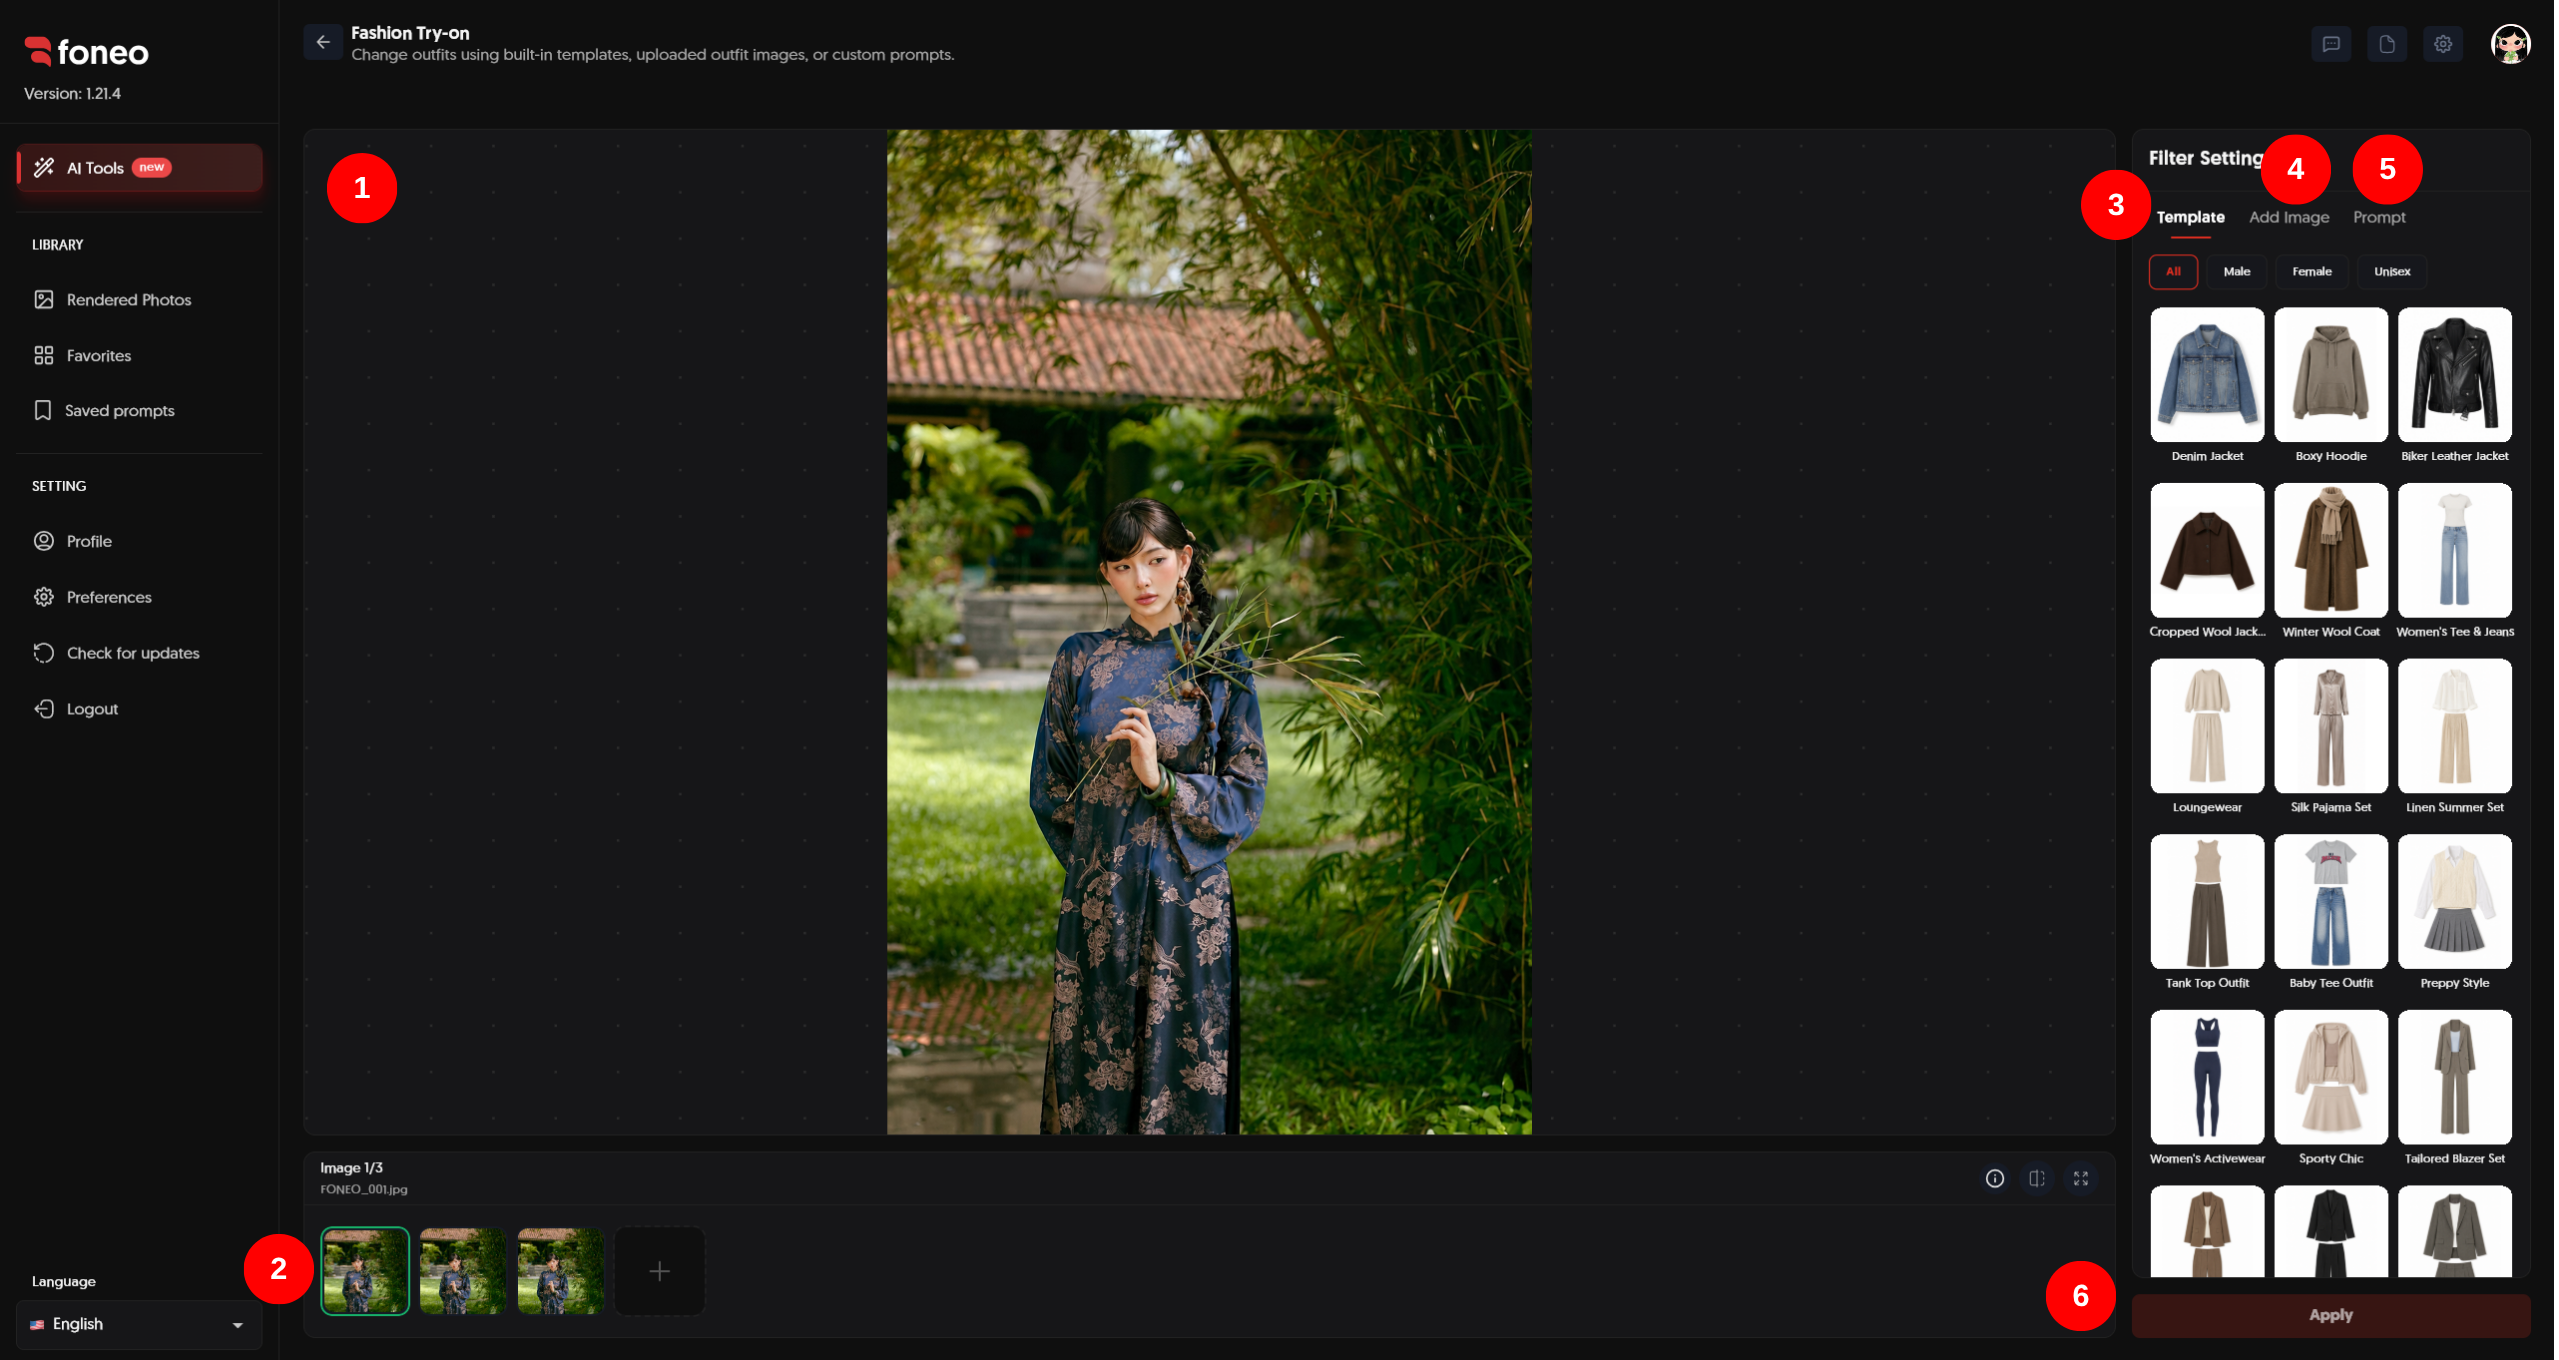
1. Preview the Image
After uploading an image to Foneo, it will appear in the central preview area.
Before changing the outfit, check the image carefully, especially the person's pose, body shape, and current clothing. This will make it easier to compare the result after processing.
2. Select the Image to Edit
Uploaded images appear as thumbnails below the preview area.
- Click a thumbnail to select the image whose outfit you want to change.
- Click + to add another image.
- Check the selected image before editing.
After selecting an image, go to Filter Settings to choose an outfit or configure your outfit replacement settings.
3. Choose a Template
In Filter Settings, open the Template tab to browse the available outfits in the library.
You can use the category filters to find suitable clothing:
- All: Displays all available outfits.
- Male: Filters outfits designed for men.
- Female: Filters outfits designed for women.
- Unisex: Filters outfits suitable for different genders.
Click the Template you want to use to select an outfit for your image.
Templates are useful when you want to try different outfits quickly without uploading a separate clothing image or entering a Prompt.
4. Use Add Image to Upload Your Own Outfit
If you already have an image of the outfit you want to use, open the Add Image tab to upload it to Foneo.
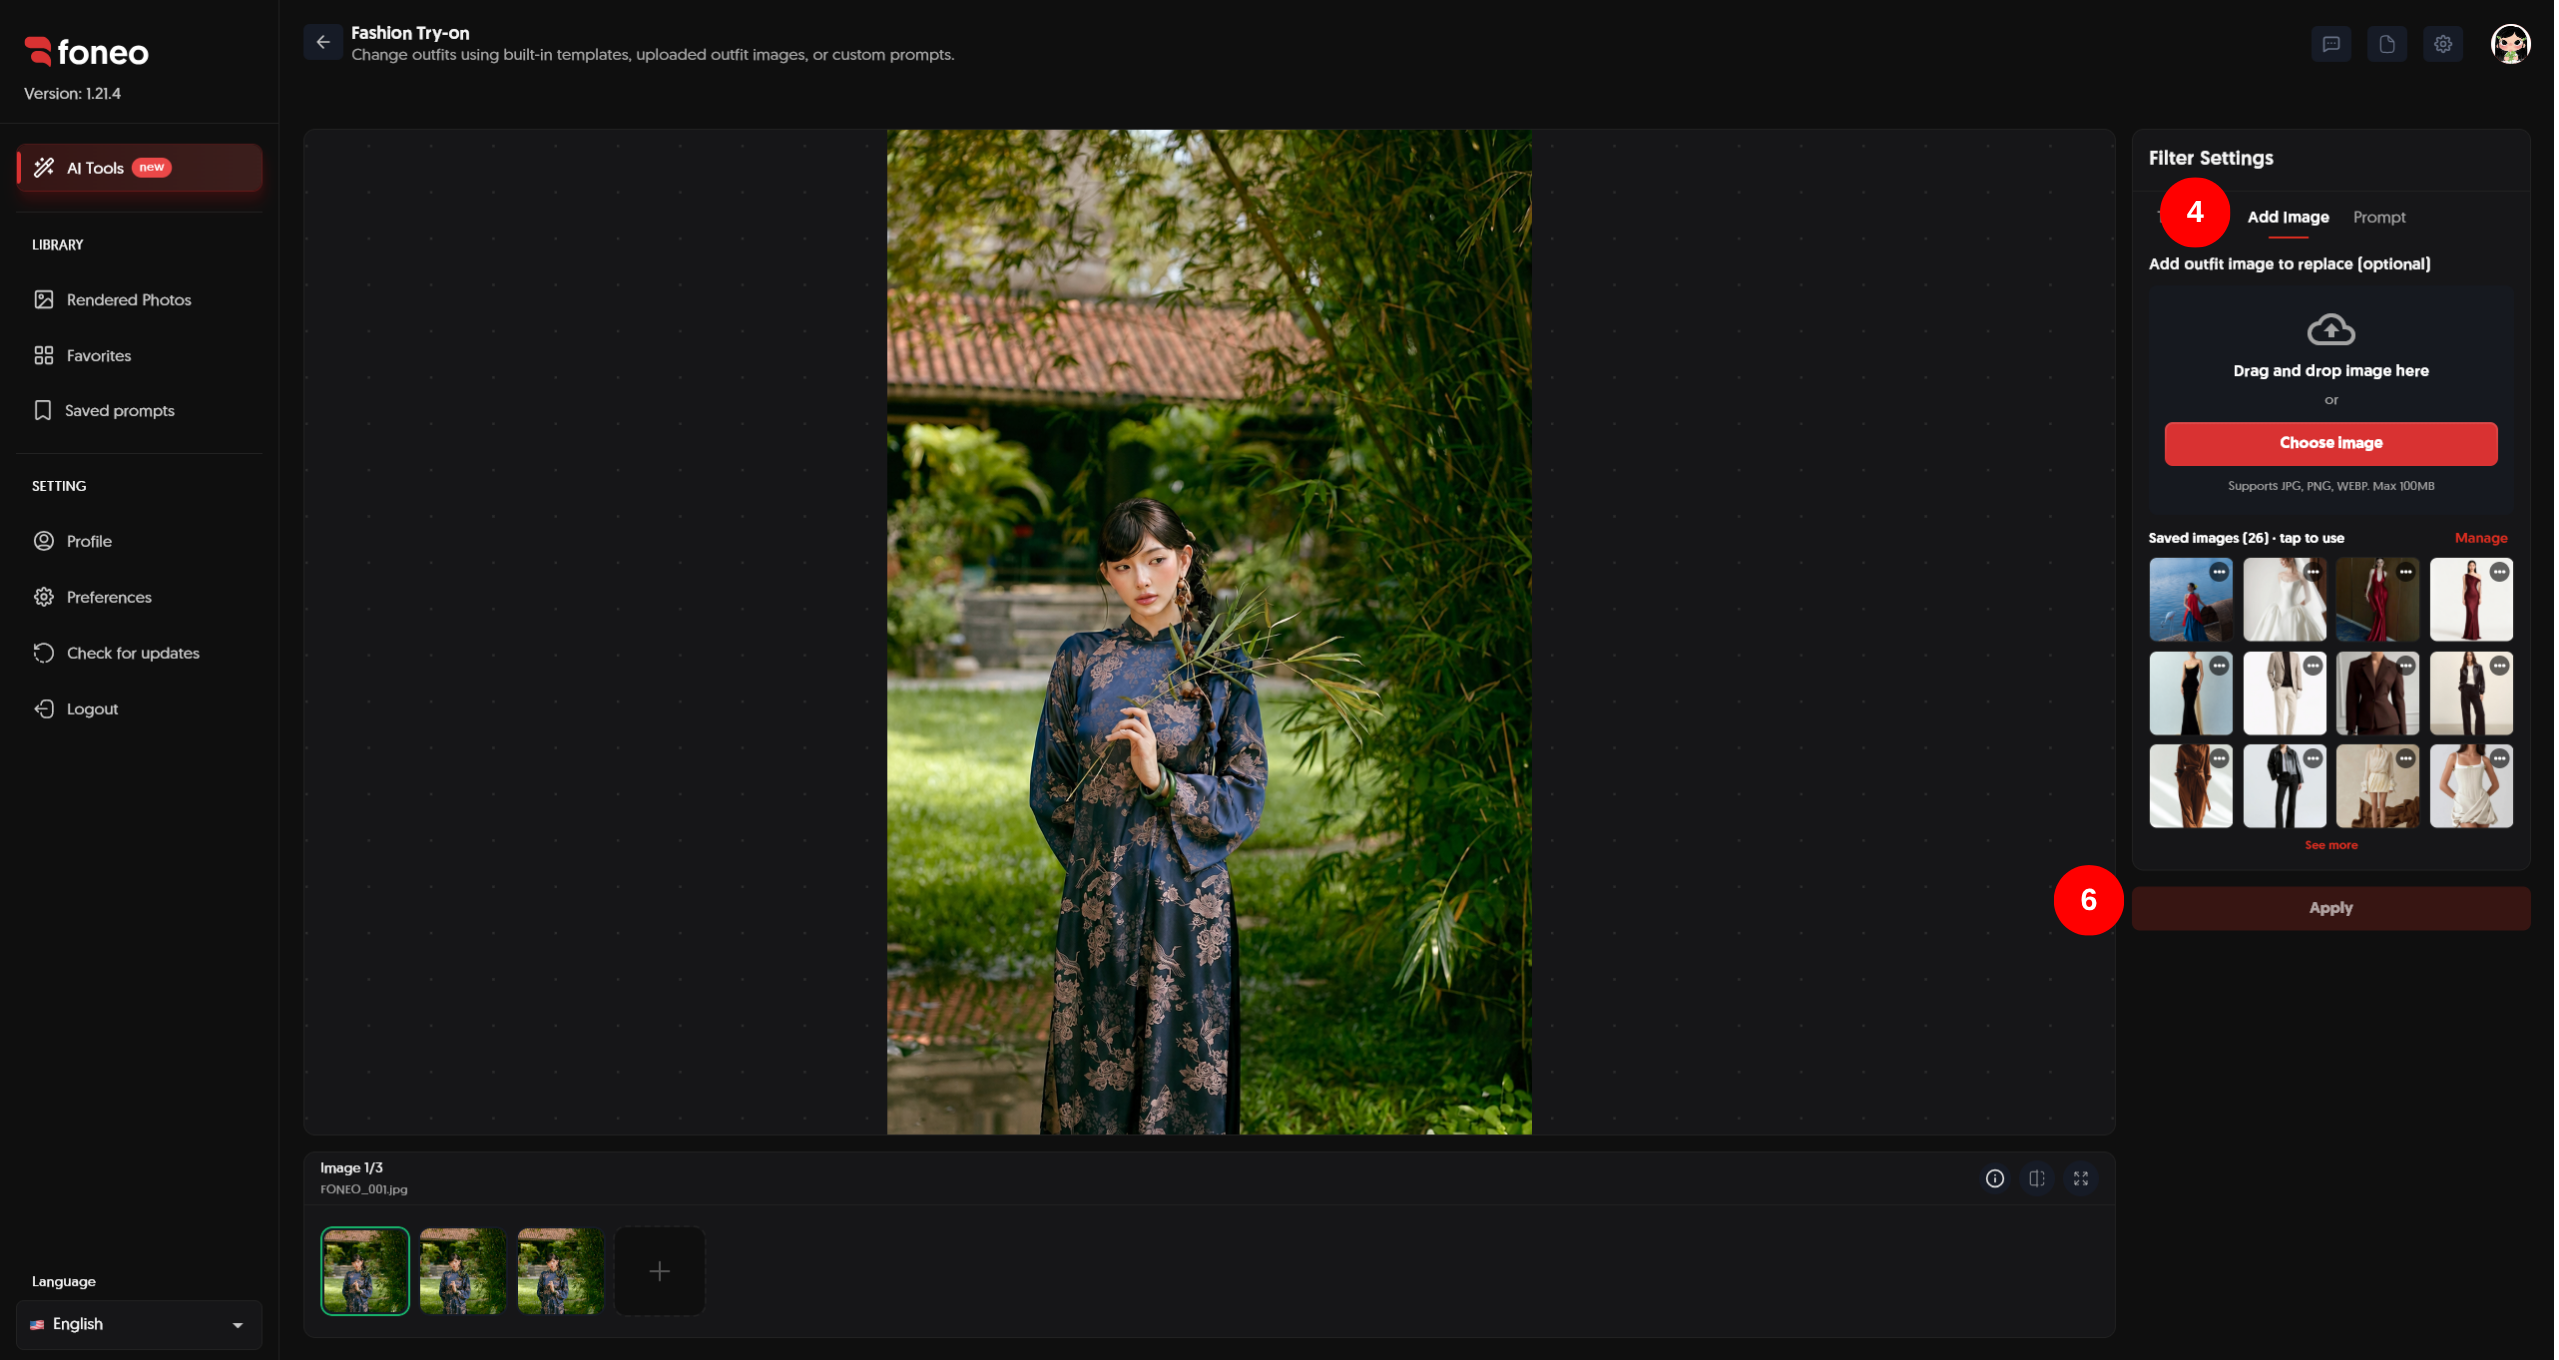
Follow these steps:
- Open the Add Image tab in Filter Settings.
- Drag and drop the outfit image into the upload area, or click Choose image to select an image from your device.
- Check the uploaded outfit image.
- If you want to use a different outfit, select another image.
Foneo supports JPG, PNG, and WEBP formats. According to the current interface, the maximum file size is 100 MB per image.
You can also select an outfit from Saved images to reuse an image you have saved previously.
Note: Uploading an outfit image is optional. You can still change outfits using Template or Prompt without uploading a separate clothing image.
5. Enter and Save a Prompt
If you want to describe an outfit based on your own ideas, switch to the Prompt tab in Filter Settings and enter your description.
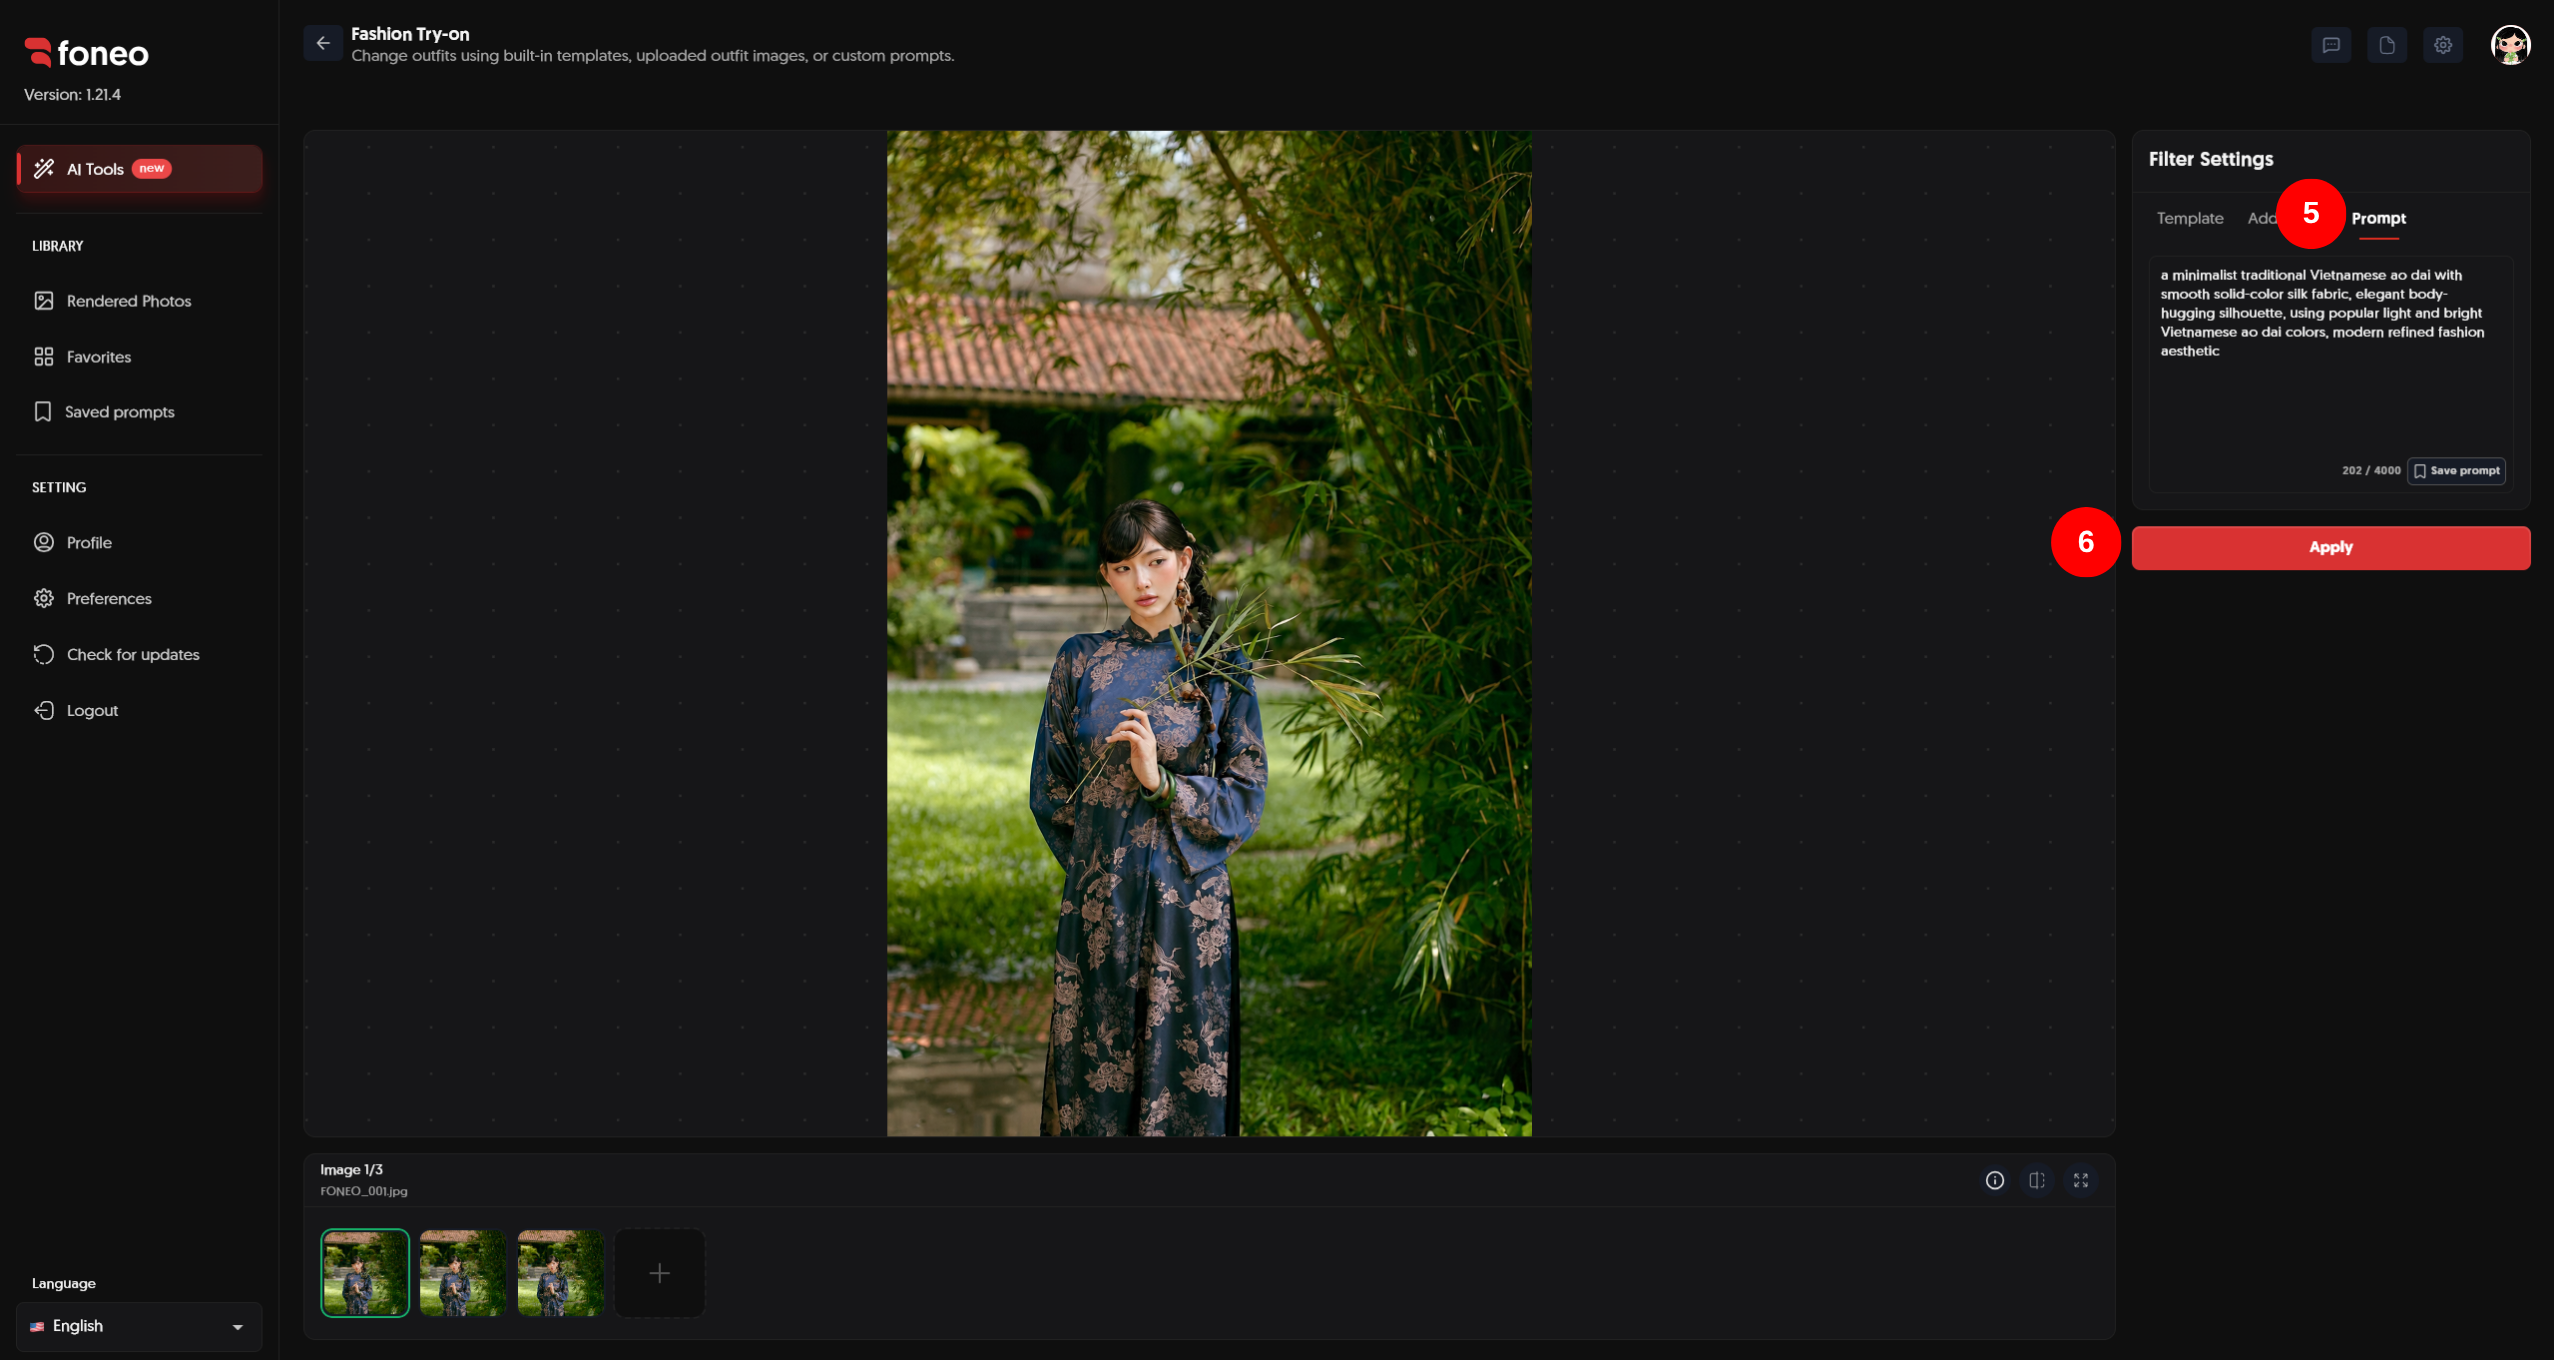
You can describe details such as:
- Type of clothing.
- Design and silhouette.
- Fabric and material.
- Colors and patterns.
- Fashion style.
- Distinctive design details.
For example:
A minimalist traditional Vietnamese ao dai with smooth solid-color silk fabric, an elegant body-hugging silhouette, long flowing panels, and light, bright Vietnamese ao dai colors, creating a modern and refined fashion aesthetic.
Describe the clothing type, colors, and style as specifically as possible to help AI understand your requirements.
If you want to reuse a Prompt for future edits, click Save prompt. Your saved Prompts can be accessed from Saved prompts.
6. Click Apply
After choosing an outfit through Template, Add Image, or Prompt, review your settings in Filter Settings.
Then click Apply to let Foneo process the image and replace the outfit using AI.
AI will use the original image and the outfit or description you provided to generate a new result.
7. Review the Result
Once processing is complete, check the result in the preview area.
You can use Before & After to compare the original image with the image after the outfit has been changed.
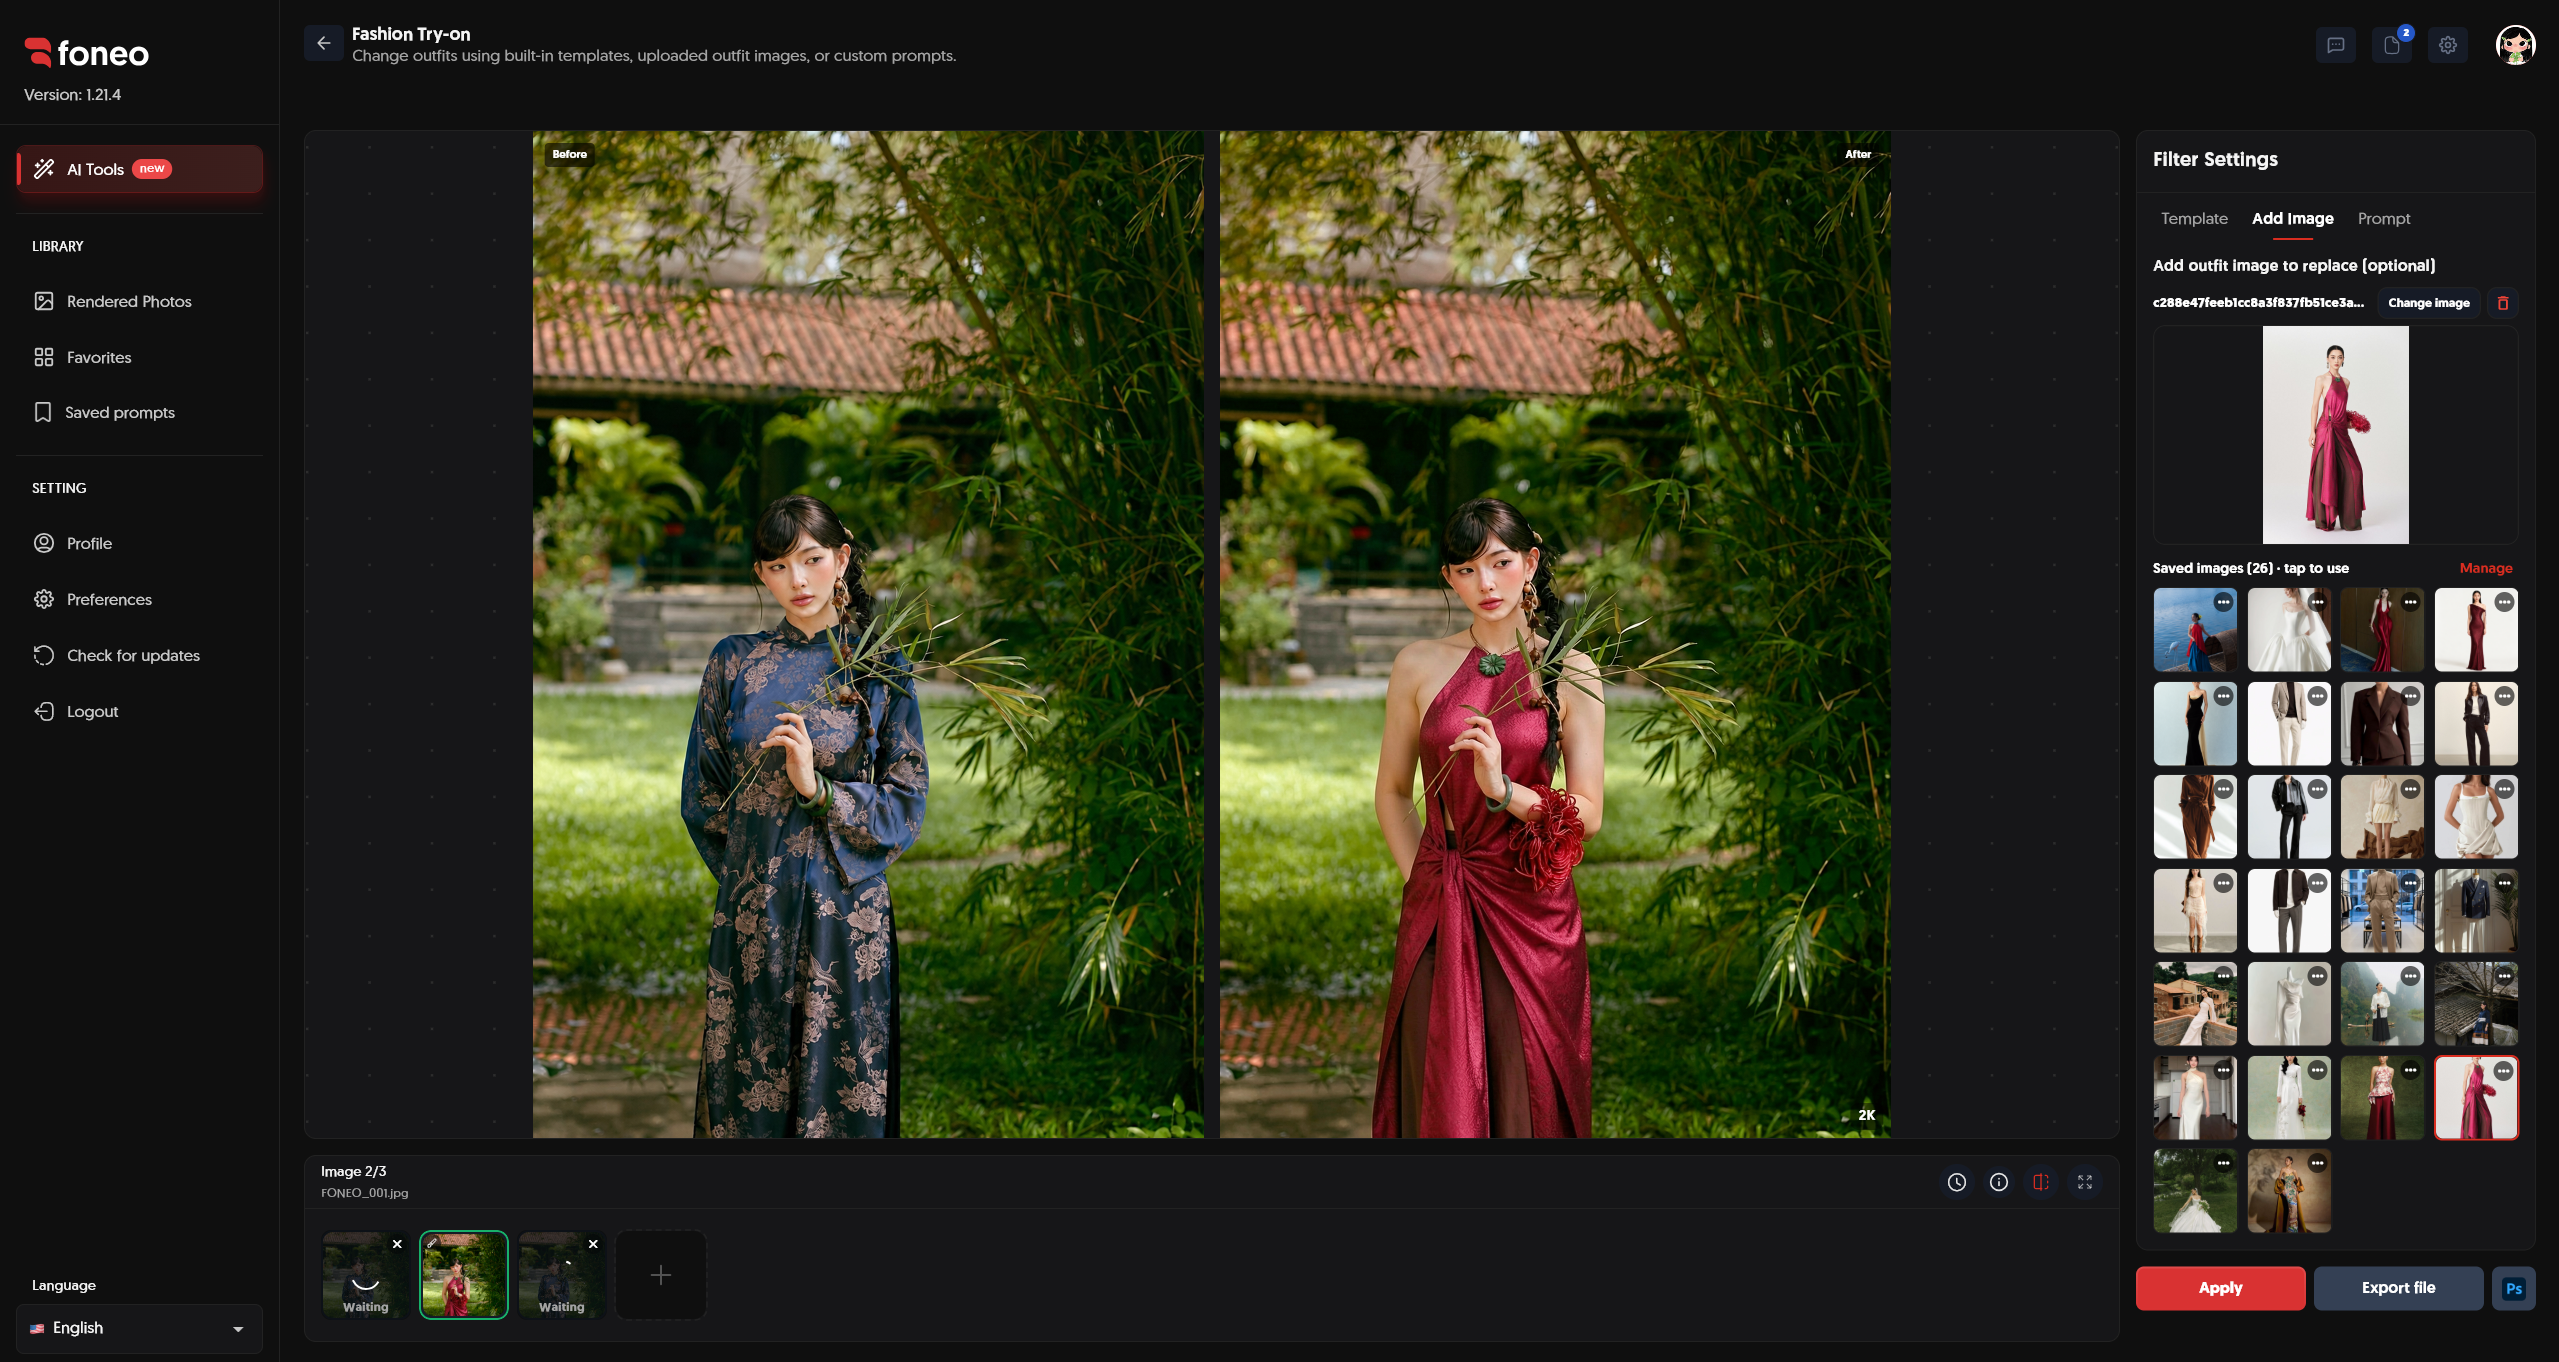
When reviewing the result, pay attention to the following:
- Outfit: Does the new outfit match your desired style, color, and design?
- Fit and silhouette: Does the outfit suit the person's pose and body shape?
- Details: Do elements such as collars, sleeves, patterns, and fabric look natural?
- Face and body: Are the person's facial and body features preserved appropriately?
- Overall appearance: Does the new outfit blend naturally with the pose, lighting, and background?
If the result does not meet your expectations, try a different Template, change the uploaded outfit image, or refine your Prompt and process the image again.
8. Export the Image
Once you are satisfied with the result, click Export file to save the image to your device.
If you want to continue editing in Photoshop, click Ps to transfer the image to Photoshop through the supported export workflow.
How to Choose the Right Outfit Replacement Method
Depending on your needs, you can choose one of the three methods in Filter Settings.
Using Template
Choose Template when you want to try outfits from the built-in library quickly.
You can filter outfits using All, Male, Female, or Unisex to find a suitable style.
Using Add Image
Choose Add Image when you already have a specific outfit image you want to try.
This method is useful when you want to use your own clothing reference instead of selecting an outfit from the Template library.
Using Prompt
Choose Prompt when you want to describe an outfit based on your own ideas or preferred style.
You can specify the design, colors, materials, and distinctive clothing details. If you frequently use similar descriptions, click Save prompt to save and reuse them.
Tips for Better Outfit Replacement Results
1. Use a Clear Input Image
Choose an image in which the person or model is clearly visible.
A clear image makes it easier to review the result and compare the original outfit with the new one.
2. Choose an Outfit That Matches the Pose
When selecting a Template or uploading an outfit through Add Image, consider the clothing design and the person's pose.
An outfit that suits the pose can help create a more harmonious result.
3. Write a Specific Prompt
Instead of entering only the name of a clothing item, include details about its color, material, silhouette, and style.
For example, instead of entering only a dress, you can provide a more detailed description:
An elegant burgundy evening gown made of satin, with a fitted bodice, a flowing skirt, and refined floral details, creating a sophisticated formal fashion look.
4. Use Add Image for a Specific Outfit
If you have a reference image of the exact outfit you want to try, use Add Image to upload it rather than relying only on a text description.
5. Save Frequently Used Prompts
If you often create outfits in a particular style, click Save prompt to save the description and reuse it whenever needed.
6. Check Before & After Before Exporting
After processing, carefully review the new outfit, silhouette, and clothing details.
Do not evaluate the result based on color or style alone. Also check how naturally the outfit fits the person and blends with the overall image.
When Should You Use Fashion Try-on?
The Fashion Try-on feature is suitable for various purposes, including:
- Trying different fashion styles.
- Changing outfits in portrait photos.
- Trying men's, women's, or unisex clothing.
- Creating fashion images for social media.
- Trying outfits from existing images through Add Image.
- Creating outfits based on your own ideas using Prompt.
- Saving Prompts for future edits.
- Creating multiple outfit variations from the same input image.
Frequently Asked Questions
What is Fashion Try-on used for on Foneo?
Fashion Try-on uses AI to change outfits in images. You can select a built-in Template, upload your own outfit image, or enter a Prompt to describe the outfit you want.
What methods can I use to change an outfit?
Foneo provides three methods:
- Template: Select an outfit from the built-in library.
- Add Image: Upload your own outfit image.
- Prompt: Enter a description of the outfit you want.
Do I have to upload an outfit image?
No. Uploading an outfit image through Add Image is optional. You can use Template or Prompt without uploading a separate clothing image.
Can I filter Templates by category?
Yes. You can use All, Male, Female, and Unisex to find suitable outfits.
What is Add Image used for?
Add Image allows you to upload your own outfit image to use when changing clothing in a photo.
Can I save a Prompt and reuse it later?
Yes. After entering a Prompt, click Save prompt to save it for future edits.
Can I change the outfit multiple times on the same image?
You can try different Templates, replace the outfit image through Add Image, or refine your Prompt to create different outfit variations from the same input image.
What should I do if the new outfit does not look right?
Try another Template, use a more suitable outfit reference image, or make your Prompt more specific. Then click Apply to process the image again and review the result.
Related Articles
- How to Use Background Replace on the Foneo AI Photo Editing App
- How to Use Product Background on the Foneo AI Photo Editing App
- How to Use Portrait Effects on the Foneo AI Photo Editing App
- How to Use Prompt Edit on the Foneo AI Photo Editing App
- How to Use Copy Pose on the Foneo AI Photo Editing App
Foneo · AI Photo Editing
Ready to try it on your own photos?
Download the Foneo app to edit photos with AI in just a few taps, or see the plan that fits your needs.